Tuesday, December 19, 2017

December Update - Theorbos, Archlutes and Guitars


My workshop has gotten crowded. In the foreground is a Tecchler archlute that is just about finished. In the back left is a Buchenberg bowl that is coming along. The baroque guitar is in for a bit of glue and the Schelle theorbo is having its neck finish redone.


I finished the archlute with French Polish that I have been allowing to harden for few weeks.


In the meantime I decided to start a new theorbo as a special project. It is based on Matteo Buchenberg (Victoria & Albert , London). The string lengths will be 90 and 170 cm.


I built this Voboam model baroque guitar ten years ago and you can see it gets a lot of work. Occasionally, it comes in for a little glue and I am always happy to see it. This time it has a loose bar and an open back seam.


The extension of the historic Schelle theorbo is painted black and at the request of my client I painted the fretted neck as well. I have used this method before, but not for ten years or more. Since then paint products have changed and my favorite is no longer available. I wasn't happy with the substitute so I am re-finishing it with black shellac using the French polishing method. You can see the  results of this method on my newest Voboam in my post from 9/11/17.

I have some catching up to do with my posts. Hopefully I'll finish my report on the Josef Pagés guitar soon and the Tecchler archlute deserves a detailed description too.


                                                                       *****


Tuesday, October 3, 2017

Josef Pagés 1813

Jonathan Bouquet MIMEd Curator, St Cecilia's 

Early last week I was in the Music Museum of St Cecilia's Hall, University of Edinburgh, for my appointment to study their Josef Pagés guitar.

Former St Cecilia's curator Darryl Martin had told me this was an interesting and important guitar.  Since Pagés was an early innovator of fan barring I was excited to get a look at what he had done.

I spent a day taking photos, measuring all principle components, making profiles of the top and back and taking notes on construction details that I could not easily photograph.


I had seen the guitar in its display case on previous visits to the museum - but it was even more impressive to see the superb and flawless artistry up close.


Pagés was just as thoughtful and meticulous with the internal construction of the guitar - to those components that effect its acoustical response and structural integrity.


Here is a partial view of one of two sheets of the working drawing that I made during my visit. The lines and lettering are faint because I always use soft lead pencils during my work.

Although this is not suitable for publication I will reproduce a full size version, adding information from my notes, and publish it here as a download.

As a companion to the download the post will include a thorough description of the Josef Pagés guitar with detail photos.


St. Cecilia's has recently undergone an extensive renovation. You can read about it here:  Friends of St Cecilia's .

The Museum and its collection is  also a teaching institution. I worked alone in one of the gallery's small glassed-enclosed teaching rooms visible just to the right in the photo. My visit was on a day when the museum was closed to the public so my only companion was the spirit of St Cecilia.


All photos by the author.


                                                                        *****


Monday, September 11, 2017

Another Voboam


Early this summer I built this Voboam model to exhibit at the Boston Early Music Festival. The design is based on the 1690 Rene Voboam, E. 2087 in Musée de la musique, Paris. I have built a lot of these always using similar aesthetics and construction methods for each one. I had been thinking about changing some of these details. Coincidently, I bought a copy of La Guitar, Paris 1650-1950, Addendum by Sinier de Ridder. Among the many photographs was a guitar attributed to Alexandre Voboam from 1657. Two features of this guitar stood out - a black neck and pegbox and a two piece back, apparently made with yew wood. The guitar also had plain ebony side ribs without ivory dividers.


Since I have been building nineteenth century guitars with maple necks finished in black shellac I decided to use the same procedure for my Voboam. My model retains the separate peg head secured with a 'V' joint and the usual Voboam inspired peg box with scalloped edges. The pegs are castelo boxwood stained black.


I colored my shellac with carbon black and applied it with a cotton rubber in the standard French polishing technique. However, the areas around the 'V' joint and the transition from the heel and the sides of the peghead required using a chisel tipped brush.

Note: I was curious about whether the black neck of the original Alexandre Voboam guitar was veneered or blackened in some manner. I emailed Françoise and Daniel Sinier de Ridder who kindly replied, "In this A. Voboam the neck is veneered in ebony and also the heel." Thank you.


I have used different methods of attaching the neck to the body. This time I used a slipper foot style neck that Sinier de Ridder calls the "archaic" method. They explain that this was the Voboam family's standard procedure. This was an important take away from  La Guitare. 

Here I am using a pair of skew chisels (left and right bevel) to shape the heel. These chisels simplified the shaping of the contour particularly in the transition from the heel to the shank of the neck.


   I am not a good draftsman  so reproducing the design for the moustache has always troubled me.


But I developed a good technique for replicating the spiral shape that defines many baroque guitar moustaches. I use tin solder as a flexible ruler.  This is the stuff used to connect copper plumbing pipes or electrical connections in electric guitars. It is easily shaped into a spiral and most importantly it holds its shape.

Tracing around the circumference achieves the basic design. I filled in the appurtenances free-hand.  The moustaches are cut from a assembly of two pieces of ebony 1.2mm thick. The pattern is glued to one face while slips of paper are glued to the opposing face and between the ebony  pieces. I used a hand scroll saw to cut the pattern.  While the assembly is still together I round the edges with various small files. The two parts are separated and the paper removed by dropping them in near boiling water for a few seconds. Everything floats apart and as long as the moustaches are rescued quickly no harm is done. I allow the new moustaches to dry sandwiched and weighted between two pieces of plexiglass.


I didn't have a suitable piece of yew for a two piece back but I have been saving a small stock of this beautiful koa for special projects.

I finished the guitar with shellac using the French polishing technique. The soundboard received multiple coats of tung oil.


The side ribs are Macassar ebony


Coming Up. I am working on a model of the David Tecchler archlute that will be finished soon. I examined this instrument in the Metropolitan Museum of Art, NY in 2000.

This is a 2008 model


All photos by the author.

                                                                        ****


Friday, August 4, 2017

Schelle theorbo - Conclusion


My last post on the Schelle theorbo focused on the historical instrument and there are still a few points I want to make about it. But this time I want to show you photos of my replica.


The bowl before the finish was applied


I have always kept a few boards of bird's-eye maple on hand - it is plentiful in Canada. But a few years ago I picked up a special slab measuring 6cm x 27cm x 94cm. All of it loaded with bird's eyes.


   From this I was able to cut consecutive matching ribs.


The neck on the original is  a conifer wood veneered with ebony. At the request of my client I used English maple painted black. In this photo the bowl has been French polished.


My extension is made with one piece of quarter sawn poplar. The back of the extension is arched side to side for its entire length so the center is the thickest part. The thickness preserves the strength of the piece but tapering reduces its weight and makes it less clunky looking.


I copied the dimensions of the  string trough on the extension but omitted the treble string bracket.


The design of the theorbo head is unique and unlike the 17th century Venetian examples.


It still curls back on itself but, as the above photo shows, but the string trough is narrow and cramped like the arrangement on swan neck baroque lutes.


It is well documented that many 16th and early 17th century lutes were rebuilt as baroque lutes or that baroque lute makers favored the shape of the earlier models for their new lutes. Sebastian Schelle's baroque lutes are built in this style.  The same characteristics can be seen in the design of the bowl of his theorbo.


Sebastian Schelle 1728
 
The Schelle theorbo bowl seen in profile is strikingly similar to those made by Laux Maler in the second half of the sixteenth century.


Laux Maler ca.1550


 This is the Laux Maler, E. 2005.3.1 in Musée de la musique, Paris.

The Maler bowl sits lower because the two edge ribs have been cut down making them less wide than the adjacent ribs. Also the lute's top was removed at this time. Note how, on both lutes, the back profile sweeps toward the neck in a gentle curve without an abrupt bend at the front block. The rear of the bowl bows out slightly rather than ending in a perpendicular to the lute's face. The contour of the rib joints are striking similar to one another.


Compare two other Maler lutes by clicking here and draw your own conclusions about the similarities. Both are in the Germanisches National Museum Nüremberg as companions with the Schelle theorbo. Bye the way,  one of them MI 619, was rebuilt as a baroque lute in the Schelle/Widhalm shop, ca. 1740.


A video that includes Daniel Swenberg playing my Schelle theorbo in the Bach at One Series can be seen at  Trinity Church Wall Street


                                                                        *****

All photos by the author unless otherwise noted.


Thursday, June 1, 2017

Sebastian Schelle Theorbo


    At the beginning of April I finished a model of the large bodied late baroque theorbo by Sebastian Schelle, 1728. Back in 2001 I built my first Schelle theorbo. That instrument was quickly followed by orders for a half dozen others. At the time I found this surprising because the Schelle is so different from other theorbo models. It isn't a flat back multi-rib triple rose striped yew job like the Italian instruments built a hundred years earlier. It is huge. The bowl is 11 wide ribs of bird's eye maple. The belly of the original measures 64.7 centimeters long x 40.2 wide while the bowl is 19.4 deep. The string disposition is 8x1, 7x2. The string lengths are 160 cm and 88 with10 tied frets on the neck. My model's string disposition is 8x1, 7x2 at 140 cm and a 9 fret neck with a fretted length of 86cm. The bridge holes can also accommodate 7 fretted singles, but more on that later.
A technical drawing of the instrument MI 574 is available from  German National Museum Nüremburg .


German National Museum Restoration Photo


After I had built the first two or three models I had the opportunity to visit Nüremburg and examine the lute.
Even though the technical drawing and descriptive notes are clear and thorough there were many features I wanted to view first hand.


The technical drawing and my photo show that the bowl is lop-sided. The second rib on the photo's left (lute's treble side) leans in while the corresponding rib on the opposite side has a straighter contour. The effect is particularly noticeable by the third rib on each side of the bowl. The measurable difference, comparing the two arcs, is 5-7mm.


Occasionally, I will incorporate features like this in my model since they obviously occur as part of the historical building process. But the difference was too large and I decided to make my mold symmetrical by using the fuller bass side contour (photo's right side).


The technical drawing provides six cross sections of the bowl. Having chosen to replicate the bass side I laid out the half sections along a central plywood spine.

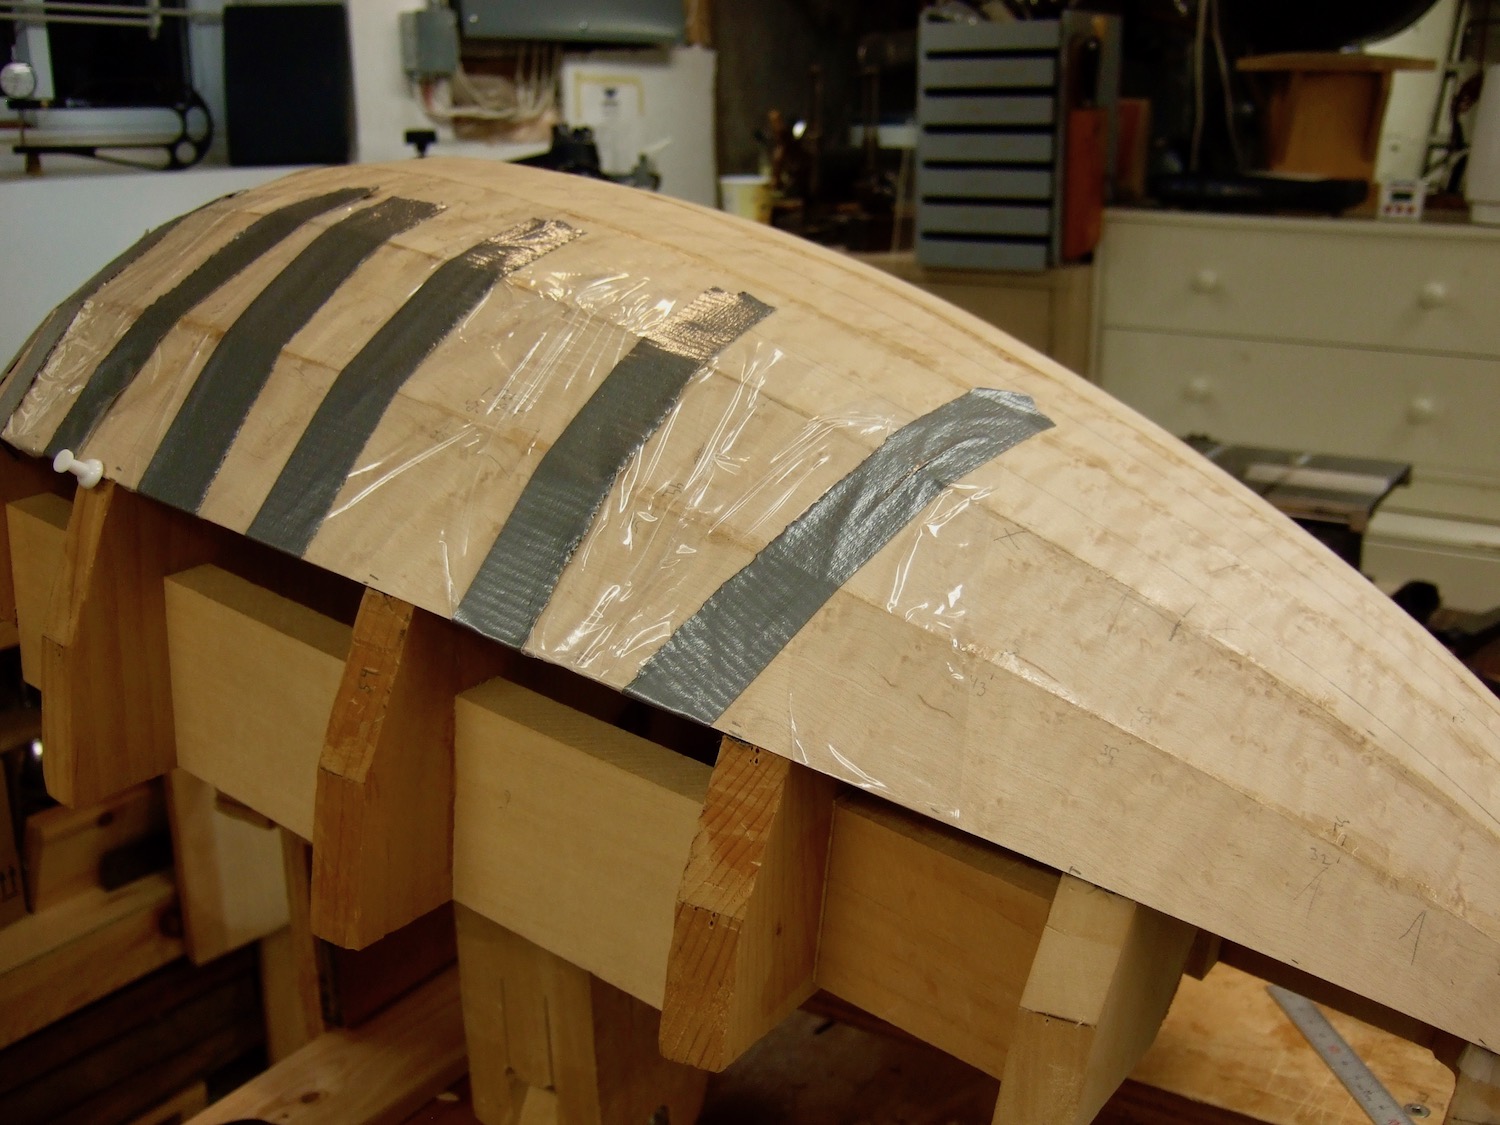
Here I am using both clear plastic tape and duct tape to hold the rib joints together. I like the advantages of using clear plastic packing tape: I have a clear view of the joint, the tape is ultra thin so, with an open mold, I can feel the joint between my thumb and fore-finger and correct a mis-alignment if necessary.  Plastic tape however is not strong and in this situation I want the extra strength that duct tape offers.

 
Here's why. I want the ribs to develop a pronounced scallop effect across their width. This occurs naturally when the joints are papered over on the inside of the bowl. But it is possible to enhance this feature. I achieve this by chamfering the bottom edge of each ribs so that when they are assembled the joint is like an inverted 'V'. Closed and tight fitting at the top (the surface of the bowl) but open at the bottom or inside of the bowl. When the joints inside the bowl are papered over the drying glue and shrinking paper pulls the bottom edges together and forces the two sides of the inverted V upward, bowing the surrounding wood  and creating a more pronounced scallop.


The reflection of light on the rib joints accentuates this effect on the original lute.


The rose is set into the soundboard and is made of a wood other than spruce, perhaps basswood. This is noted on the technical drawing.

Apparently Schelle followed the traditional method in preparing to cut the rose. Once the blank disc of basswood (?) was inserted into the soundboard the rose pattern was glued on the inside covering the joint The pattern was then cut from the inside out. This is visible on a restoration photo of the inside of the soundboard showing that the paper pattern covered the joint of the soundboard and inserted rose.


Schelle's rose is not precisely cut nor is the drawing precisely rendered. The design is somewhat fanciful. I photocopied the rose pattern  from the technical drawing and using a light screen made a full size tracing, altering details as I went. I did not follow Sebastian's example and I cut my rose directly from the table but I did not carve a border.


The bridge is located close to the rear of the soundboard but its original position can be seen just forward of that. Apparently the bridge was relocated rather than re-glued in the original spot because the wood was too badly damaged. I do not know if this was done during restoration or at an earlier date.

There is little doubt that the Schelle bridge is original as the shape of the bridge tip matches the footprint of the original position on the right side.


   My client wanted a slightly wider spacing between courses and extra string holes so the lute could be single or double strung.  This increased the width of the bridge by more than a centimeter so I diminished the size of the bridge tips to help compensate.


The pegbox has 14 pegs for 7 courses although in this photo of the original lute the nut is grooved for a single first and the first bass peg does not carry a string.
 

The treble string is mounted in a bracket attached to the side of the pegbox. This style of side bracket is often a feature of swan neck baroque lutes as it allows the thinnest string to run straight over the nut rather than angling around the pegbox cheek and on to its peg.  It does not however alleviate he problem of  the build-up of string windings that jam into the narrow opening. Here a frustrated lutenists has chopped away the inner part of the pegbox.


For reference, here's a closeup of a similar bracket on the triple nut extension of a Jauch that I built several years ago. This bracket was constructed as part of the pegbox cheek and a rectangular slot was cut through for the string. You can see that it allows little room for string windings.


The Schelle theorbo is probably best known  for this feature - the neck  can be folded back on itself to allow for easy transport. The iron hinge is the center of a simple mechanism. The theorbo extension is in two parts connected by a simple half lap joint.

Note that this series of photos show the theorbo extension upside down.


Here is a closeup and you can see the half lap. The hinge pin sits toward the bowl.  Each half of the two part extension is notched so that one over laps the other. The hinge swings back on itself from right to left.

I photographed this while the lute was upside down on the table


The theorbo head is nearly 18 cm long so there is plenty of room for the eight diapasons.
The extension is constructed with two types of wood and although both are painted black the quality of finish is different.


For example, the peg box has a smooth satin finish and in areas where it is worn a nice patina has developed. In contrast, the finish on the theorbo head and its half of the extension is dull and rough. There are tool marks on the sides of the head.


Obviously I am fascinated with the historical theorbo and it has been my pleasure to share these photos from my time in the museum. I had intended to show more photos of my Schelle and I will.
There is more to say about this instrument too so I'll put that all together in my next post.
Also, the new Voboam and Stauffer are about finished so there will be stories about those.

All photos by the author except as noted.

                                                                       *****

Sunday, April 23, 2017

April Update

The last several months has been a busy time: After I finished a model of the 1690 Voboam guitar that my client picked up at the end of January I started another one but with changes in the aesthetic and internal construction. I am nearly finished with a new Stauffer based on an early (1822) "Legnani" model. And I finished a model of the large, powerful German theorbo by Sebastian Schelle 1728.

Long Island Guitar Festival photo
Early in April I attended the Long Island Guitar Festival at LIU Post. Harris Becker, the festival director and owner of my 7-string Stauffer, invited me to show my guitars. Raphaella Smits was one evening's featured performer in a program of Ponce, Mangoré and Mompou brilliantly played on a 1980 John Gilbert. Raphaella performs regularly on 19th century guitars so this was an opportunity to ask her to critique my work. We met after her master class with Harris and guitarist Huy Thanh Nguyen. Raphaella was generous with her time, thoughtful and direct in her comments. There were many take aways; nut width, string tension and string choice among the practical.

The inspirational was the gift of her CD of Antonio Jimenez Manjon played on a 1899 Vicente Arias. The music is at times "dreamy" but also "rough and virile" to quote adjectives Raphaella uses to describe his music. The guitar is very lightly constructed with a long string length of 72 centimeters, Its tonal characteristics, to my ear, embody the period's spirit: vitality and sentimentality. The guitar's uniqueness beckons adventurous luthiers.


My 1822 Stauffer (the neck is in the background) has progressed since this photo was taken. The purfling is finished and the body is just about ready for French polishing.


I had built several examples of this large theorbo, using the museum plans, before I examined the original in Nüremburg in 2005.  Earlier I thought there were several odd features in the instrument's construction. These were clarified when I studied the original. My post will include material from that visit. The string lengths of my model is 86 and 140 cm while the bowl is 41 by 65 cm.


The baroque guitar  that I finished in January was my usual 1690 Voboam model . But I made several changes in the aesthetics and construction features . My newest Voboam will have different features too. I'll compare my work on those two guitars  and explains my thinking about them in a future post.

All photos by the author except as noted.

                                                                      *****