
This is the nut end of the Schelle fingerboard. The curvature of both the nut and the ivory inlaid panel show the degree and evenness of the camber. I measured the height to be well over 4mm. The fingerboard is 78mm wide at this point.

The height of camber at the neck joint of MI 46 is over 2mm and exhibits the same evenness as at the nut. The neck width is 105mm.
These measurements are estimates because the rounded edges of the fingerboard do not allow exactness.

Here's a sample of two necks. The one underneath is the neck of the Jauch that I am building. I have cut out the recess for the triple nut extension and except for final smoothing of the fingerboard surface and rounding of the bass edge, it is finished. The one on top is from one of my theorbos. Unfortunately, the lute was left leaning upright in a corner and fell over, splitting the area of the neck at the back of the recess for the extension. Re-gluing this type of damage always leaves the joint weak, so I replaced the neck, but saved the artifact.
 |
| Photo: German National Museum, Nuremberg |
This is a restoration photo of the bare neck of the Sebastian Schelle, MI 46. The smudges are glue "shadows" of the inlaid ivory design left on the surface after the fingerboard was removed. On the right end of the neck you can see the recess for the nut and the curvature of the camber. In this example Schelle created the camber directly from the core wood rather than from an added slab. The advantage to this method is that those strings that lie farther from the neck center are closer to the plane of the lute. The top string at the nut, for example, actually lies below the plane. The second string may as well. On lutes with 11 courses on the fingerboard several of the lower courses may lie close to or below the plane of the lute. The over-all effect is to lessen the total upward pull on the neck.

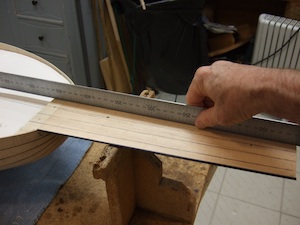
I secure the lute in a cradle and work from the front. Using a block plane with a fine setting I start cambering the neck from the nut area down the length of the neck, across the front block and on to the top edge of the side ribs. Progress is slow as I must check frequently for accuracy. Across the neck I use a straight-edge to eye-ball the camber. In the photo, in which I am beginning to glue the fingerboard in place, you can see four pencil lines on the neck wood. These represent the second, fourth, sixth and eighth courses. I use these as guides to determine the levelness along the axis of the neck (see previous photo). When I was confident the camber was accurate I bent a piece of 2mm thick ebony over a hot pipe and glued the fingerboard in three stages as was shown and described in an earlier post.
My clients are not unanimous about the degree of camber and I construct variations. Historical lutes also exhibit a variety of cambers both at the nut and the neck joint.

The degree of camber at the nut on this lute by Thomas Edlinger, No. 497 in Leipzig is very much like the Schelle.

But at the neck joint the camber has flattened, relatively more, than the Schelle and is only a millimeter or so high.
All photos by the author unless otherwise noted.
No comments:
Post a Comment