Showing posts sorted by relevance for query French. Sort by date Show all posts

Monday, July 22, 2019

July Update - Theorbos and Early guitars

   It has been almost a year since I last posted. That doesn't mean that I haven't been busy. Here is an update on what I've been doing.

 
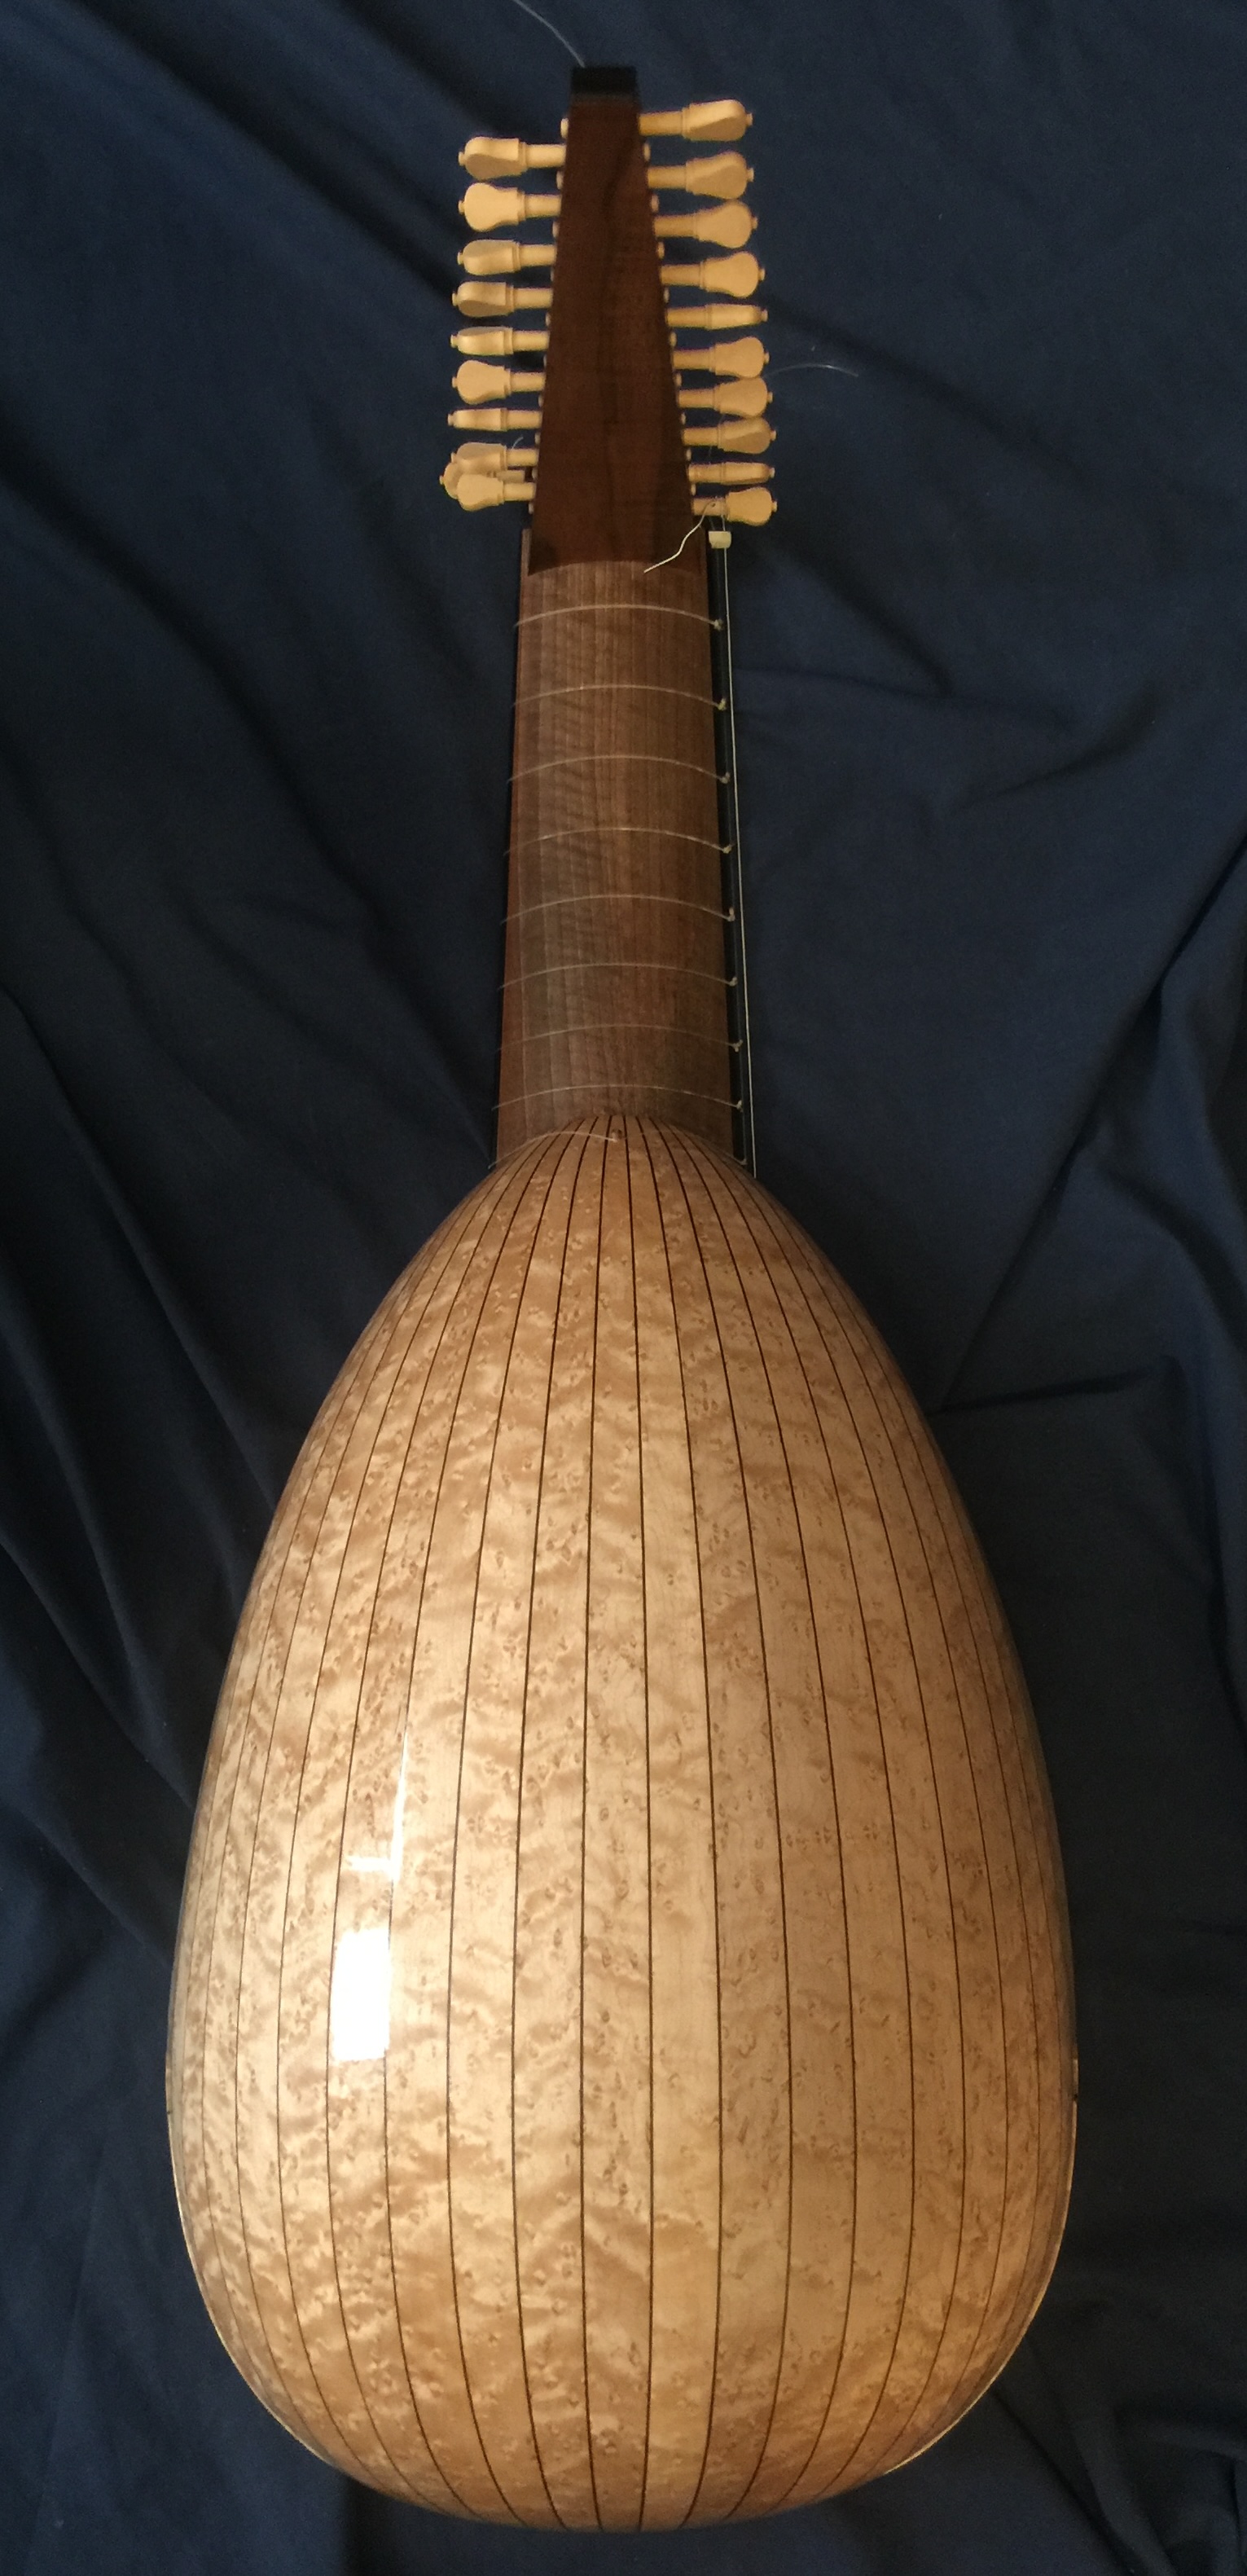
I designed and built a small  travel friendly theorbo to be used by a client who is playing a lot of the late seventeenth century French repertoire.

I thought this instrument should be different than the early seventeenth century Italian theorbos, even the small ones.  So I used construction features that I associate with the iconography of French lute/lutenists of the era or that anticipate lute designs that became popular in the early eighteenth century.

The fretted string length of my instrument is 78 centimeters while the diapasons are 105 cm.  With an extra peg for the fretted strings the  lute can be strung either 7/7 or 8/6 as well as 7/7.  My client's choice of diapason length was so short I could not mount the diapasons in the usual way - on a straight extension. the choices were either an extension with the theorbo head off-set from a straight extension, or  one with the extension angled precariously off the end of the fingerboard. I settled on a solution that Joachim Tielke and others started to use at the end of the eighteenth century for out-fitting  angélique or baroque lutes.


I thought an archaic rose design would be appropriate so I chose a pattern that is very close to the 1550 era Hans Frei's Warwick lute.


My client has liked several of my Venere model theorbos from the 90s so I used the same cross -sectional arching as the original Venere but with eleven ribs. I also thought that maple, in this case bird's eye, would be the most suitable wood for a lute of that era.


Here is a model of one of my Venere theorbo circa 2004 with the historically correct number of ribs (27) for comparison.


As you know I have been avoiding the use of ebony or other exotic woods when possible. The neck veneer is Claro walnut, Juglans hindsii. from California or Oregon. The board I used has a diagonal curl. I cut thin, narrow strips, and reversed the direction of every other one to achieve the pattern.


The extension is English walnut, Juglans regia, cut on the slab.

The pegs are Castelo boxwood stained black.  Smooth operating pegs are essential. Therefore, I prefer to turn my own pegs because I can have control of every step of their creation. I buy the wood as lumber and cut it into manageable boards if necessary. From these I manufacture 1 inch square lengths about 3 feet long which are sticked and stacked for storage. When I begin a new lute I cut the number of peg blanks I need from these lengths and turn them to a rough form. Each peg is indexed to fit back on my lathe. When I need a break from carving the rose I put the pegs back on my lathe and finish turning the form, free hand and by eye using only calipers to check the size of the various components. Inevitably, the heads vary in size but I use this to advantage and fit them in descending order from largest to smallest along the length of the pegbox- a feature often observed in historical lutes.


Guitar Connoisseur is an online magazine that publishes interviews and articles accompanied by high quality photos of guitarists and luthiers. Occasionally, it delves into the world of classical guitar and recently even back to the nineteenth century.


The Spring issue of GC includes this interview by client and staff writer Pat Bianculli.

http://www.guitarconnoisseur.com/


For more than a year I have been working on a copy of the Martinus Kaiser theorbo, E.24 Musée de la musique, Paris. I have built a dozen models of this instrument but this is the first that I have copied all of the aesthetic details.


 In April I was nearly finished. I had strung the instrument and was letting it settle before I started the final adjustments when the bridge exploded. I took a photo (see below) and put the lute in its case. I notified the client that there would be a significant delay and offered to return his deposit. He kindly agreed to wait until I replaced the soundboard. I needed some time away from the instrument but now I am anxious to begin work on it again.


This is type of failure is troubling because I am not sure of the reason; perhaps the glue on the treble side of the bridge jelled before I applied the clamps resulting in a loss of strength while the bond on the bass side held firm, or perhaps my support caul was not positioned properly. Whatever the reason,  it took a great bite out of the belly.


I have just about finished a model of the 1813 Josef Pagés guitar that is conserved in St Cecilia's, University of Edinburgh. I spent a wonderful day with the original two years ago. You can read my post from that visit at:
http://schreinerlutesandguitars.blogspot.com/2017/10/josef-pages-1813.html
In this photo I have strung the guitar with six single strings from a set for romantic guitar tuned to 432Hz.


There are twelve planetary pegs and the bridge is drilled for six courses. A second nut is grooved for an eleven string (single first) set-up.

The back and ribs of the original Pagés are Lacewood. I was unable to obtain suitable Lacewood boards so I got into my stock of planation grown Cuban Mahogany for the first time. The neck is Spanish Cedar.

The finish on the entire guitar is multiple coats of tung oil sealer. The oil has been drying since early June. Soon I will French polish the back, sides and neck. The top will be left with the oil finish.


interior of my Pagés model


As promised, some time ago, I am making a drawing of this guitar and I will publish it here along with the story of building this model.


I will soon be finished with another Buchenberg.
This one in yew at 93 and 170. A story will follow.


In June Susan and I exhibited at the Boston Early Music Festival. On the table is the Pagés and a Baroque chitarriglia after Matteo Sellas that I borrowed from a client.

We always look forward to renewing friendships from previous years, attending shows, some featuring our friends and talking to an enthusiastic public. This year was as exciting and interesting as all the others.


I wanted to have something special for a back drop so Susan created these wonderful posters of my clients when they visited us to picked up their instruments.


All photos by the author


Tuesday, July 2, 2024

A French Baroque Lute


When I took this photo three weeks ago my French baroque lute was assembled but there was still much to do. You may be able to see the scribbles on the top. These are thickness measures I made at various locations before I glued the top in place. The idea is to string and tune the instrument and see how it responds. If I think it can be improved by thinning the top in specific spots I scrape some wood off. The top thickness at this point of construction varies from 1.75 mm behind the bridge gradually diminishing to 1.5 in the rose area and 1.0 at the rose itself. Then increasing to 1.8 mm at the neck joint. If you are able to decipher my scribbles the numbers are thousandths of an inch. 


The lute bowl shape and size is modelled after E.25, an anonymous instrument that is conserved in Musée de la musique, Paris as an archlute. The details of the top; bridge, rose position and rose diameter are borrowed from the Hans Burkholtzer baroque lute, Kunsthistorisches Museum, Vienna. 

There is a strong connection between E.25 and the Burkholtzer but rather than repeat myself see my blog from 9/22/22, "An Anonymous Archlute" and from 2/17/16 "Thirteenth Course Baroque Lute After Hans Burkholtzer and Anonymous E.25". 

Like the Burkholtzer, the bowl is assembled with twenty-one ribs, my lute with bird's eye maple and Burkholtzer's with ivory ribs. My lute has walnut spacers as I have given up on ebony for everything other than fingerboards. For thin parts like binding and spacers that need to be bent the quality of today's ebony is poor and it breaks easily. The bowl is varnished with a true oil varnish.


The neck veneer is curly English walnut edged with ebony laid over a quartered spruce cord. The pegbox is also walnut cut from the same plank. I turned the turning pegs on a mini lathe without templates using only calipers to keep track of the dimensions. The wood is Castelo boxwood. The pegbox and pegs are finished with multiple applications of rubbed tung oil.


This photo offers a narrow view of the chanterelle bracket. Note that the tenth course is fully on the neck while the eleventh is completely of the edge. The fingerboard is flat rather than arched.

If you think the strings look funny you're right. My client who lives in Buffalo NY planned on taking the lute to the LSA Seminar in Cleveland a week ago. I didn't think there was enough time for my string order to clear customs and get to me here in Montréal before the lute was scheduled to be hand-delivered to Buffalo. I had strung the lute with these strings multiple times to learn what characteristics it displayed and whether there were buzzes on the nut and fingerboard or to reveal other problems. I nearly had enough spare strings but I ended up with only single strings for the 3rd through 5th courses. When the lute reached its owner he strung it with the new and complete set of strings and happily attended the LSA Seminar.


The rose design is from an Unverdorben lute in the collection of Harvard University (see the original  below). I am not aware of it appearing on any other instrument.


I took this photo of the original rose when I examined the lute in 2008.

If you study the design you can find instances where the pattern is interrupted or does not repeat as expected. I copied the design as it appears without improving the Master's work.


                                              Photographs by the author and John Edwards


                                                                            *****


Monday, September 11, 2017

Another Voboam


Early this summer I built this Voboam model to exhibit at the Boston Early Music Festival. The design is based on the 1690 Rene Voboam, E. 2087 in Musée de la musique, Paris. I have built a lot of these always using similar aesthetics and construction methods for each one. I had been thinking about changing some of these details. Coincidently, I bought a copy of La Guitar, Paris 1650-1950, Addendum by Sinier de Ridder. Among the many photographs was a guitar attributed to Alexandre Voboam from 1657. Two features of this guitar stood out - a black neck and pegbox and a two piece back, apparently made with yew wood. The guitar also had plain ebony side ribs without ivory dividers.


Since I have been building nineteenth century guitars with maple necks finished in black shellac I decided to use the same procedure for my Voboam. My model retains the separate peg head secured with a 'V' joint and the usual Voboam inspired peg box with scalloped edges. The pegs are castelo boxwood stained black.


I colored my shellac with carbon black and applied it with a cotton rubber in the standard French polishing technique. However, the areas around the 'V' joint and the transition from the heel and the sides of the peghead required using a chisel tipped brush.

Note: I was curious about whether the black neck of the original Alexandre Voboam guitar was veneered or blackened in some manner. I emailed Françoise and Daniel Sinier de Ridder who kindly replied, "In this A. Voboam the neck is veneered in ebony and also the heel." Thank you.


I have used different methods of attaching the neck to the body. This time I used a slipper foot style neck that Sinier de Ridder calls the "archaic" method. They explain that this was the Voboam family's standard procedure. This was an important take away from  La Guitare. 

Here I am using a pair of skew chisels (left and right bevel) to shape the heel. These chisels simplified the shaping of the contour particularly in the transition from the heel to the shank of the neck.


   I am not a good draftsman  so reproducing the design for the moustache has always troubled me.


But I developed a good technique for replicating the spiral shape that defines many baroque guitar moustaches. I use tin solder as a flexible ruler.  This is the stuff used to connect copper plumbing pipes or electrical connections in electric guitars. It is easily shaped into a spiral and most importantly it holds its shape.

Tracing around the circumference achieves the basic design. I filled in the appurtenances free-hand.  The moustaches are cut from a assembly of two pieces of ebony 1.2mm thick. The pattern is glued to one face while slips of paper are glued to the opposing face and between the ebony  pieces. I used a hand scroll saw to cut the pattern.  While the assembly is still together I round the edges with various small files. The two parts are separated and the paper removed by dropping them in near boiling water for a few seconds. Everything floats apart and as long as the moustaches are rescued quickly no harm is done. I allow the new moustaches to dry sandwiched and weighted between two pieces of plexiglass.


I didn't have a suitable piece of yew for a two piece back but I have been saving a small stock of this beautiful koa for special projects.

I finished the guitar with shellac using the French polishing technique. The soundboard received multiple coats of tung oil.


The side ribs are Macassar ebony


Coming Up. I am working on a model of the David Tecchler archlute that will be finished soon. I examined this instrument in the Metropolitan Museum of Art, NY in 2000.

This is a 2008 model


All photos by the author.

                                                                        ****


Saturday, October 25, 2014

Eleven Course Lute after Magno Tieffenbrucker


I finished an eleven course lute using the bowl from Magno Tieffenbrucker's archlute C45 that is conserved in the KHM, Vienna. It is one of my favorite models and I have built it with various string dispositions; as an archlute, like the original, as a larger eight course and as a ten. This lute is strung in the old G tuning with an extended bass. The owner also intends to restring it for D minor. The string length is 646mm.

I built the mould for the lute around 1985 from plans drawn by Gerhard Söhne. It has given good service. I prefer working with solid moulds like this for lutes with many narrow ribs and open moulds for wider and fewer ribs. I have thirty odd lute moulds and they are split fairly evenly between the two types. My two posts from May 8 and 17, 2012 describe building a open mould.  This mould was assembled from blocks of basswood cut to specific cross-sectional profiles as denoted on the published plans, glued together (you can see the glue lines) and then sculpted to the finished shape.


The original archlute has a triple rose. When I build the archlute model I incorporate that design, but as a lute with fewer courses I use a single rose, positioned in the same location as the triple rose.


The design is a abbreviated version of a rose that appears on many renaissance lutes. My source is from the swan neck thirteen course by Joachim Tielke 1678, Bayerisches Nationalmuseum, Munich, Mu 10.


The bridge is constructed of plum with an ebony cap. I positioned it the same distance from the rear of the belly as it is on the original archlute. I think that maintaining Magno's original geometry for these features is as important as the shape of the bowl for preserving his tonal vision.


The original bowl is constructed with 31 ribs of yew with dark spacers. I used Indian rosewood with holly spacers.


The neck is constructed with a poplar core veneered with strips of black ebony that taper in width from the neck joint to the peg box separated by holly lines. I do not taper the strips individually. I carefully plane an ebony block to the required taper and cut each piece from its edge.


The finished pieces can then be lined up to check for discrepancies.


The length of an eleven course pegbox can be intimidating so I was careful in determining its proportions. The core is pear with an ebony back plate.


The cheeks are veneered with rosewood and holly. The chantrelle bracket is carved from a small block of ebony.


The ninth fret is tied on the neck but it sits very close to the neck joint which makes it very difficult to tie tightly. I like  to insert a tiny peg into the center rib to hold the fret securely in position.

I usually apply an oil finish to mult-rib rosewood bowls. But this time I decided to shellac it using a French polish technique.

 Solvents in the finish will often cause rosewood color to bleed onto lighter woods so I painted the holly spacers with several coats of shellac to seal them using a tiny brush. Then I filled the open grain of the rosewood with commercial wood filler. Once the filler was dry I scraped and sanded the ribs smooth.
 There are many descriptions of french polishing on the internet and if you are interested in trying the technique read a few explanations and watch the videos. Here I'll cover the major points of my technique but I think it is best if you develop your own through practice and patience. In essence, it is a simple procedure.

1. A 2 lb. cut of white shellac flakes dissolved in denatured alcohol.
2. 'Fads' or applicators made from good quality white cotton stuffed with cotton balls and secured with white cotton string.
3. The smaller fad is about the same size as the width of this lute's ribs and is used to apply the polish to one rib at a time. I use a circular motion that is the size of an American Quarter.
4. Ridges from the circular motion build up with repeated applications of polish. These must be removed using the larger fad with a 1 lb. cut of polished. Use a straight light sweeping motion over each rib. A little over-lapping is OK.
5. Always allow the polish to dry for several hours before resuming work with a different fad.
6. 'Spirit off' using the larger fad and a polish that is increasingly more dilute until a flawless mirror finish is achieved.
7. Or, if the spiriting off proves troublesome allow the finish to dry for a week and polish with rottenstone lubricated with mineral oil until you are satisfied.
Decorative tip of the End Clasp


I decided that spiriting off would be too tricky on these narrow ribs. I reduced the amount of shellac to a little less than a 1 lb. cut and made several passes. I allowed this to dry for several days.  Then I rubbed the finish with rottenstone and mineral oil using a soft paper shop towel and Q-Tips for the difficult areas.


Future posts will describe the 1805 Giovanni Fabricatore in the Edinburgh University Collection of Historical Musical Instruments that I examined last month.
 
And a multi-post description of my construction of a Panormo guitar from a 1834 model.


All photo by the author.


Sunday, December 6, 2015

Stauffer Terz - a Photo Album


Terry McKenna is a long time friend and client. He had stopped by to pick up a lute repair that I had finished for him. The terz, strung up but unvarnished, was lying on my bench begging to be played. Terry gigs, records, teaches, lectures, tours and has fun playing an eclectic variety of early string instruments. He would have taken it on the spot, but I needed to varnish it.


The back and sides are two different types of maple. The sides are a hard North American maple while the back is a less dense European maple. I wanted to argument the tone of the guitar with a little extra snap or a kind of percussive quality. I thought using hard maple for both the back and sides would result in a brittle tone but using the harder maple for the sides only would be about right.

This created a problem for varnishing. The European maple back was nearly white while the sides ribs were considerably darker. I used several applications of a chicory tea stain to darken the back before I applied any finish. Then I French polished the back and sides with blond shellac.


I put the guitar aside for several weeks to allow the shellac to harden and then I rubbed it out with fine pumice followed rottenstone using mineral oil as a lubricate.


Even though the back and sides are two different species of maple the curl  figures compliment one another.


The soundboard is finished with multiple applications of tung oil allowing each to dry thoroughly and then rubbed out with a lamb's wool pad. It is important to be sure the previous coat of oil is dry before a further application of oil. If it isn't, uncured oil will migrate to the surface over time and result in a permanently tacky finish.

The bridge was sprayed with black lacquer before I glued it to the soundboard. The saddle is a length of T-fret, the same size as I used for the frets.


The neck is finished with black French polish. I add a small amount of lamp black to my usual shellac and alcohol mix and apply it with a small polishing pad. It is important to round off the edges of the peg head sufficiently before beginning the polishing procedure. Otherwise, the polish will not build up leaving bare wood visible .


It is necessary to use a brush to apply polish right into the angle of the heel joint. I use a brush that is shaped to a chisel edge to build up a layer of polish. Alternating with a polishing pad blends the colour onto  the brushed area.


I'm just finishing the polishing of a Panormo model guitar. I last reported on this instrument on 10/10/15 and continuing this story will be the subject of a post or two in the near future.


All photographs by the author