It has been a while since I last posted, but that doesn't mean that I've not been busy. Before I describe my work I want to mention a nice surprise. Fiona Thistle, whom I had not previously met, stopped by to get an endpin for her lute. Fiona who has been playing since the age of 10 (!) bought the lute second-hand for her studies at university so I didn't know which of my lutes she had. I was delighted to see that it was one of my red Gerles from 1995. The Hans Gerle model was my go to renaissance lute from about 1983 to 2000. Most of them were varnished with a cooked resin varnish in shades from amber to chestnut. Occasionally, I added red madder as is obvious in this photo. Making the varnish is a cottage industry and instrument makers usually make their own. However, I was always hesitant to do this as making the mixture is a tricky and dangerous procedure. Luckily one of my students from my teaching days had access to a university chemistry lab's extraction chamber so for a time I had a reliable supply. I also bought the prepared varnish from Northern Renaissance Instruments (England) until Canada Post banned the delivery of hazardous materials - my last shipment was confiscated. I'm always amazed by the appearance of this varnish - translucent, vibrant with incredible depth.
I have just about completed a seven string Lacôte guitar except for the finish. I combined features from two Lacôte multi-string guitars that I examined in the last several years. This guitar cried out for a set of Rodgers replica tuners. The gears of the tuners are concealed in the peghead (see following photos) and fitting them was a lot of work, but well worth it.
In my next post I'll have photos and descriptions of this work, information about the two historical guitars that I consulted as well as my usual construction descriptions and photos.
The gears fit in the rectangular slots while the string rollers sit in the cut-outs. A central cover plate will conceal the roller ends.
I've also gotten a good start on another 7 string, this one after Johann Stauffer, 1827. The model (G24) is described with photographs of the front, back and side profile and complete external measurements in Stauffer&Co., The Viennese Guitar of the 19th Century.
*****
All photos by the author
This is a blog about building lutes and historical guitars. It is not only a "how to" blog but also a "why" blog. I have always enjoyed thinking about lutes and guitars as much as building them. I also enjoy the music associated with the instruments I build as well as the inspiration I gain from visits to museums to examine them.
Tuesday, March 29, 2016
Sunday, February 21, 2016
Thirteenth Course Baroque Lute After Hans Burkholtzer and Anonymous E.25

I finished a thirteen course lute based on two historical lutes that share a common lineage. The Hans Burkholtzer lute, SAM 44 (NE 48) conserved in Kunsthistorisches Museum, Vienna was built in 1596 in Füssen. Robert Lundberg notes that it was converted from its original string disposition to an 11 course in 1705 by Thomas Edlinger and later to a 13 course with a bass rider. This description was published in Historical Lute Construction published by the Guild of American Luthiers.
http://www.luth.org/books/lute_book.html
The second lute is anonymous E.25 an archlute conserved in Museé de la musique, Paris.
Visit site
This lute came to my attention when I read Joël Dugot's article Some Lutes in Paris Museums published in the Journal of the Lute Society of America, Vol. XVII & XVIII. Like the Burkholtzer lute, it was converted from an earlier string position to an archlute. At the time I was interested in building a larger archlute and this was an interesting candidate.
I examined E.25 in 2000 making a tracing of the bowl contours and recording other measurements. I went on to build the model but I never repeated the experiment. Dugot made an interesting observation in his article by pointing out the similarities between the design of E 25's bowl and the bowl of the Burkholtzer lute. Both were built with multiple ribs of ivory and the profile as seen from the side are similar. E 25 has 17 ribs while the Burkholtzer has 21. More importantly the cross-section of the bowls share the same contour. It is this latter feature that I consider to be the most significant in identifying styles of lute construction.
![]() |
| Burkholtzer from the museum's technical drawing |
![]() |
| E.25 author's photo |
In these two photos the similarity is obvious. A desirable feature of this design is that the depth of the bowl is less than half the width. Shallow bowls usually require shaping the ribs to a kind of banana or 'S' shape and then fitting them to an equally complex mold. For the most part this design avoids those difficulties. A secondary benefit is that the angle of the edge ribs as they glue to the top provides more grip for the bar ends, perhaps resulting in fewer loose braces.
There are more similarities. The rose and bridge positions from each lute are the same, relative to the length of the top. Also, the harmonic bar positions are nearly identical. Each lute has a single bar across the centre of the rose, three bars between the rose and the bridge, a J-bar and a single finger on the treble side of the bridge. The lutes differ only in that E 25 has three bars above the rose while the Burkhlotzer has two. The former perhaps because the top of E.25 is 20 millimetres longer.
A technical drawing of the Burkholtzer lute and a list of other drawings are available from Kunsthistorisches Museum Wien by contacting Ilse.Jung@khm.at
A thorough description of E.25 can be found in:
Les luths (Occident) catalogue des collections du Musée de la musique (vol.1) les cahiers du musée de la musique 7. This catalogue contains excellent photos and descriptions of 78 lutes, edited by Joël Dugot. The entry on E.25 includes an x-ray that shows the position of the harmonic bars. The catalogue is available at http://philharmoniedeparis.fr/en/visitor-information/online-shop
Use the search box to locate the catalogue.
Although I only built one archlute with this bowl I've used it for a number of baroque lutes. Thomas Edlinger had a high enough opinion of the Burkholtzer bowl to use it as the basis for an eleven course. Another, anonymous maker chose to convert Edlinger's work to a thirteen, therefore, it must have been a successful design. I wanted a larger lute than the 70 centimetre string length of the Burkholtzer, so I followed the same path as my two predecessors and out-fitted the E.25 bowl as a thirteen course. With a ten fret neck it produces a large baroque lute with a string length around 73 centimetres. With the bass bracket the twelfth and thirteenth courses are just short of 80 centimetres.
The tenth fret sits close to the neck joint and this can cause the fret to slip forward, out of position. I make a tiny peg and loop the fret over it.
Like the Burkholtzer, I like to used an outside edging, but made of ebony.
E. 25 has a unique and seldom replicated rose and I carved it for my archlute model.
But Leonardo's knots is my favourite rose pattern and Burkholtzer used it too so I didn't hesitate to include it.
Burkholtzer's bass bracket and chanterelle are elaborate affairs in ivory.
I used J.C. Hoffmann's bracket (MIM Brussels 3188) and chantrelle.
The brackets are maple ebonized with black French polish.
The top photo of the Burkholtzer lute is from Lauten und Geigenmacher des Füssener Landes by Richard Bletschacher. All other photos by the author.
***
Sunday, December 27, 2015
Building a Louis Panormo - Part 2
I finished the model of a Louis Panormo guitar that was the subject of my post from 10/10/15. It is closely based on a Panormo that I restored in 2014 ( see 7/9/14).
Harris Becker, director of the guitar program at Long Island University Post, had commissioned a renaissance lute and when he came to Toronto to pick it up I showed him the work I was doing on my Panormo. Harris reserved the instrument and last week he was back in Toronto to pick it up.
My previous post about this guitar focused on my description of assembling the guitar on a solera. The technique requires finishing the soundboard with the rosette in place and most of the shaping done on the heel and slipper foot part of the neck. In this post I will take up the story where I left off.
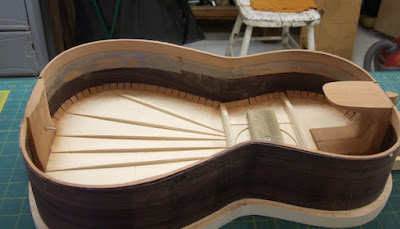
There are a number of steps that are required before the side ribs can be glued to the soundboard. The first step I had done earlier - drawing the contour of the top on the back of the soundboard before I assembled the fan struts and harmonic bars. The side ribs will be bent precisely to this shape and then glued to the top positioning them on that line. But the front edge of each rib needed to be trimmed so that it fits in the slot that is cut into the side of the front block. This needs to be a tight fit both for strength and appearance.
The tail block has an interesting shape - fairly wide (80mm) but bevelled on the edges so the maximum gluing surface to the back is reduced while the gluing surface to the soundboard is rectangular and measures 80mm wide by 13mm front to back. The tail block was previously glued to the top taking care that it was perfectly up-right.
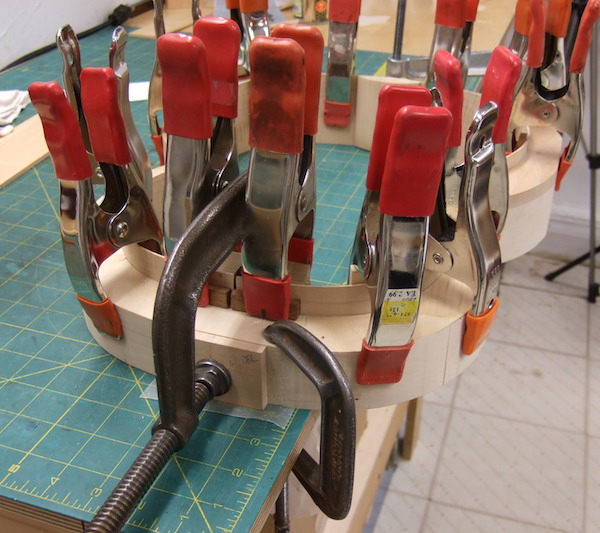
The side ribs are held in place while the glue dries with threaded rod screw clamps.
The top lining for the soundboard is composed of dozens of small triangular block glue in place separately. I made these from Spanish cedar, the same wood as the neck assembly and tail block. They are glued by setting them in a puddle of hot glue, holding them in place for a few seconds and moving to the next one. I wanted to feel more secure about this technique so I used a small stick of wood the height of the sides and a small spring clamp. After setting the piece in a puddle of glue I place one end of the stick against the top of the rib and the other against the face of the block. When the spring clamp pinches the rib and stick together at the top, the bottom of the stick pushes the block down against the soundboard and in against the rib. With a few sticks and clamps I work from one quadrant of guitar frame to another thus allowing the glue a few seconds longer to set-up.
![]() |
| Panormo No. 2154, built 1834 |
Panormo tied down the ends of the fan struts by gluing the lining block right on top. This was probably his usual method as I have seen this in several of his guitars. Note the toothed plane marks on the side ribs.
The inside linings for the back need to be carefully bent to the proper contour. I made a simple but accurate template out of plywood, heat bent two strips of Spanish cedar and allowed them to set in the form until they were needed.
The back slopes forward from the tail where the rib depth is 92mm to the neck joint where the depth is 87mm. This is not an abrupt change but it is still necessary to account for this when gluing the linings. The difficulty arises in bending the interior linings because they must conform to both the outline of the guitar and the sloping profile of the sides as well as fitting snuggly against the inside of the ribs. I employed the same technique as I did when assembling the terz guitar. See my post: Building a Stauffer Terz Guitar - Part 2 from 20/11/15.
Panormo used deep back linings, perhaps because he also used thin sides. These linings are about 19mm by 3mm. Of the original Panormo's that I have examined the sides vary from 1.6mm to 1.0mm with perhaps a general thickness of 1.2 - 1.3mm. Areas on one guitar measured .5mm! From what I understand about Spanish guitar making tradition, thin sides are standard and Panormo did advertise himself, "Guitars in the Spanish Style". The back linings are tapered to a thin edge. In the photo I lined the side with a strip of duct tape to protect them while I vigorously scraped and sanded the linings to a thin edge.
The back of the original guitar is arched 5mm across the lower bout, 4mm at the waist and 3mm across the upper bout. I made an arched contouring jig out of flexible plywood about 35cm wide and glued three concaved forms to it; one with a 5mm arch over the 35cm width, the middle one 6mm and the last 7mm. Coarse sandpaper was glued to the business side of the jig. By thoughtfully rubbing the board over the guitar sides both before the back linings are made (as seen in the photo) and again to level them once they are glued in place I can create a smooth transition from one end of the guitar to the other. When it is time to glue the back with its corresponding arched braces to the sides the contours will match perfectly.
Here the back is ready to glue onto the sides. There are only two bars. Other early Spanish makers built guitars with only the two lower bars. They obviously felt there was an acoustical advantage and that the size of the slipper foot compensated structurally for the missing third bar.
![]() |
| Panormo No. 2154 |
I modified the Panormo design in one important aspect. The raised front edge of the Panormo design is straight and does not compensate for the slight difference in pitch between strings of different diameters when each is depressed. As a result such guitars always play a little out of tune. I modified the front edge by creating a flat surface where the ridge had been and cutting a saddle slot as found on modern guitars. I then fashioned a saddle in ebony and shaped it to compensate for each string. The result is visible as a wavy line.
This close-up shows the depth of the bridge pin trough, the sharp angle of the strings over the saddle, the high string height and the angled sides of the bridge block.
Since the soundboard is domed a few millimetres I shaped the bottom of the bridge to match.
The Indian rosewood was filled with a commercial filler with a little burnt sienna pigment added to the mix to bring out the red undertone. The neck was filled with a light mahogany filler mixed with enough neutral colored filler to lighten the mix.
Once the filler was thoroughly dry and lightly sanded I started applying shellac with a French polish technique using blond flakes dissolved in alcohol.
After allowing the finish to harden for several weeks I rubbed it down first with fine pumice and finished it with rottenstone using mineral oil as a lubricate.
***
I'm finishing a thirteen course baroque lute after Hanns Burkholtzer and anonymous E. 25. I'll soon have details and photo album.
All photos by the author.
Sunday, December 6, 2015
Stauffer Terz - a Photo Album
Terry McKenna is a long time friend and client. He had stopped by to pick up a lute repair that I had finished for him. The terz, strung up but unvarnished, was lying on my bench begging to be played. Terry gigs, records, teaches, lectures, tours and has fun playing an eclectic variety of early string instruments. He would have taken it on the spot, but I needed to varnish it.
The back and sides are two different types of maple. The sides are a hard North American maple while the back is a less dense European maple. I wanted to argument the tone of the guitar with a little extra snap or a kind of percussive quality. I thought using hard maple for both the back and sides would result in a brittle tone but using the harder maple for the sides only would be about right.
This created a problem for varnishing. The European maple back was nearly white while the sides ribs were considerably darker. I used several applications of a chicory tea stain to darken the back before I applied any finish. Then I French polished the back and sides with blond shellac.
I put the guitar aside for several weeks to allow the shellac to harden and then I rubbed it out with fine pumice followed rottenstone using mineral oil as a lubricate.
Even though the back and sides are two different species of maple the curl figures compliment one another.
The soundboard is finished with multiple applications of tung oil allowing each to dry thoroughly and then rubbed out with a lamb's wool pad. It is important to be sure the previous coat of oil is dry before a further application of oil. If it isn't, uncured oil will migrate to the surface over time and result in a permanently tacky finish.
The bridge was sprayed with black lacquer before I glued it to the soundboard. The saddle is a length of T-fret, the same size as I used for the frets.
The neck is finished with black French polish. I add a small amount of lamp black to my usual shellac and alcohol mix and apply it with a small polishing pad. It is important to round off the edges of the peg head sufficiently before beginning the polishing procedure. Otherwise, the polish will not build up leaving bare wood visible .
It is necessary to use a brush to apply polish right into the angle of the heel joint. I use a brush that is shaped to a chisel edge to build up a layer of polish. Alternating with a polishing pad blends the colour onto the brushed area.
I'm just finishing the polishing of a Panormo model guitar. I last reported on this instrument on 10/10/15 and continuing this story will be the subject of a post or two in the near future.
All photographs by the author
Friday, November 20, 2015
Building a Stauffer Terz Guitar- Part 2
In my last post I focused on constructing the adjustable neck and the corresponding V slot. Now it is time to describe assembling the body of the guitar.
Since I had cut the V slot before I glued the front block onto the side ribs it was essential the everything remained properly aligned. With the side ribs clamped securely in the mold I then clamped the mold to the edge of my bench with the axis positioned on one of the lines on the mat. Then I glued the front and rear blocks in place.
The back slopes gently toward the waist and then plunges by nearly 15mm to the neck joint. The height of the side ribs are contoured from 77mm at the tail to 70.5mm at the waist and then to 56mm at the neck joint.
This creates difficulty in bending the interior linings for the back because they must conform to both the outline of the guitar and the sloping profile of the sides as well as fitting snuggly against the inside of the ribs. When the profile is less drastic the linings can be bent and twisted into the proper shape. But here that is not possible. I solve the problem by making my lining material extra deep, bending it to the contour and clamping it to the ribs, letting the extra width overhang. Scribing a line, as shown, denotes the correct profile. A second line scribed parallel to the first and then removing the excess makes the linings uniform in depth.

Once the linings are cleaned up I complete the frame by shaping and fitting the struts for the top and back. These all follow the size, shape and placement given on the museum's drawing - with one exception. I added a smaller strut, thinner and lower, in a position behind the bridge. I like to assemble the backs and tops in this manner. The ends of the struts fit perfectly into notches in the linings, and as a result, the frame is perfectly stable and remains so when the top and back are glued in place. The three back struts are arched as much as 4mm for the lower bout and nearly 3mm for the upper.
The two lower struts on the top are arched 3mm while the two above the rose are flat. These values are my choices. I also include a thin maple bridge plate that conforms to the arch of the top. The museum's drawing has no information about arching, nor is a bridge plate part of the original guitar.
I describe my technique for gluing the back and top onto the struts and frame in "older posts" from 1/20/13, 9/19/11 and 9/10/11.
The original Stauffer soundboard is thin. The area from the bridge through the sound hole and up to near the front block is 2.1 - 2.2mm. Other areas are 1.9 - 1.7mm. I used the same sort of gradation but I started at 2.4mm.
![]() |
| J.G.Stauffer MIM 4152, Berlin |
The museum plans do not include details of the purfling or the design of the bridge. I photographed the guitar but only in its location in a free-standing display case. The photo is of little value because of poor light and reflections.
![]() |
| N.G. Ries, private owner |
I do have a Nicolaus Georg Ries guitar circa 1840 in my shop. I consulted it for the design and details of the bridge, purfling, peghead and neck contour.
The Ries purfling design is similar to that found on many of Stauffer's instruments so I chose a variation of that for my terz.
Because the waist is so tight I didn't trust the strength of the my masking tape to hold the multiple strips in place at the waist. Also, I chose not to glue on the thicker hardwood outer piece at the same time as the others. I substituted a plastic strip and glued everything in the normal way. A special purpose caul with a large cam clamp that spanned the waist secured a tight fit. Hide glue doesn't stick to plastic so the next day I peeled the strip off and glued on the final ebony strip.
The Ries bridge (see previous photo) is a delicate design that was often used by the Viennese builders. The original is made with a hardwood painted black. I photographed the Ries bridge, re-sized it to the dimensions I needed, printed it and from that made a simple template. I chose a piece of European plum, drilled the bridge pin holes and cut the saddle fret slot.
Here's the finished piece ready to be blackened.
Viennese bridges are usually very low. This one is 5mm high, tapering to less than 2mm at the ends. The rear slopes to about 2.5mm.
Next time, I'll post a photo album of my finished guitar with further descriptions and explanations.
All photos by the author.
Subscribe to:
Posts (Atom)


