Monday, August 28, 2023

A Late Medieval Lute after Sedano Triptych


It has been many years since I built a medieval lute. So I was      surprised when Esteban La Rotta (photo) asked  me to build one modelled after the  lute portrayed in the Gerard David (1460-1523) painting,  Triptych of the Sedano family, 1490-95, Musée du Louvre, Paris.


You can see the entire central panel that measures 97cm x72cm. 


I studied the painting with the same diligence as I do when I examine a museum instrument; I recorded my impressions, made notes of the visual details and estimated various proportions and measurements. These follow.

Many of the lute's construction features are rendered in detail, others are ambiguous. The number of frets on the fingerboard is ambiguous.  Perhaps there are only eight but there could be nine. The neck appears to be long enough for another fret near the neck joint.  The bridge is set low on the lute's belly and is thin and wide.  The design of the finials is ambiguous. The five course string spacing at the bridge is narrow, while the width of the nut appears a little wide. The spacing within each course appears generous. The edges of the neck are nearly parallel. The first course appears  to be a single string. Two of the five visible pegs are heart shape while a third is oddly squarish --  a self made replacement? The peg box is bent back at or near 90 degrees. The bridge and the fingerboard are the same color, one that reminds me of boxwood.

There is a beautiful crumpled (silk?) lace around the edge of the bowl that obscures the neck joint. My guess is that the joint is an abrupt butt joint rather than the earlier medieval style of the bowl's ribs blending into the neck stock. There are two openings in the belly. The central rose is composed of three layers probably assembled from parchment and wood similar in design to known early baroque era roses. A second sound hole in the shape of a lancet window, often referred to as a fenster is positioned at the top of the belly and appears to be constructed of parchment and wood. Two inlays are positioned on each side of the rose.

Good representations of the back of lute bowls are rare in the iconography but here there is an excellent depiction of the bass side rear of the bowl. The width and arc of the visible ribs suggest a nine rib bowl.  The shape of the arc also suggests a bowl whose cross section at the widest point is a slightly flattened  circle. The wood has no figure or other distinguishing characteristics that could identify it. The artist's choice for the wood's color is the only clue. However, the representation may say more about the color of the finish than the wood itself. I have noticed lutes rendered in the same color by artists of the same era.


I thought if I could figure out the proportions of the Sedano lute I could construct an accurate model of  an A pitched lute with a string length of 54 centimeters. 

To the left is an open copy of The Strad, May 1995, Early music issue. I subscribed at the time and I kept this issue in my library specifically for the article on making a renaissance viol.
This image shows the painting, The Ecstasy of Saint Cecilia by Raphael (1514) and the first page of an article by viol maker Toon Moonen on deciphering the size and proportion of the early viol shown at the feet of an elevated Saint Cecilia. Moonen reasoned that since Raphael was known as a master of perspective drawing the instrument would be accurately portrayed.  Moonen did the math and went on to a build a copy of the instrument. Without getting into the details, recent research questioned Moonen's methodology and the authenticity of his subsequent reconstruction. 


Despite this criticism I thought the composition was interesting and I could see that it was dependent on geometry. I set out to see what I could discover.


 I quickly identified two parallel horizon lines; one passing through the eyes of both musicians and perhaps more importantly, the second through each musicians' right index finger - their plucking hands. The center of the panel is equidistant from the left eye of the lutenist and the right eye of the harpist. A perpendicular line from this point passes through the left eye of the Madonna. This fact places the key figures in the painting in a geometric relationship. However, the manner in which the lute is represented is more complicated. The lutenist stands as if facing a viewer who is viewing the scene from the right front. As a result the lute is angled away from us. It is held at an angle slightly up from the horizontal and tilted away from the vertical. My investigation went no further.
 

Returning to David's representation of the lute I found myself thinking: if you strip away the medieval features; the tiered rose, the secondary sound hole and the soundboard inlays, the lute bowl looks very much like a lute from the late 16th century. I decided to design a lute based on this idea but I wanted  a candidate to serve as a model. Turning to my collection of lute plans and photographs I soon decided to take a closer look at the  the 1592 Venere.


I have a Venere model built by my early apprentice Bruce Duncan around 1983. It has a string length of 60 cm. I recruited Susan to pose with the lute in the same posture as the angel lutenist for comparison. Even though the Venere is a larger lute the similarities are obvious.


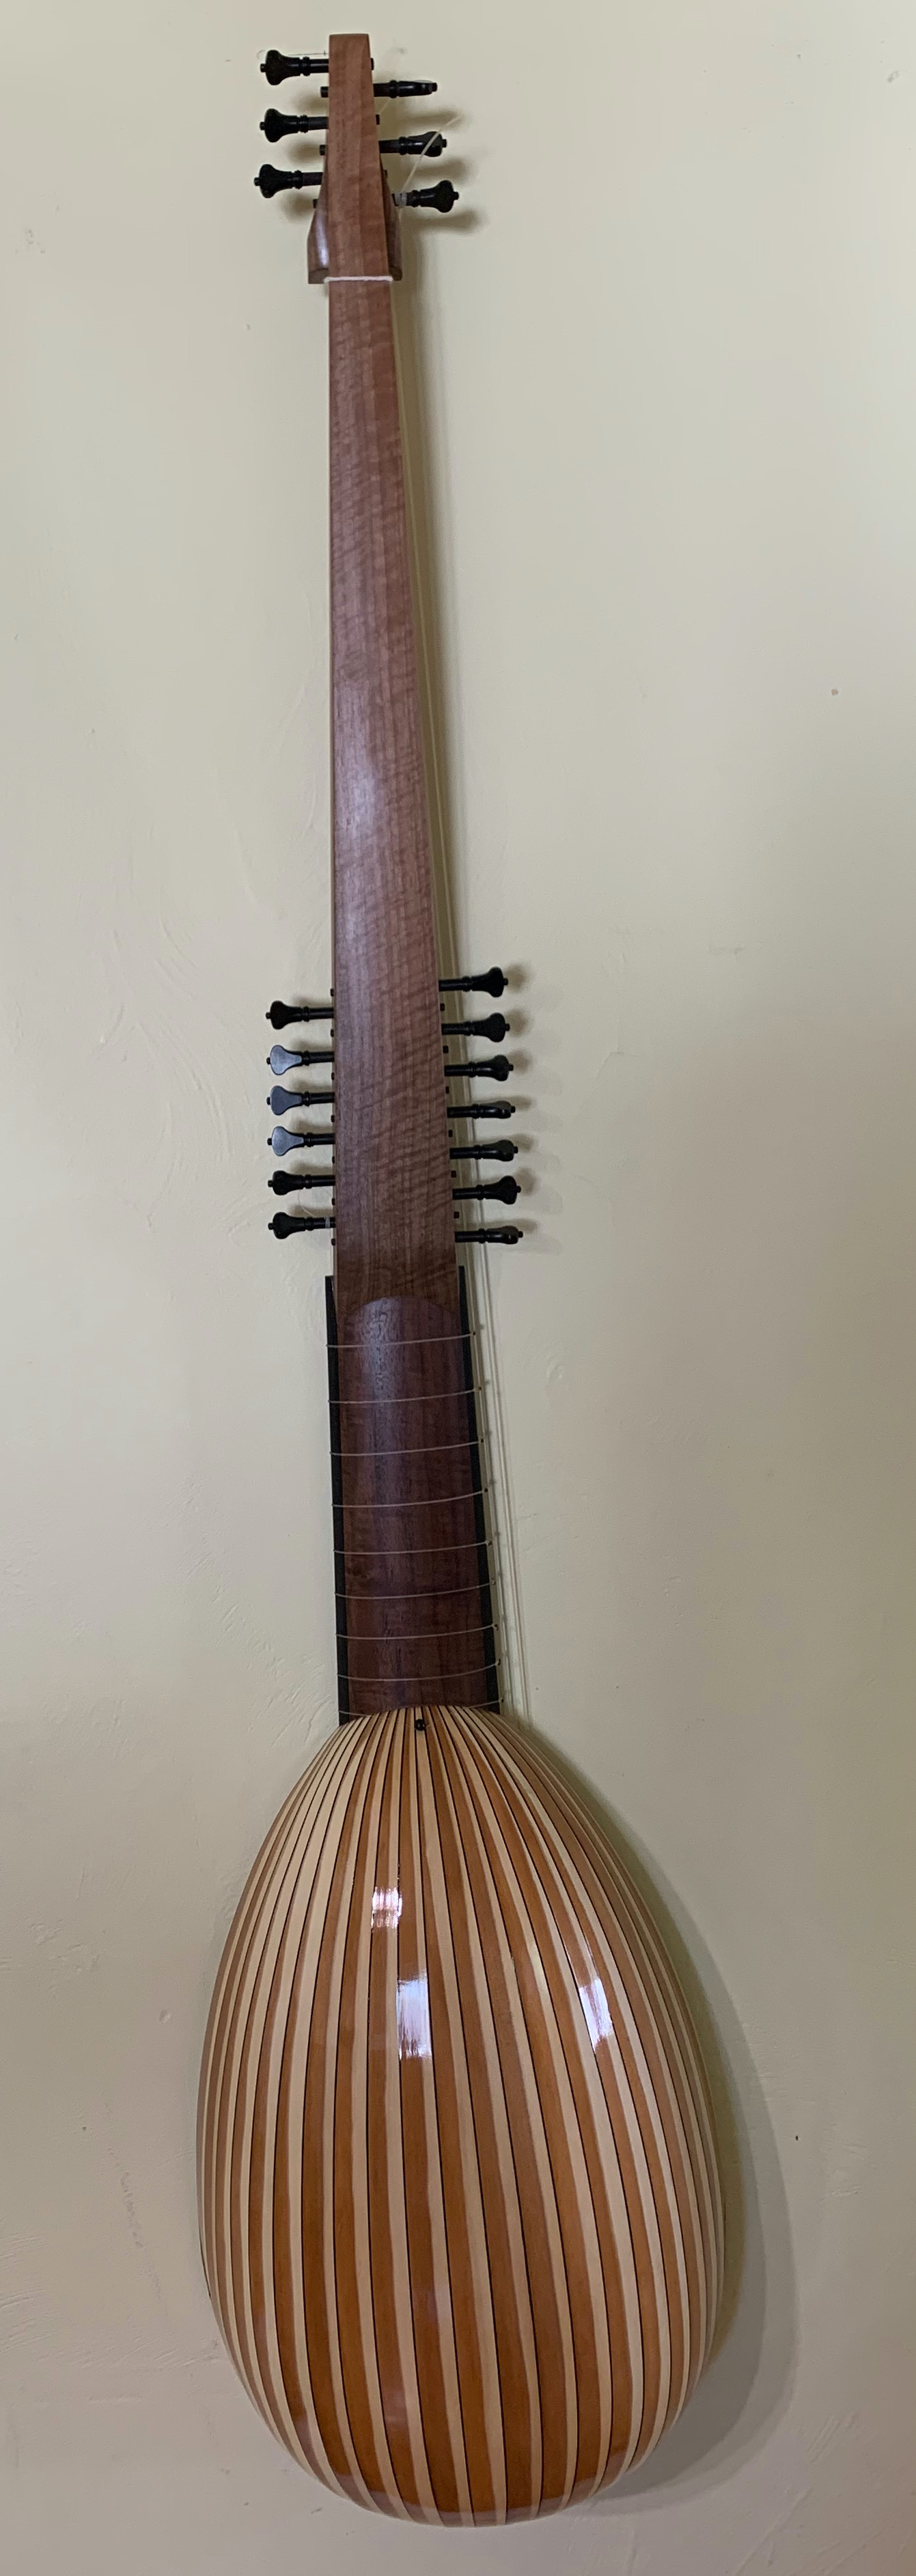
My lute was to have a string length of 54 centimeters with eight tied frets and designed for a neck and bridge to carry six courses rather than five. I proportionally reduced the Venere contour to a bowl width of 27 centimeters. The resulting length was a little longer than I wanted so I removed a short section of the face at its widest point giving the lute a plump appearance that I thought matched the contour of the Sedano lute.


I drew a cross section for the widest point of the bowl as a half circle flattening it slightly as I described in my description of the lute in the triptych. I divided the flattened arc into nine equal parts that represented the lute's nine ribs. From this drawing I created further cross sections by reducing the size of the original on a photocopier and then using the result to further create a smaller cross section and so on until I has seven sections. The width of each cross section was determined by its assigned place on the profile of the top as represented here by the plywood base.


As I assembled the ribs I undercut the joints so that when I papered over them on the inside of the bowl the drying glue and shrinking paper pulled the two faces together closing up the joint and forming a noticeable peak.


The end clasp was fairly high but the bowl design in cross section is somewhat squarish so gluing the clasp in place was much easier. I glued the clasp in place using thin wood cauls of varying lengths that have a concave surface and a selection of spring clamps or one inch clamps spaced at close intervals. When clamping pressure is applied the top, middle and bottom edges of the each caul makes good contact with the bowl insuring a perfect bond.


I finished the neck and pegbox and even fitted the pegs before I began working on the top. The wood for both is the last of my stock of brown ash that I have been saving for a special project. The neck is solid ash while the pegbox is assembled from five pieces; two sides, top and bottom blocks and a thin back cap.


The sound board is Swiss spruce thinned to about 1.5 - 1.4 mm in the lower third of the top down to 1.2-1.3 in the middle third and gradually up to 1.6 over the front block

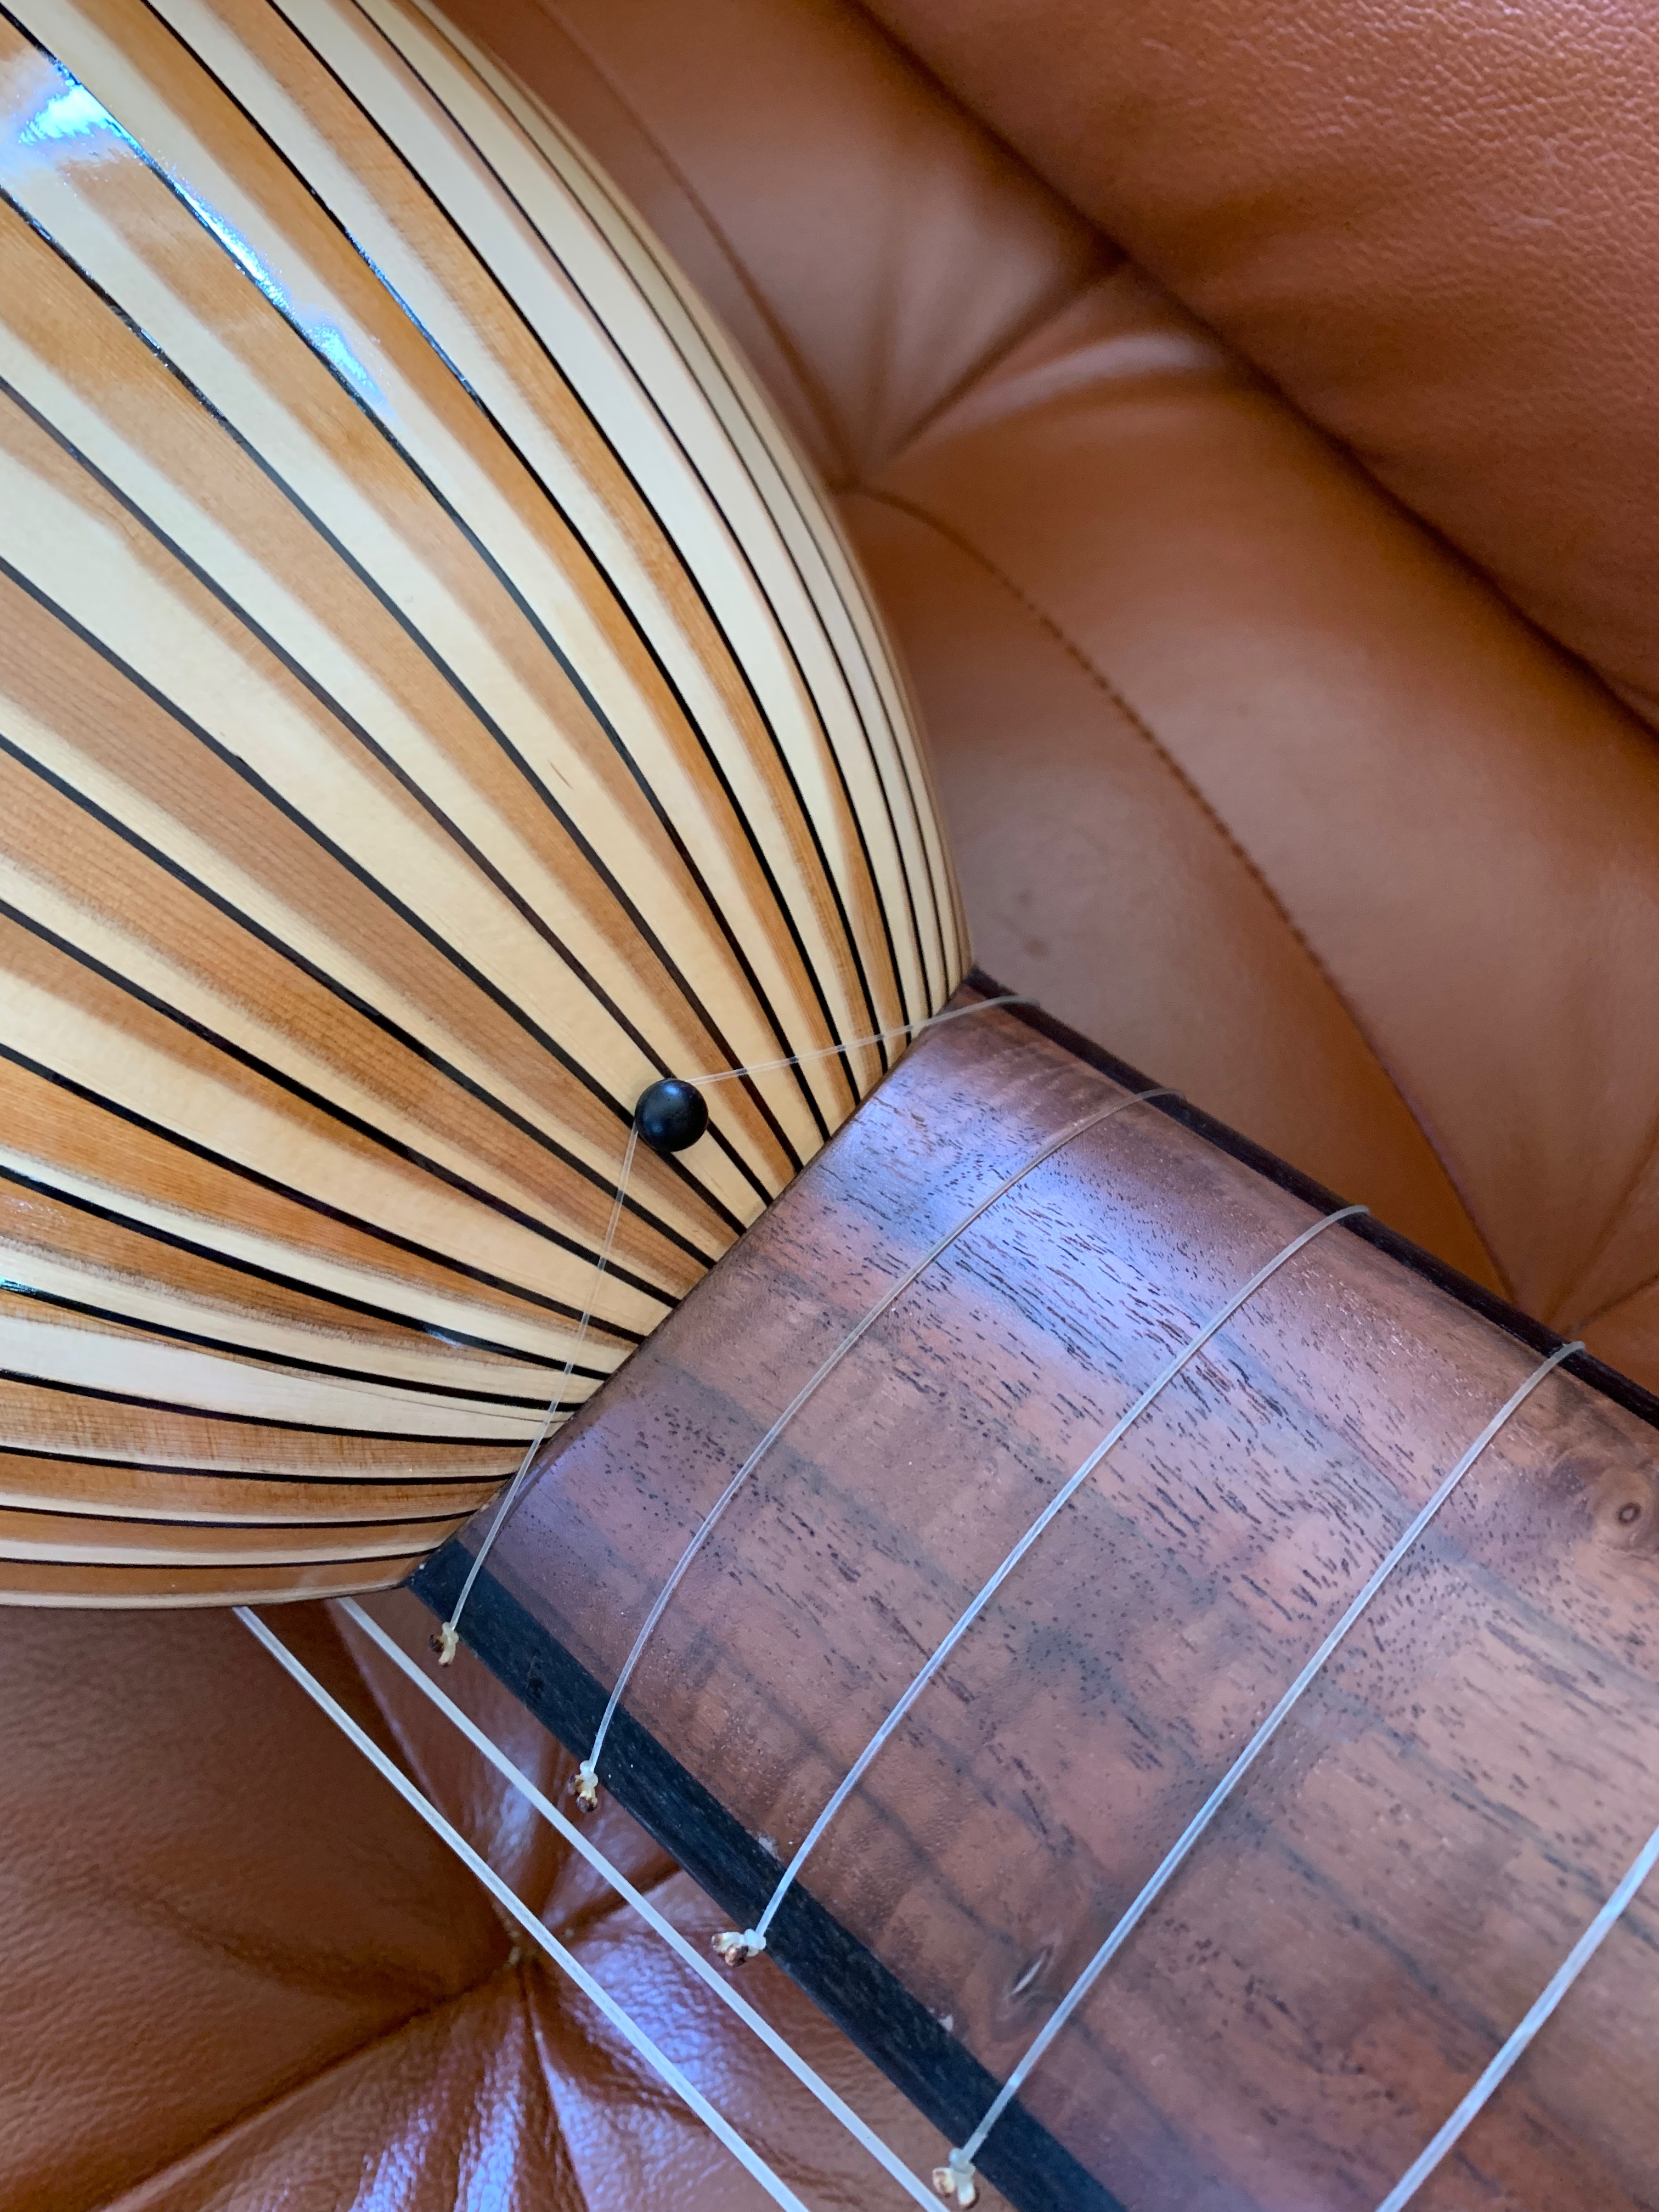
I positioned the fenster near the neck joint. It overlaps the neck block by about 5 millimeters. When the top was finished and ready to glue to the bowl, I cut away the part of the block that would be visible and painted the area black.

The decorative parchment ring is the first layer of the tiered rose that I temporarily put in place.


The next element is a vertical ring punched with a four point star. You can see that I indexed the underside of the first tier to aid in positioning the two parts. I also added narrow strips of parchment to the top and bottom of the vertical ring to reinforce the gluing surface.


The second tier is an elaboration of the top tier but broader with an added ring of small punched holes. 


The second vertical ring, shown while it is still held in a retainer, is a simple pattern of pairs of vertically punched holes. Reinforcements will be added to it as with the first ring.


The last layer is a cut pear wood design borrowed from the plastic rose that I removed from an oud many years ago.


The barring is adapted from the 1592 Venere allowing for the reduced length of the sound board. This choice might surprise you as you think,"too many bars,"given the early date for the lute.

I think that this pattern of barring had been in use for many years. before the Venere was built. My reason for thinking this is influenced by the genealogical evidence of lute making families enduring for generations. The success of a design or style of lute achieved in one generation would likely be carried over to the next and so on until it became outmoded by a technological innovation or charge in playing style. The two major innovations that did take place from 1495 to 1592 were the increase in the number of courses and the plucking technique. The success of both benefited from a sophisticated barring pattern.


                                      Additional photos                                                    


The soundboard is Swiss spruce. It is edged with a parchment paper banding that is varnished for protection.


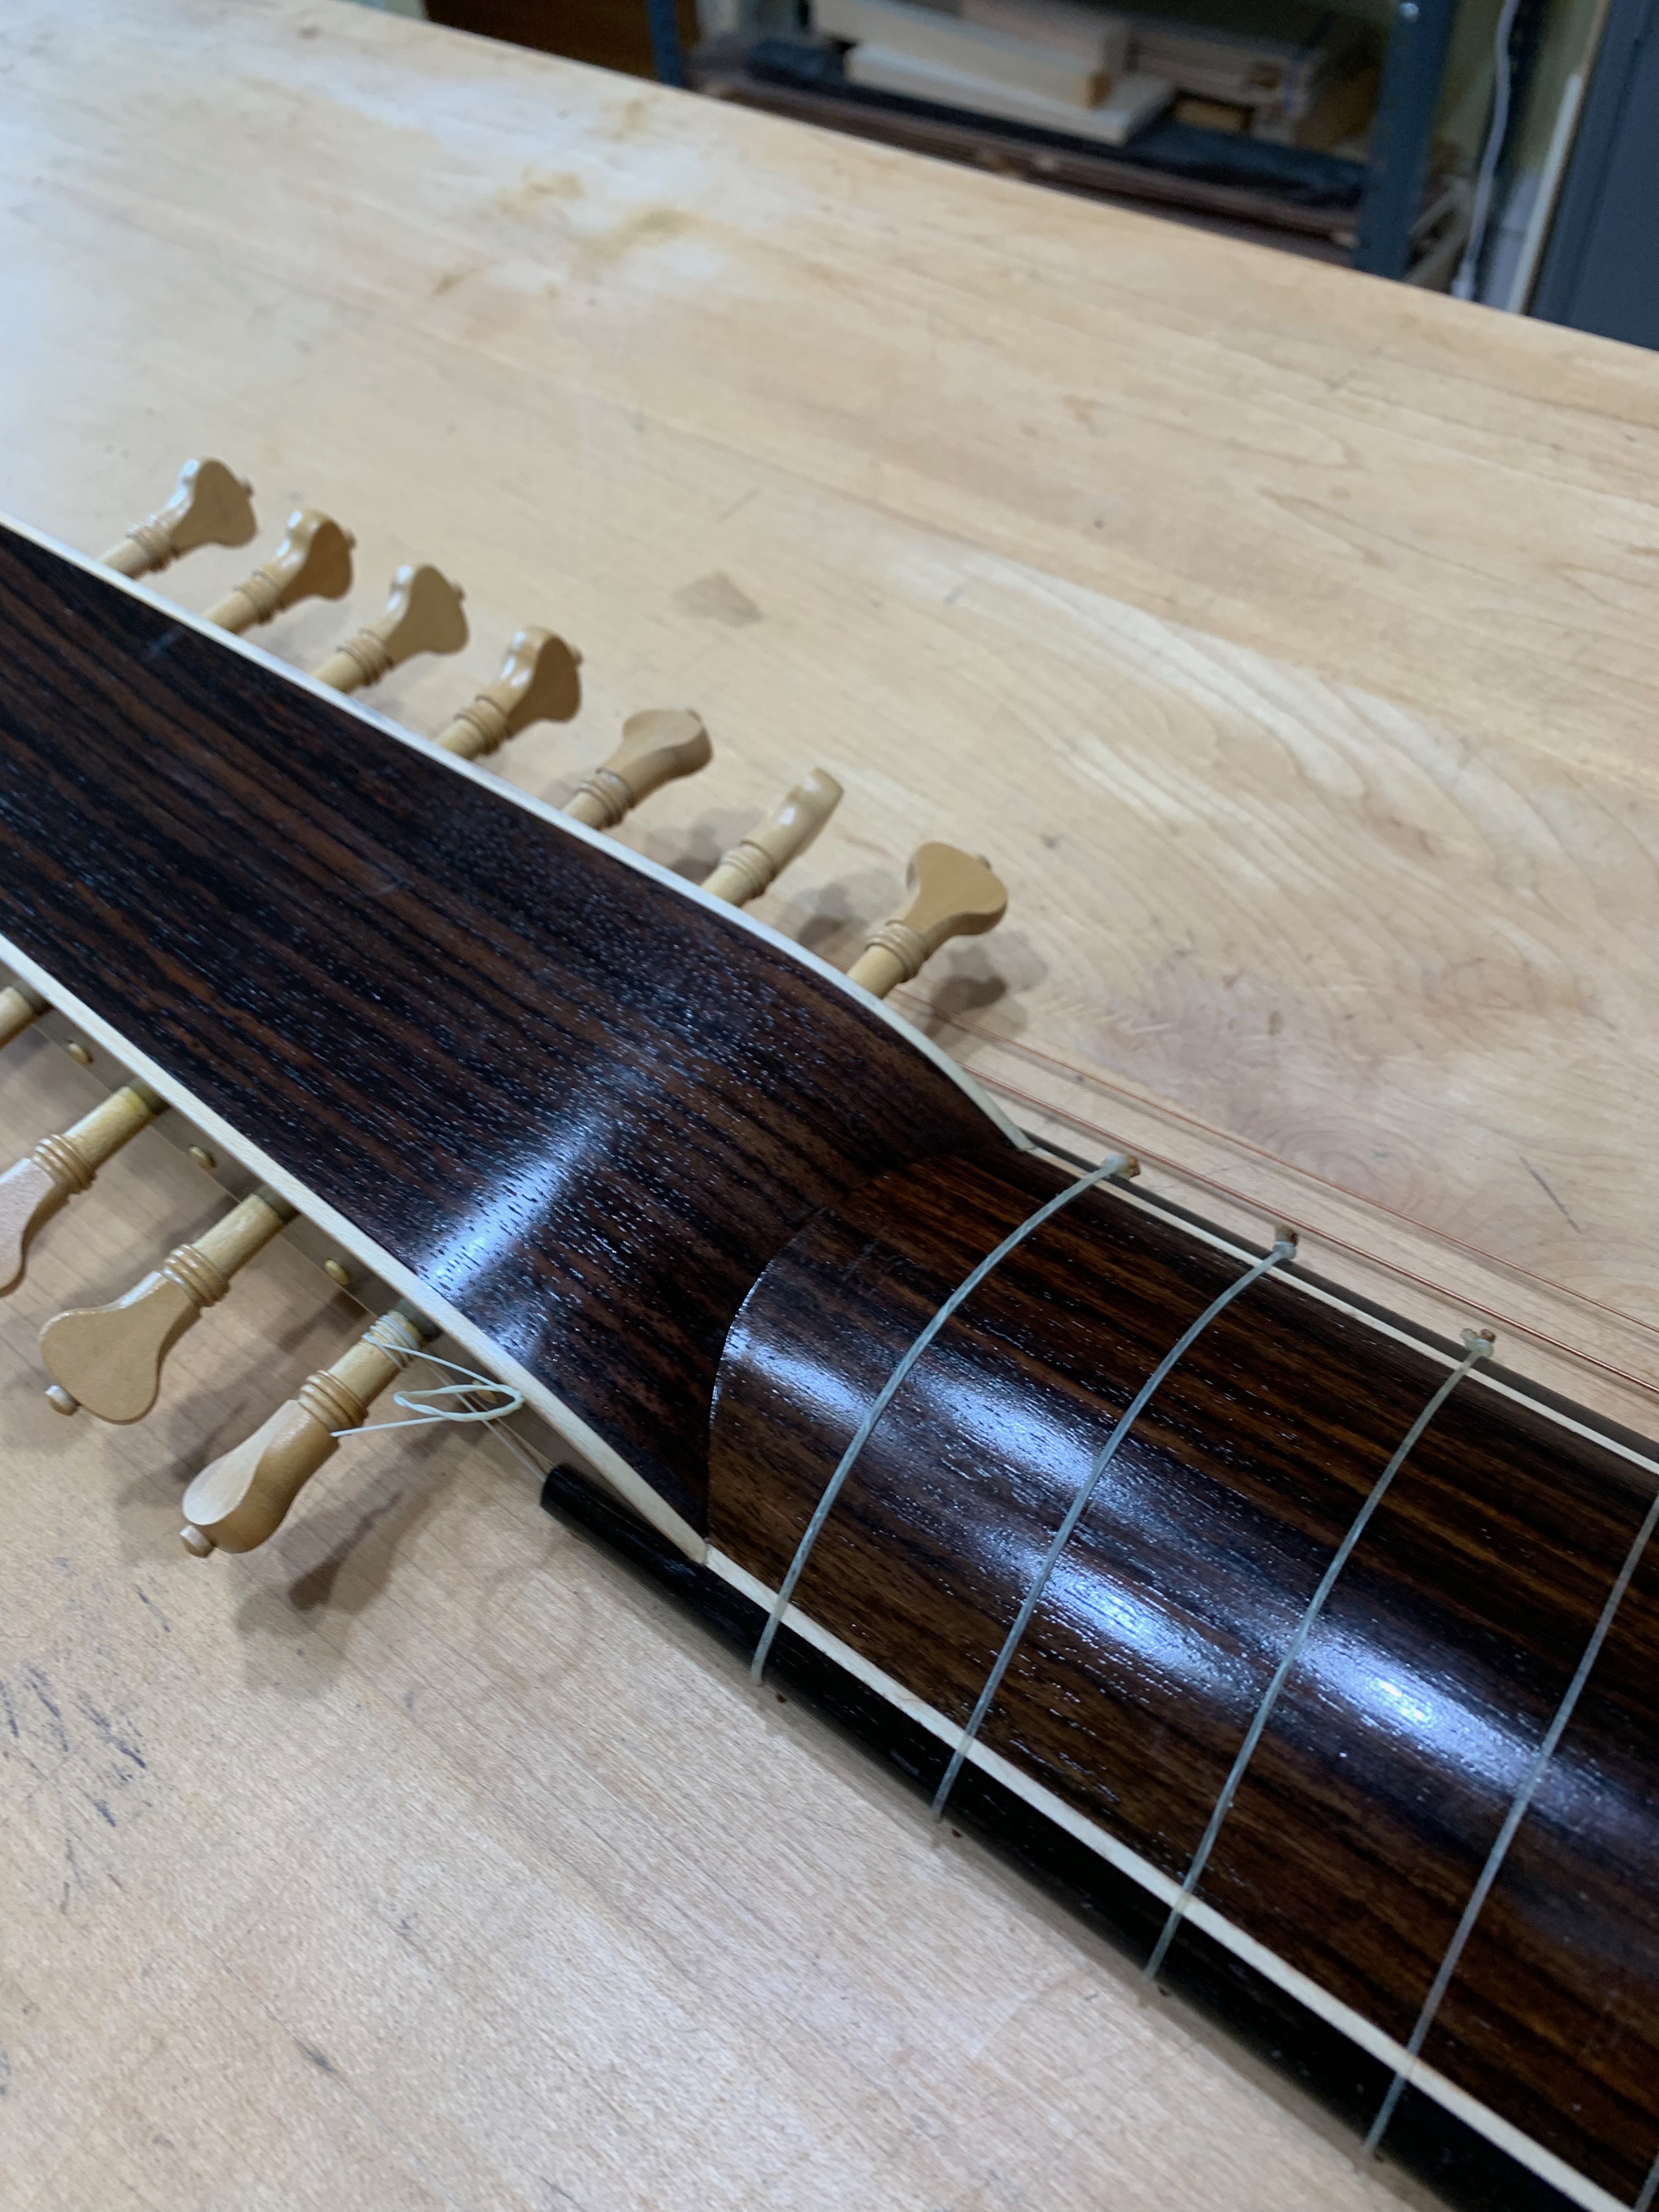
The inlays are walnut and holly while the bridge is plum.

The fingerboard is European boxwood. 


The window near the neck joint is assembled with eight separate pieces of walnut; a Y shaped mullion, two side frames bent to form the arch and three circles.


The bowl is blistered North American maple. The ribs were thinned to 1.3 mm before assembly.


                                                          All photos by the author.

Edited for clarity August 29, 2023


Monday, February 6, 2023

Koch archlute


This post is about why I chose a particular historical model for my client and how I altered it to suit his needs. Along the way I found that there were some visual trickery in historical lute making. 

This is my model of a small Christoph Koch archlute. It has a fretted string length is 59 cm with diapasons of 119 cm. These measurements are considerably different from the original lute. I took the photo with it leaning against my studio wall surrounded by small tools and the soundboard for a small theorbo in order to emphasis its size. 

My client formerly had one of my Venere theorbos (C 47, KHM) with string lengths of 79cm and 150cm. The soundboard in the photo was constructed for such a theorbo. He enjoys playing in a small ensemble but was finding his theorbo too much of a chore. He decided that a small archlute would enable him to continue making music with friends without the stress of handling a larger instrument. 

I supported his decision and immediately pulled out my drawing of the small Koch archlute that is conserved in Musée de la musique, Paris (E.546). I was familiar with this lute having seen it while studying other instruments in the museum. I did buy the museum's technical drawing because I was immediately attracted to it and thought the plans would come in handy. The original instrument is configured with an eleven fret neck, a fretted string length of 61.8 centimeters and diapasons of 142.9 centimeters. The fingerboard, neck and extension are all elaborately decorated. You can see the original lute here. The page also includes a short video of the lute's restoration and several audio videos of artists playing the restored lute. My client would not have wanted a long fretted neck and he did want a short extension. I thought the contours of the bowl and the shape of the soundboard would offer superior tone and volume even if I built it with a ten fret neck and a 119 centimeter extension.


The soundboard is only 405mm long but the face contour is full with a squat bottom.  The rose is located at 3/5 of the length of the belly and the open area of the rose is 1/3 of the belly width at the rose position. The bridge is set low on the belly and it spans 2/3 of its width at that position. The remaining area that hosts the J-bar and two short low diagonals appears cramped. This is the most important area for producing and controlling the sound of the lute. But the squatness of the form increases the area more than it would if the profile were more round. 


The contours of the bowl are important as well because they determine the internal air capacity.

Its depth is slightly more than half its width. (152mm vs. 300mm). But the significant increase in volume comes about from the high shoulders and squarish sides as seen in this view of the bowl's cross-section.


The side profile is full, flowing gently from its highest point and then dropping quickly to the neck joint. 

All of these features maximize the internal air volume of the bowl.


I approached building the mold with some trepidation because of my experience in building the Koch theorbo, No. 3581 Musikinstrumenten Museum of Berlin's Staatliches Institut für Musikforschung. See my post Theorbo after Christroph Koch, September 20, 2013. On that occasion I built the mold and it was only when I started making templates of the ribs that I discovered that the rib orientation was hopelessly out of alignment. I abandoned that mold and built a new one with the ribs aligned more uniformly.


 Before I started building the mold for this archlute I checked the accuracy of the rib alignment as described in the technical drawing. I made poster board templates of the cross-sections of the bowl and compared the ribs positions on the treble and bass sides. It was clear that the layout of the ribs was badly out of alignment on this lute too!


I thought it was strange that an experienced lute maker who built both an elaborately decorated theorbo and an archlute in expensive, exotic woods would be so clumsy as to construct a bowl with misaligned ribs. It was only when I started writing this post that I realized that rib alignment might have been a secondary consideration. I thought back to when I examined  a baroque lute built by Thomas Edlinger (NMM 10214 in Vermillion SD). The bowl is composed of 21 shaded yew ribs of varying widths.  However, the distribution of heart wood and sap wood is fairly even. It then became evident to me that the bowl was assembled to display the shaded yew as uniformly as possible with the wood that was on hand.  You can see the lute by following the links here. Both of the aforementioned Koch lutes have 15 ribs of flat sawn Kingwood, sometimes called violetta (Dalbergia cearensis). The ribs of both lutes display intense color and interesting grain patterns and the rib alignments on both lutes are asymmetrical. However, they show their wood grain to great advantage. My Koch bowl is Indian Rosewood cut from commercially available guitar sides. The holly spacers are 3 mm wide. I  also used this width of holly with the neck and extension veneers.
 
I proceeded to built an open pinewood mold with a central axis and five cross-sections per the plan but I  divided each cross section into 13 equal widths (the edge ribs are wider) and marked the position of each  rib. The rear of the mold is constructed with a wrap around form that is a little higher than what the end clasp will be. It provides support when the ribs are scraped clean and level. The wrap around is less than an inch thick so it provides a convenient surface for holding multiple small clamps when the gluing the end clasp.


Although I "corrected" the mold for rib width uniformity I did not alter the symmetry of the bowl's contours. That affected the position of the ribs as they wrapped around the tail end of the bowl. However, this irregularity is covered by the end clasp. See the earlier photo.
 
For all of the trouble the bowl caused me I was happy with the way it turned out.


I copied the positions and size of the rose but I used a different pattern than the original. The bridge position is the same too. the original lute has a long soundboard tongue that projects nearly two frets length over the neck joint. It does not look out of place and structurally it provides a little extra support to the bowl/neck joint.
 
Unfortunately, I did not photograph the barring that I used but if you watch the restoration video you will have a brief glimpse of it as the camera pans by. 
The top has a full set of harmonic bars; three between the bridge and the rose, three above the rose, three full width bars across the rose itself, two fingers on the treble side and a long J-bar that extends halfway under the finger bars.
 
I had doubts about the dense barring of the top but it is only 1.3 mm thick in the area from the rose to the bridge and 1.2 mm behind the bridge. Listening to the audio videos convinced me and I copied the thickness of the top and the barring scheme of the original archlute as closely as possible.


My extension is much different. It is much shorter by 23 centimeters, it has a different style of head, one that folds back on itself like the majority of Italian achhlutes. The lute can be strung in courses as a 13 course (1x1, 6x2, 6x1) or single strung as a 14 string (7x1, 7x1).
The original lute is 1x1, 5x1,8x1). I made this alteration at the request of my client.


The core wood of the extension is quartered spruce veneered with Indian rosewood cut from guitar sides and thinned to 1 mm. The back of the extension is flat like the original lute rather than contoured. 


 For the extension head I use the design found on the Tieffenbrucker archlute  C.45, KHM.  


The neck core is quartered spruce veneered with Indian rosewood cut from a leftover guitar side and thinned to 1mm. A spacer of holly borders the rosewood followed by a strip of ebony. Even though I shortened the string length from 61.8 to 59 centimeters the neck was still long enough to carry ten tied frets. The tenth is held in place with the help of a small wood pin inserted into the middle rib with the fret looped over it.


I delivered the instrument strung in New Nylgut, carbon fibre and Savarez wound copper.
 

                                                          All photos by the author


Thursday, September 22, 2022

Archlute after Anonymous E.25


My newest archlute is packed and ready for the flight to San Francisco.  I have stuffed bubble wrap in the empty spaces around the lute to immobilize it. An additional layer of bubble wrap will be laid on top. Needless to say, all tension has been released from the strings. Not in the picture is the shipping box that I constructed. It is assembled from two inch thick styrofoam insulation sheets glued together so that the case fits tightly inside. This construction is then covered with heavy cardboard that I savage from shipping boxes and glued to the styrofoam with  styrofoam adhesive.  

Obviously, I worry a lot about shipping instruments and I try to convince clients to pick up their new instruments. That is not often possible, as with this lute. Formerly, I delivered lutes myself, driving to New York, Virginia or Bloomington and Ann Arbor and many places in between. But now-a- days I stay close to home.


The lute is a model of E.25, an anonymous archlute conserved in Musée de la musique, Paris. The original lute is large with a fretted string length of 71cm.  Its diapason are 109 cm. I built the first model in 2000 as a close copy. But I never built an archlute of that model until now. In the meantime it has served very welI as the basis for baroque lutes. I have used the bowl design and soundboard lay-out for many, building models with swan-necks, bass riders or triple nuts. All perform admirably.  

The fretted string length of this lute is 68.5 cm.

The diapason length is 130 cm.

The width of the soundboard is 33.8 cm.

The length of the soundboard is 47.1 cm from the tail to the neck joint.


When I examined the lute in Paris in February 2000 curator Joël Dugot told me that the lute, meaning the bowl and soundboard, was a very close match to Hans Burkholtzer's thirteen course lute in Künsthistorisches Museum. And indeed it it. The profile of the top, the cross-sectional arch of the back and the placement of the bridge and rose on the soundboard are proportionally the same. Both lutes bowls are assembled with ivory ribs and dark spacers. The Burkholtzer has 21 ribs while E.25 has seventeen. E.25 is a few millimeters smaller.

I chose to use 21 ribs because my stock of striped yew was not wide enough to achieve the width required for 17 ribs.

You can read more about the similarities in my blog from February 21, 2016. Enter E.25 in the Search Box.


 The striped yew ribs are separated by thin ebony spacers on the same open mold that I used since 2000.

Striped yew can be difficult to use because it it necessary to choose pieces that will equally display heartwood and sap in an attraction symmetrical fashion. Finished lute ribs are never symmetric, however, meaning  that  the centre line between the prepared edges is never straight but curves more or less gradually.  If a rib in prepared from  straight stock with equal parts of heart and sap wood there is the danger that either one or the other will be cut away as the rib narrows towards either end - as happened  here. 


The end clasp is composed of two pieces separated by an ebony spacer. 

In this view the heart wood and sap wood are proportionally equal from rib to rib.


The neck core is sitka spruce veneered with Claro walnut edged with ebony.

The instrument has nine tied frets. The ninth sits so close to the neck joint that I inserted a small button  and loop the fret over it to prevent the fret from sliding up the neck. I like this arrangement rather than using a wood fret at a similar location.

The neck joint is 10 cm wide and the thickness of the neck at this point is 30 mm.


Since the extension is only 75cm long I decided to make it out of a solid piece of English walnut. The piece has a small regular curl.


The extension head is carved from walnut too. The design of the head is inspired by the one from the Tieffenbrucker archlute C.45, KHM.


The belly is Swiss alpine spruce that I have stored since 2013.
The bridge is European plum with a 1.2mm thick ebony capping strip. 

The string span is 145 mm. 

The top is thicknessed in five areas that blend into one another.  Starting in the area behind and under the bridge: 1.6 mm, 1.5 below the rose, 1.4 in the rose area but 1.1  or less at the rose position and then increasing to 1.6 near midway between the top of the rose and the twelfth fret and finally 1.8 over the block area and soundboard tongue.


The rose is the original rose of E.25. Coincidently, an identical rose design appears on another anonymous lute at the Musée, E.980.2.320.


The bowl is 16 cm deep and appears to be a half-circle. But it in fact it is 9 mm less than half the width of the widest point of the top (33.8 cm ). It is as if the bottom 9 mm were cut off the  half a circle.


Edited for clarity. Sept. 24, 2022

All photos by the author.


Sunday, June 26, 2022

Building a Baroque Bass Guitar after Matteo Sellas - Edited for Content January 14, 2023


This past winter I built a large baroque guitar with a string length of 71 centimeters. The instrument is based on the Matteo Sellas 1614 that is conserved in  the University of Edinburgh Collection of Musical Instruments. The Original Sellas Guitar. My blog title "Bass Guitar", although an attention getting, is a misnomer. The guitar is tuned in standard e' b g d A and can be tuned comfortably to 440.

I took the guitar to Quebec City for David Jacques to try out. David is a busy performer, an authority on and a collector of early guitars. He previously owned one of my 67 centimeter Sellas style guitars. You can listen to David play that guitar here.


 The body is 48 cm long with the upper bout width at 20.8, the waist is 18.6 and the lower bout measures 25.9. These dimensions are slightly larger than the original guitar.


The wood that I chose for the back is special to me and I want to share its story. In the late 1970s when I was building a significant number  of viola da gambas I bought a large plank of curly hard maple that I  cut into backs and sides. Some of the pieces had long heavy iron stains and bore holes from having been tapped for sap to make maple syrup. I set those aside and when I was considering a good wood to use for the flat back I checked out the few pieces that I had put away to see if they were large enough.


Two pieces were just wide enough to accommodate the width of the larger Sellas guitar. It is difficult to make out in the photos but besides the obvious curl in the grain there is a long patch of bird's eye along the centre joint of the guitar and adjacent to the iron streak in the plank.

I glued two book-matched pieces together with a thin ebony spacer and thinned the back to slightly under 2mm.


The side ribs are Indian Rosewood inlaid with thin holly lines. The rib depth at the neck joint is 79mm which deepens to 92mm at the tail.


Edited January 14, 2023

A reader wrote and asked me to explain why I chose to build this guitar with a flat back rather than an arched one like the original guitar.  There were many factors involved in this decision. Foremost was that I had built a model of this guitar with its original arched back in 1995 specifically for use by the musicians of The Harp Concert for their recording Spanish Dances. It worked well in that context. The guitar was very good at playing rasgueado chords, but I felt that it could not stand alone. The prevailing opinion among a group of clients and other baroque guitarists was that arch backs were best for strumming while flat backs  excelled at punteado.  This assessment  became a guiding principle for me. Over the next 10 or 12 years I built several dozen models of a smaller ( 67 centimeter string length) anonymous arch back guitar mainly for use in continuo bands. David Jacques is playing the last of these in the above link.

When I received a commission to build a long scale (71cm) flat back baroque guitar I found that there were few options. Several Stradivari were considered but their string lengths are too long. A Domenico Sellas conserved in NMM Vermillion SD is the right size but the maximum rib depth of 117mm scared me off because I knew my client would require a guitar that was capable of supporting good punteado playing. In my opinion excessively deep body guitars are ill-suited to playing in this style.The University of Edinburgh 1614 Matteo Sellas came to mind and I started to think of the possibility of using it with a flat back. It is the right size both in string length, number of frets to the neck joint and width of the body. When I imagined a line from the bottom of the tail block to the bottom of the front block the measurements of 92mm and 79mm, essentially cutting off the arch, convinced me that the guitar configured as a flat back would produce the tonal effects I desired. Would Matteo Sellas have approved?

                                                          _________________________


I constructed an inside mold from several pieces of clear pine and drilled large holes around the perimeter to accommodate clamps that I would use to hold the bent sides in place. I shaped the rear block out of spruce with the grain direction on end and perpendicular to the gluing surface. The original guitar has a wider and slightly thicker front block to accommodate the extra torque of the longer string length. I built a model of this guitar in the 1990s and it needed a neck re-set after a few years. I decided to switch to a slipper foot construction that would counteract the string tension more effectively. I wedged both blocks snuggly into their respective locations. Once the ribs were bent and glued to the blocks I trimmed the height of the ribs close to their final contour. With the frame (the ribs and blocks) clamped securely in the mold I then rubbed the surface that was to be the front of the guitar on a rough sanding board. This procedure ensured that the top of the guitar would sit on a level plane. Then I used the same procedure to create the desired tilted plane of the back.


This shows the completed interior with the back glued on. My guitars get a lot of use both at home and on the road. Therefore I add reinforcements that I think will help to protect the integrity of the guitar but have little effect on their acoustical response. For example, I thinned the rosewood ribs to 1.1mm which helps to create a transparent tone, but this leaves them vulnerable to bumps and other hazards. The thin narrow spruce pillars placed at strategic locations help to protect them. Since the gluing edge of the back to ribs is so small I added short supports to the cross struts and covered the upper bouts and lower bout joints with 90 pound cold press watercolour paper. 


I decided not to use the barring of the original Edinburgh Sellas guitar. It consists of only two bars arranged about 3 centimeters above and below the rose and angled so that they are closer together on the treble side. Early in my baroque guitar building career I built many Sellas type guitars with this barring. They were very good in continuo where energetic strumming styles (rasgueado - love that word) were important. But to prevent the tops from sinking in the area around the bridge it was necessary to use a thickness of 2.2 to 2.5mm. Thicker tops always seemed to be a cover the treble tone a little. Eventually I used thinner tops and added a diagonal bar angled toward the treble side at various distances from the bridge. You can hear David Jacques play such a guitar that I built for him in 2009 Here .  


This photo shows the barring layout that I did use. It is based on the Stradivari guitar that is in the Ashmolean Museum (formerly part of the Hill Collection). The dimensions of the guitar's body, except the depth, are very close to the Edinburgh Sellas. Listening to  Rolf Lislevand's YouTube recording of the Sabionari convinced me that the barring pattern had merit. That is not to say that the Sabionari has the same pattern. In fact, very little information about the Sabionari is available so I was taking a leap of faith.  I added two small bars in the upper and lower bouts as well as the smaller tabs along the outline of the top. The guitar is bright and focused with a transparent tone.


The parchment rose is by Elena dal Cortivo. 

The top is finished with multiple applications of beeswax polish.


This section of the back shows both the curl and bird's eye grain patterns.

The back, sides and neck are finished with oil varnish.


The core of the neck is poplar veneered with 0.9 mm ebony.

The sides of the heel and neck are flat, and angled in slightly.


The core of the peg head is walnut with the faces in ebony. The joint is a  true V but the raised part was added after the joint was assembled. I concealed the glue line by fine sanding over the area, then carefully pressing the dust into the very narrow crevice and applying a thin coat of Crazy glue.  After many applications the joint disappeared.


All photos by the author.