Thursday, September 22, 2022

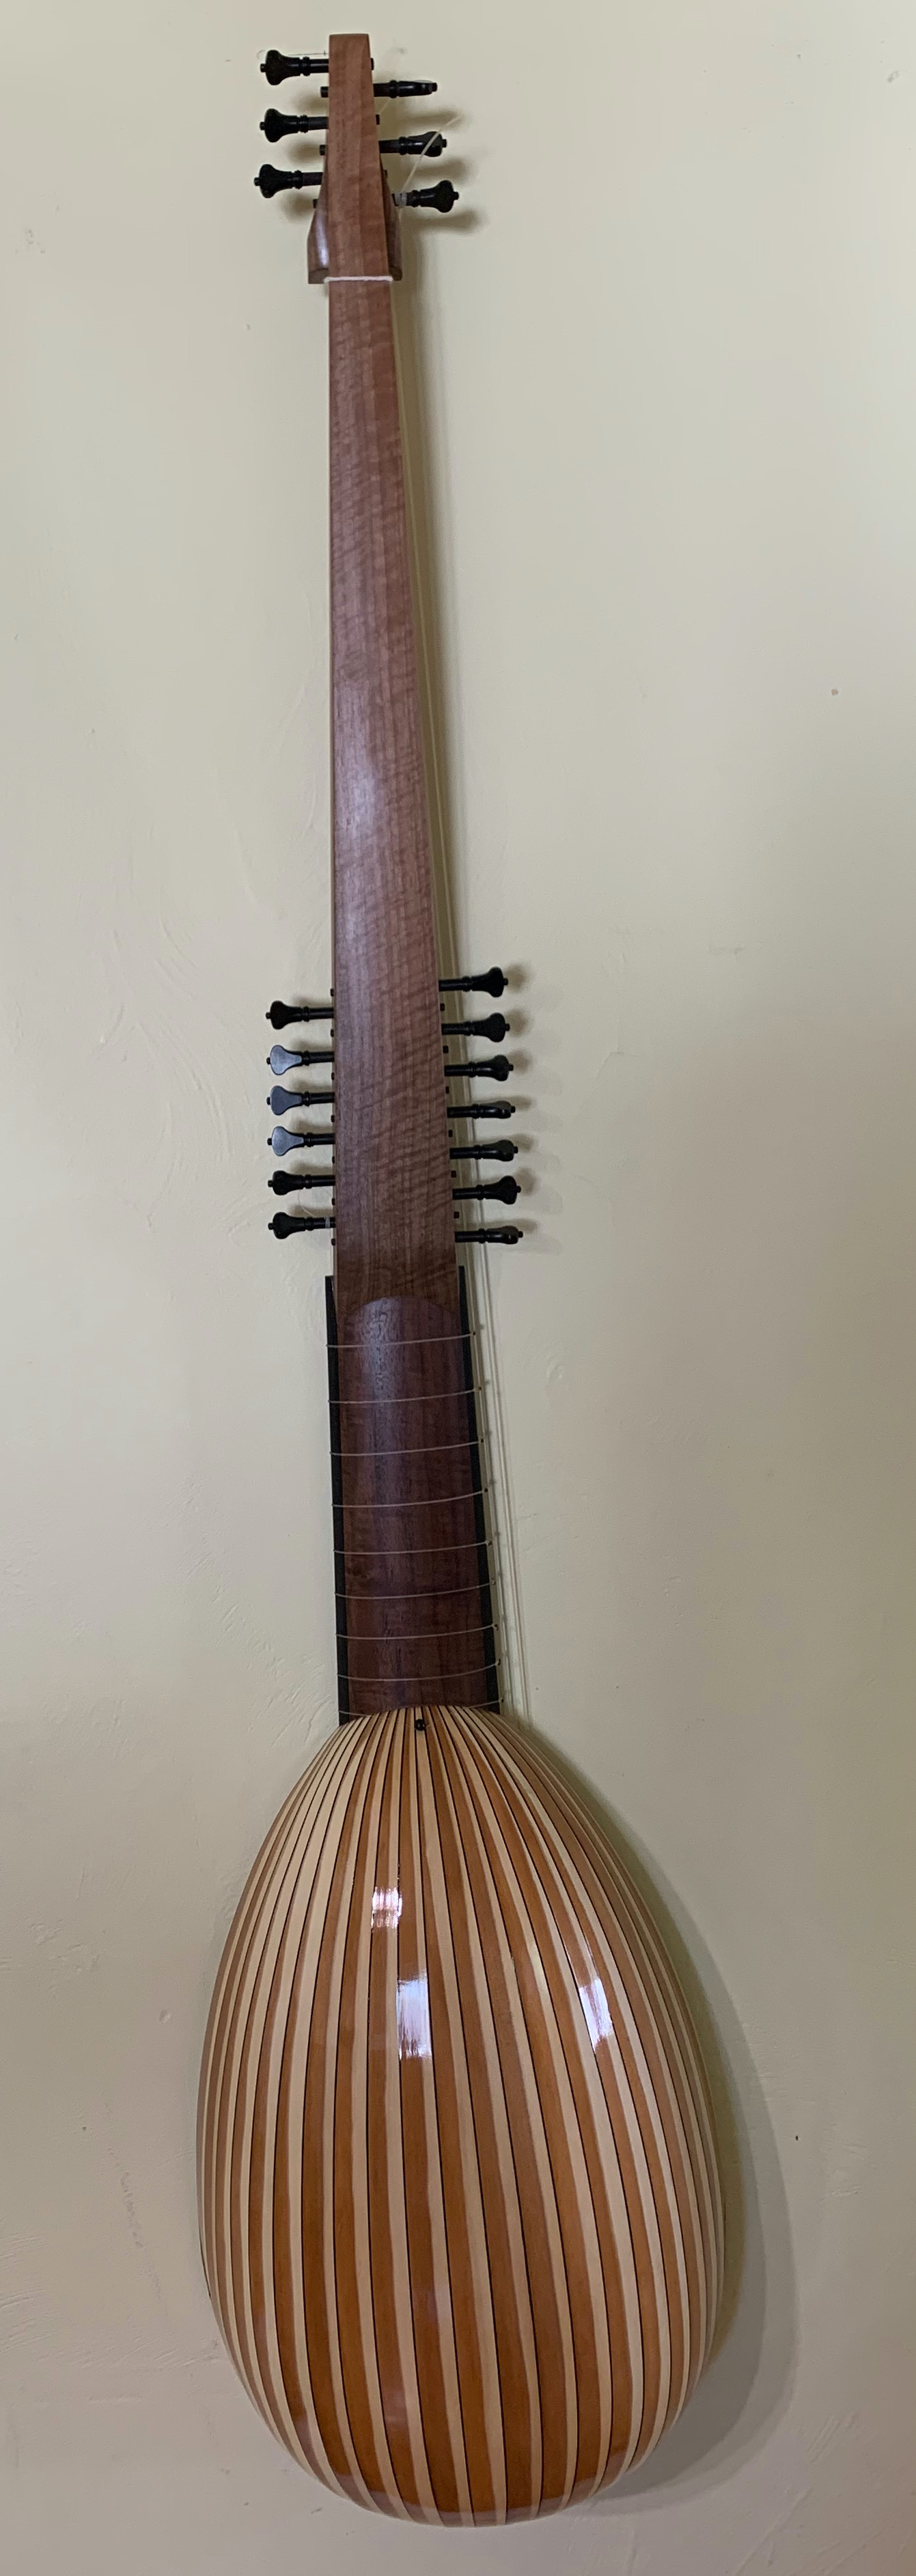
Archlute after Anonymous E.25


My newest archlute is packed and ready for the flight to San Francisco.  I have stuffed bubble wrap in the empty spaces around the lute to immobilize it. An additional layer of bubble wrap will be laid on top. Needless to say, all tension has been released from the strings. Not in the picture is the shipping box that I constructed. It is assembled from two inch thick styrofoam insulation sheets glued together so that the case fits tightly inside. This construction is then covered with heavy cardboard that I savage from shipping boxes and glued to the styrofoam with  styrofoam adhesive.  

Obviously, I worry a lot about shipping instruments and I try to convince clients to pick up their new instruments. That is not often possible, as with this lute. Formerly, I delivered lutes myself, driving to New York, Virginia or Bloomington and Ann Arbor and many places in between. But now-a- days I stay close to home.


The lute is a model of E.25, an anonymous archlute conserved in Musée de la musique, Paris. The original lute is large with a fretted string length of 71cm.  Its diapason are 109 cm. I built the first model in 2000 as a close copy. But I never built an archlute of that model until now. In the meantime it has served very welI as the basis for baroque lutes. I have used the bowl design and soundboard lay-out for many, building models with swan-necks, bass riders or triple nuts. All perform admirably.  

The fretted string length of this lute is 68.5 cm.

The diapason length is 130 cm.

The width of the soundboard is 33.8 cm.

The length of the soundboard is 47.1 cm from the tail to the neck joint.


When I examined the lute in Paris in February 2000 curator Joël Dugot told me that the lute, meaning the bowl and soundboard, was a very close match to Hans Burkholtzer's thirteen course lute in Künsthistorisches Museum. And indeed it it. The profile of the top, the cross-sectional arch of the back and the placement of the bridge and rose on the soundboard are proportionally the same. Both lutes bowls are assembled with ivory ribs and dark spacers. The Burkholtzer has 21 ribs while E.25 has seventeen. E.25 is a few millimeters smaller.

I chose to use 21 ribs because my stock of striped yew was not wide enough to achieve the width required for 17 ribs.

You can read more about the similarities in my blog from February 21, 2016. Enter E.25 in the Search Box.


 The striped yew ribs are separated by thin ebony spacers on the same open mold that I used since 2000.

Striped yew can be difficult to use because it it necessary to choose pieces that will equally display heartwood and sap in an attraction symmetrical fashion. Finished lute ribs are never symmetric, however, meaning  that  the centre line between the prepared edges is never straight but curves more or less gradually.  If a rib in prepared from  straight stock with equal parts of heart and sap wood there is the danger that either one or the other will be cut away as the rib narrows towards either end - as happened  here. 


The end clasp is composed of two pieces separated by an ebony spacer. 

In this view the heart wood and sap wood are proportionally equal from rib to rib.


The neck core is sitka spruce veneered with Claro walnut edged with ebony.

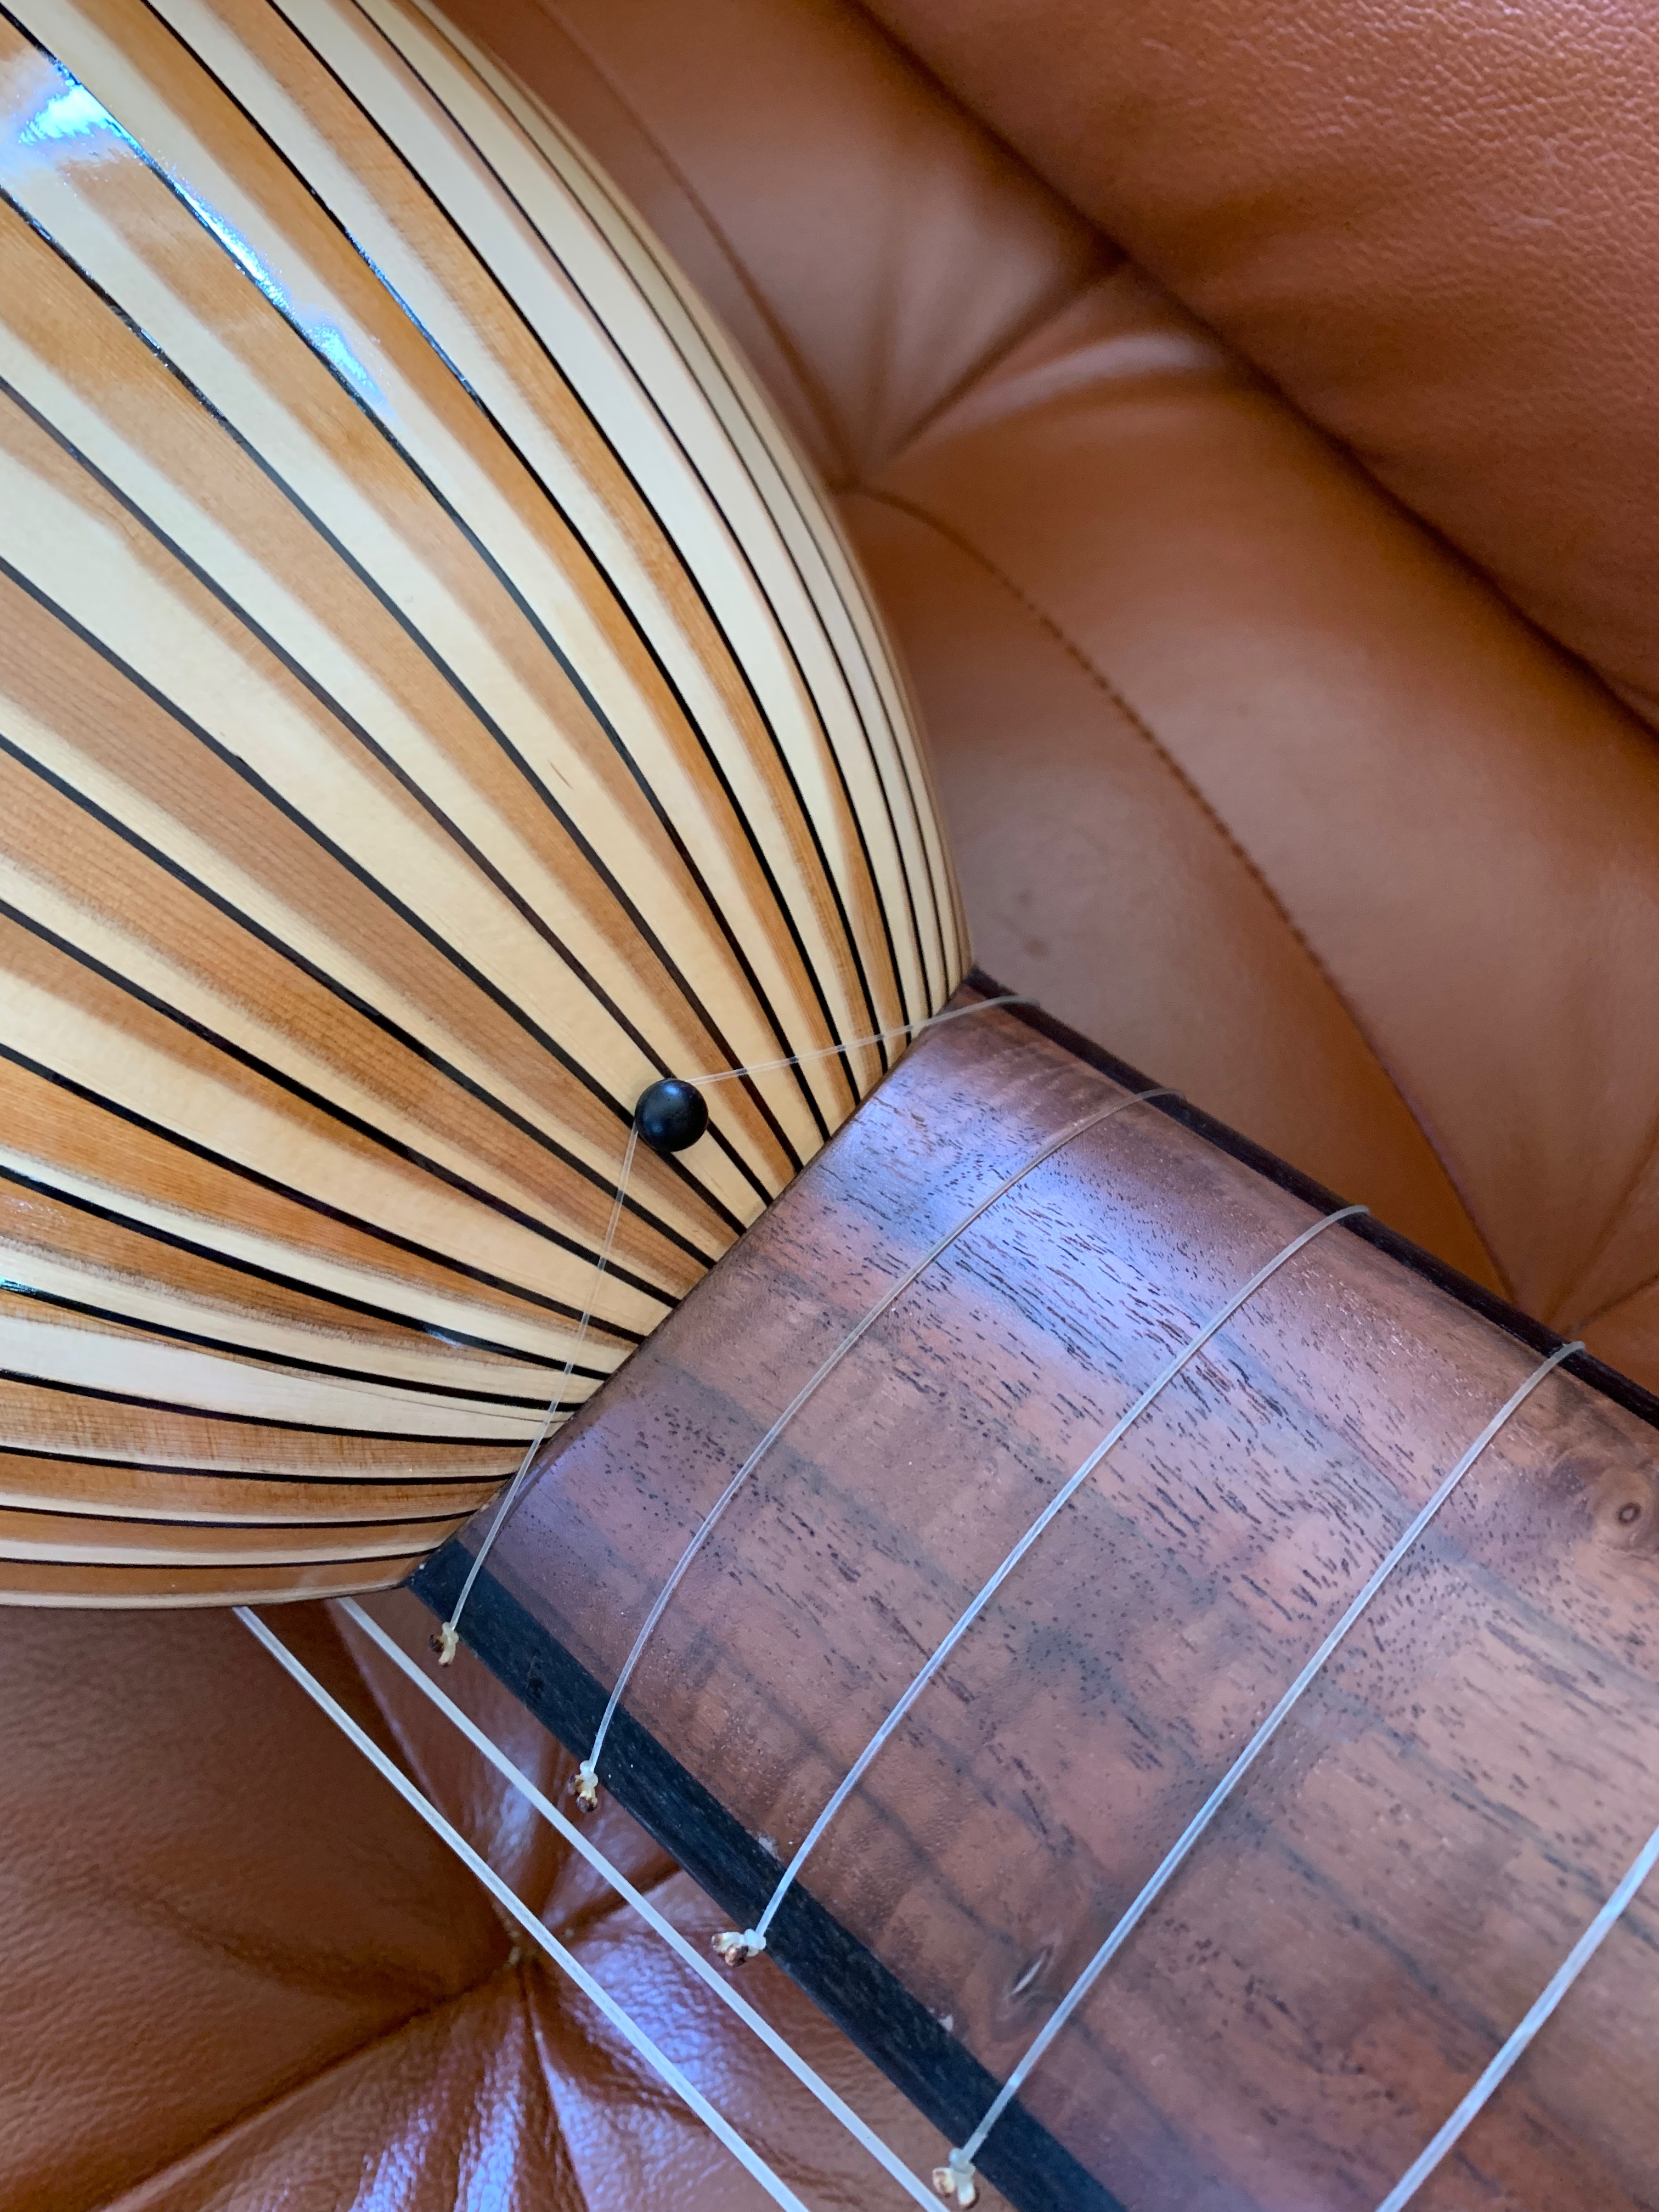
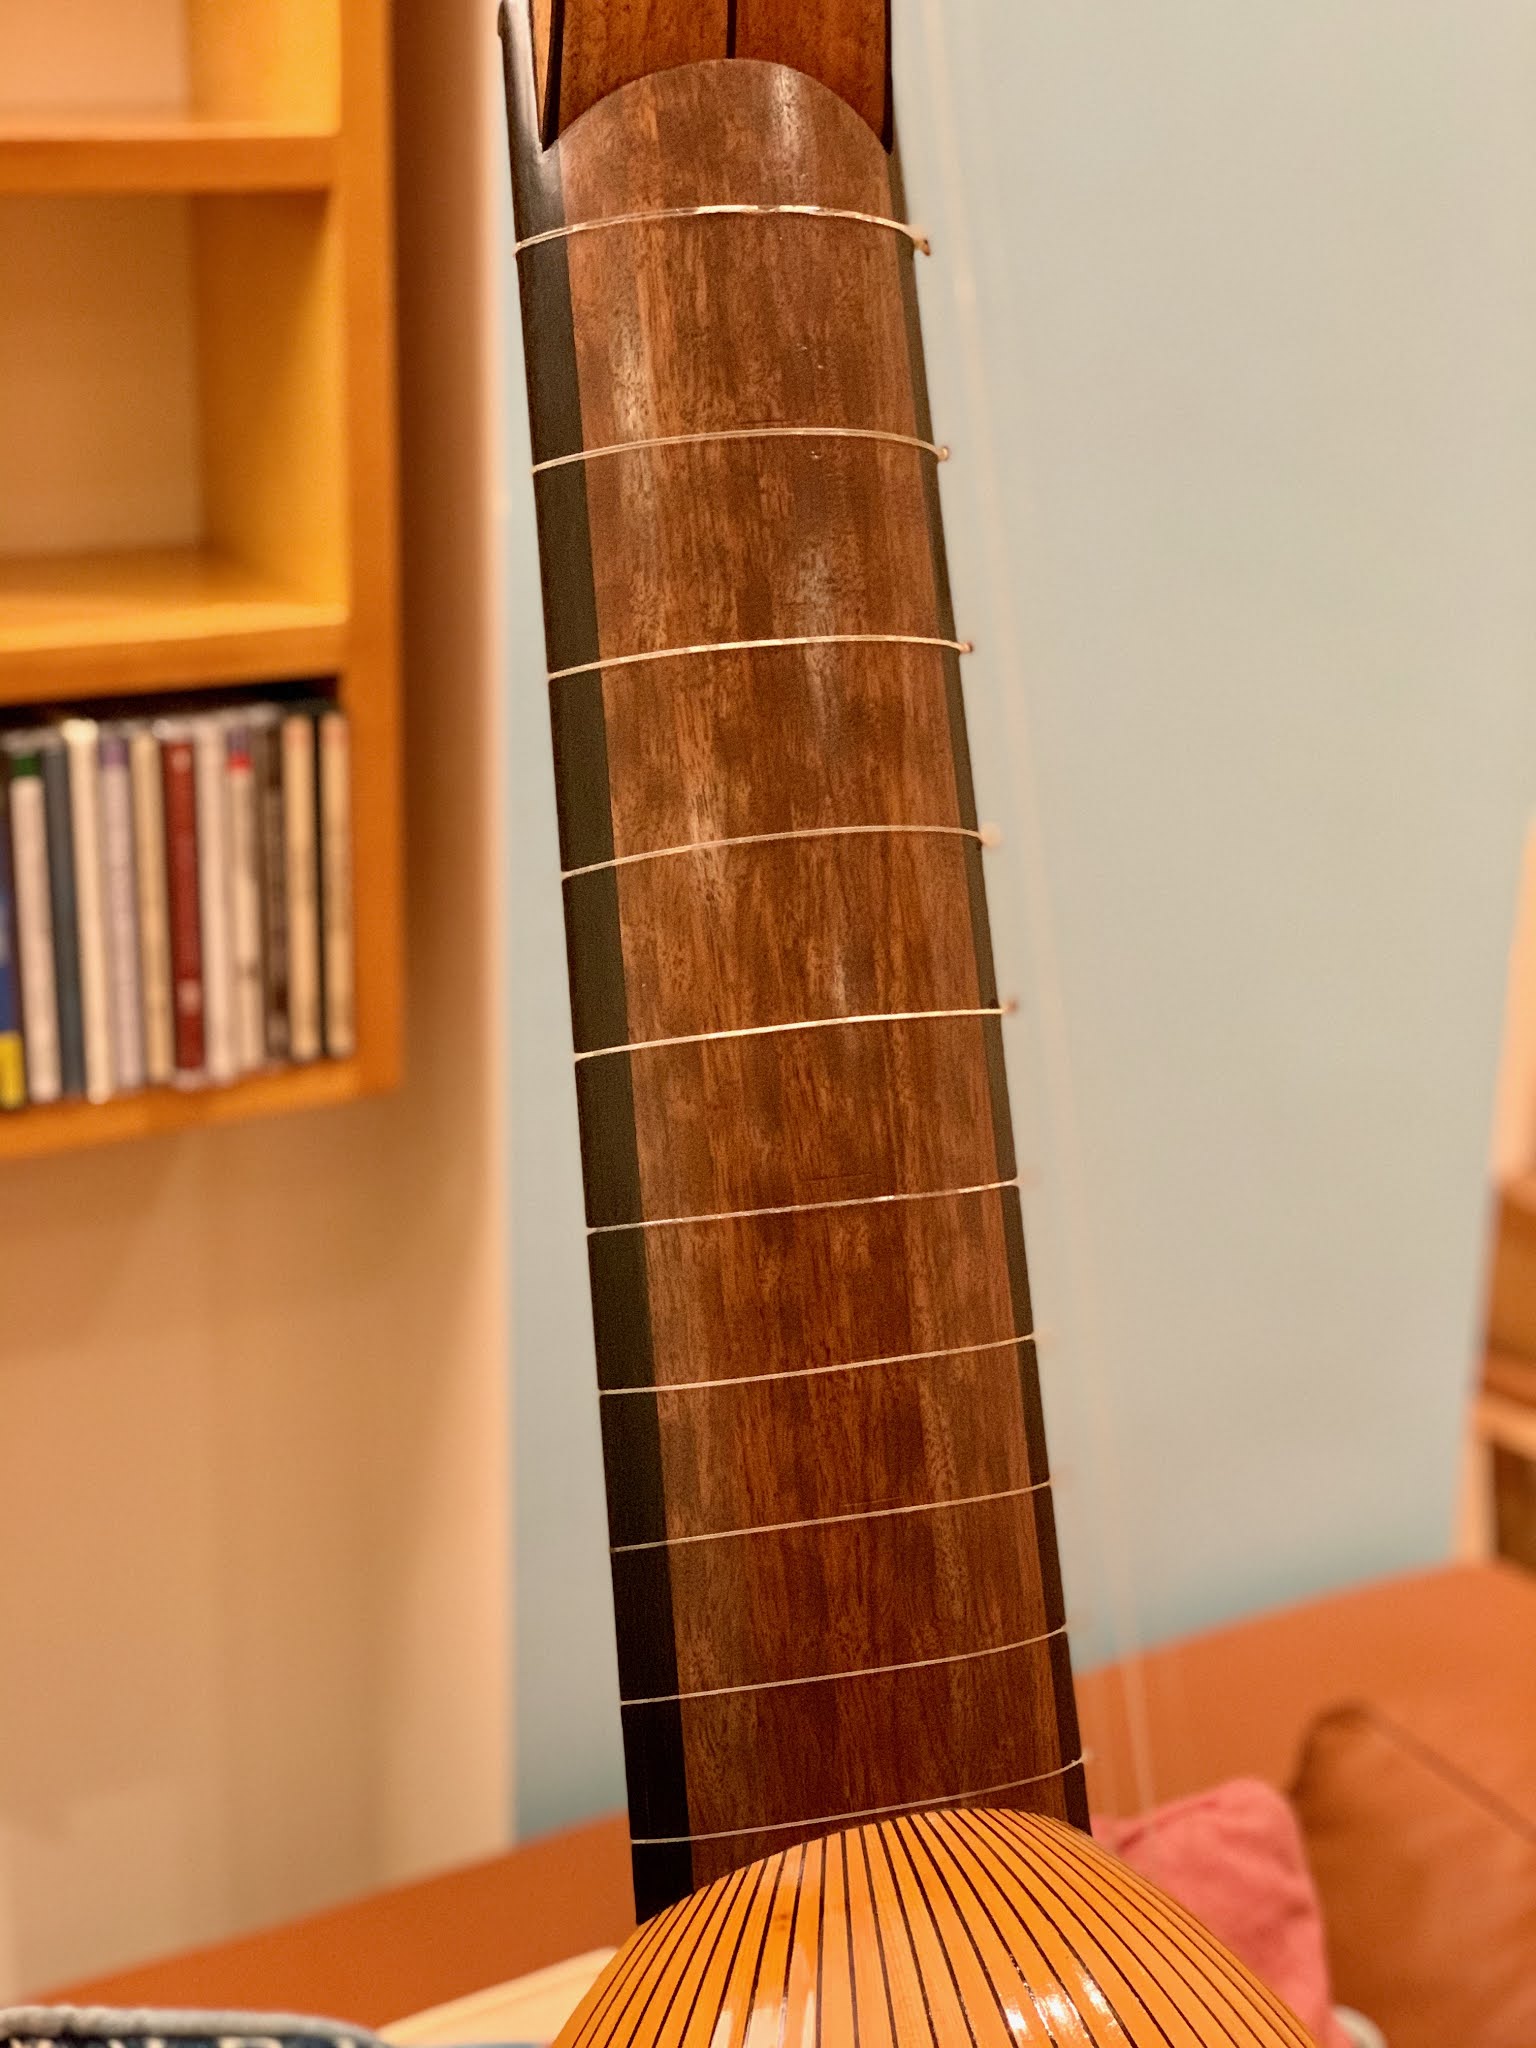
The instrument has nine tied frets. The ninth sits so close to the neck joint that I inserted a small button  and loop the fret over it to prevent the fret from sliding up the neck. I like this arrangement rather than using a wood fret at a similar location.

The neck joint is 10 cm wide and the thickness of the neck at this point is 30 mm.


Since the extension is only 75cm long I decided to make it out of a solid piece of English walnut. The piece has a small regular curl.


The extension head is carved from walnut too. The design of the head is inspired by the one from the Tieffenbrucker archlute C.45, KHM.


The belly is Swiss alpine spruce that I have stored since 2013.
The bridge is European plum with a 1.2mm thick ebony capping strip. 

The string span is 145 mm. 

The top is thicknessed in five areas that blend into one another.  Starting in the area behind and under the bridge: 1.6 mm, 1.5 below the rose, 1.4 in the rose area but 1.1  or less at the rose position and then increasing to 1.6 near midway between the top of the rose and the twelfth fret and finally 1.8 over the block area and soundboard tongue.


The rose is the original rose of E.25. Coincidently, an identical rose design appears on another anonymous lute at the Musée, E.980.2.320.


The bowl is 16 cm deep and appears to be a half-circle. But it in fact it is 9 mm less than half the width of the widest point of the top (33.8 cm ). It is as if the bottom 9 mm were cut off the  half a circle.


Edited for clarity. Sept. 24, 2022

All photos by the author.


Sunday, June 26, 2022

Building a Baroque Bass Guitar after Matteo Sellas - Edited for Content January 14, 2023


This past winter I built a large baroque guitar with a string length of 71 centimeters. The instrument is based on the Matteo Sellas 1614 that is conserved in  the University of Edinburgh Collection of Musical Instruments. The Original Sellas Guitar. My blog title "Bass Guitar", although an attention getting, is a misnomer. The guitar is tuned in standard e' b g d A and can be tuned comfortably to 440.

I took the guitar to Quebec City for David Jacques to try out. David is a busy performer, an authority on and a collector of early guitars. He previously owned one of my 67 centimeter Sellas style guitars. You can listen to David play that guitar here.


 The body is 48 cm long with the upper bout width at 20.8, the waist is 18.6 and the lower bout measures 25.9. These dimensions are slightly larger than the original guitar.


The wood that I chose for the back is special to me and I want to share its story. In the late 1970s when I was building a significant number  of viola da gambas I bought a large plank of curly hard maple that I  cut into backs and sides. Some of the pieces had long heavy iron stains and bore holes from having been tapped for sap to make maple syrup. I set those aside and when I was considering a good wood to use for the flat back I checked out the few pieces that I had put away to see if they were large enough.


Two pieces were just wide enough to accommodate the width of the larger Sellas guitar. It is difficult to make out in the photos but besides the obvious curl in the grain there is a long patch of bird's eye along the centre joint of the guitar and adjacent to the iron streak in the plank.

I glued two book-matched pieces together with a thin ebony spacer and thinned the back to slightly under 2mm.


The side ribs are Indian Rosewood inlaid with thin holly lines. The rib depth at the neck joint is 79mm which deepens to 92mm at the tail.


Edited January 14, 2023

A reader wrote and asked me to explain why I chose to build this guitar with a flat back rather than an arched one like the original guitar.  There were many factors involved in this decision. Foremost was that I had built a model of this guitar with its original arched back in 1995 specifically for use by the musicians of The Harp Concert for their recording Spanish Dances. It worked well in that context. The guitar was very good at playing rasgueado chords, but I felt that it could not stand alone. The prevailing opinion among a group of clients and other baroque guitarists was that arch backs were best for strumming while flat backs  excelled at punteado.  This assessment  became a guiding principle for me. Over the next 10 or 12 years I built several dozen models of a smaller ( 67 centimeter string length) anonymous arch back guitar mainly for use in continuo bands. David Jacques is playing the last of these in the above link.

When I received a commission to build a long scale (71cm) flat back baroque guitar I found that there were few options. Several Stradivari were considered but their string lengths are too long. A Domenico Sellas conserved in NMM Vermillion SD is the right size but the maximum rib depth of 117mm scared me off because I knew my client would require a guitar that was capable of supporting good punteado playing. In my opinion excessively deep body guitars are ill-suited to playing in this style.The University of Edinburgh 1614 Matteo Sellas came to mind and I started to think of the possibility of using it with a flat back. It is the right size both in string length, number of frets to the neck joint and width of the body. When I imagined a line from the bottom of the tail block to the bottom of the front block the measurements of 92mm and 79mm, essentially cutting off the arch, convinced me that the guitar configured as a flat back would produce the tonal effects I desired. Would Matteo Sellas have approved?

                                                          _________________________


I constructed an inside mold from several pieces of clear pine and drilled large holes around the perimeter to accommodate clamps that I would use to hold the bent sides in place. I shaped the rear block out of spruce with the grain direction on end and perpendicular to the gluing surface. The original guitar has a wider and slightly thicker front block to accommodate the extra torque of the longer string length. I built a model of this guitar in the 1990s and it needed a neck re-set after a few years. I decided to switch to a slipper foot construction that would counteract the string tension more effectively. I wedged both blocks snuggly into their respective locations. Once the ribs were bent and glued to the blocks I trimmed the height of the ribs close to their final contour. With the frame (the ribs and blocks) clamped securely in the mold I then rubbed the surface that was to be the front of the guitar on a rough sanding board. This procedure ensured that the top of the guitar would sit on a level plane. Then I used the same procedure to create the desired tilted plane of the back.


This shows the completed interior with the back glued on. My guitars get a lot of use both at home and on the road. Therefore I add reinforcements that I think will help to protect the integrity of the guitar but have little effect on their acoustical response. For example, I thinned the rosewood ribs to 1.1mm which helps to create a transparent tone, but this leaves them vulnerable to bumps and other hazards. The thin narrow spruce pillars placed at strategic locations help to protect them. Since the gluing edge of the back to ribs is so small I added short supports to the cross struts and covered the upper bouts and lower bout joints with 90 pound cold press watercolour paper. 


I decided not to use the barring of the original Edinburgh Sellas guitar. It consists of only two bars arranged about 3 centimeters above and below the rose and angled so that they are closer together on the treble side. Early in my baroque guitar building career I built many Sellas type guitars with this barring. They were very good in continuo where energetic strumming styles (rasgueado - love that word) were important. But to prevent the tops from sinking in the area around the bridge it was necessary to use a thickness of 2.2 to 2.5mm. Thicker tops always seemed to be a cover the treble tone a little. Eventually I used thinner tops and added a diagonal bar angled toward the treble side at various distances from the bridge. You can hear David Jacques play such a guitar that I built for him in 2009 Here .  


This photo shows the barring layout that I did use. It is based on the Stradivari guitar that is in the Ashmolean Museum (formerly part of the Hill Collection). The dimensions of the guitar's body, except the depth, are very close to the Edinburgh Sellas. Listening to  Rolf Lislevand's YouTube recording of the Sabionari convinced me that the barring pattern had merit. That is not to say that the Sabionari has the same pattern. In fact, very little information about the Sabionari is available so I was taking a leap of faith.  I added two small bars in the upper and lower bouts as well as the smaller tabs along the outline of the top. The guitar is bright and focused with a transparent tone.


The parchment rose is by Elena dal Cortivo. 

The top is finished with multiple applications of beeswax polish.


This section of the back shows both the curl and bird's eye grain patterns.

The back, sides and neck are finished with oil varnish.


The core of the neck is poplar veneered with 0.9 mm ebony.

The sides of the heel and neck are flat, and angled in slightly.


The core of the peg head is walnut with the faces in ebony. The joint is a  true V but the raised part was added after the joint was assembled. I concealed the glue line by fine sanding over the area, then carefully pressing the dust into the very narrow crevice and applying a thin coat of Crazy glue.  After many applications the joint disappeared.


All photos by the author.


Tuesday, June 8, 2021

My Virtual Booth at Boston Early Music Festival


This year the Boston Early Music Festival went virtual. Having been a regular exhibitor over the last twenty years I felt that I couldn't miss this one. So I registered for a Virtual Booth and it is online now. It includes a brief statement about me, detailed photos of the instruments that I have recently built, videos of my instruments played by clients and on Saturday, June 12 an Interactive Exhibition Event via Zoom breakout rooms. This offers the opportunity to visit me in my studio and discuss all things about lutes and guitars.


Go to Boston Early Music Festival and follow the links to the Exhibition.  Update. This link is no longer available.

Be sure to check out the many concerts and events taking place during the week and the week after when the Fringe Concerts begin.

I hope to see you Saturday.

Saturday, February 6, 2021

A Decacorde after René Lacôte

 
By last April, Covid had become a serious threat for everyone. I had had some bad experiences on my daily walks, so I was staying very close to home, becoming angry and depressed.  Then one of   my regular  clients got in touch and asked if I was interested in   building a Lacôte  decacorde, "just wondering," he said. I had   previously measured and  photographed two decacordes conserved  in  Musée de la musique,  Paris and a third in St. Cecilia's, University of Edinburgh. Immersing myself in a new challenging project sounded like the  perfect tonic.


The three instruments vary considerably in body size, neck design and aesthetic details. No single instrument appealed to me, but each had features that I wanted to model. My choices were guided by admiration for Lacôte's work, passion for the extraordinary, past experience with building models of his work and discussions with my client.

 I have included photos of these instruments at the conclusion to this post. Or if you want to read about them in detail you can  find my posts about these instruments by entering decacorde in the blog's search box.


The body design and dimensions are taken from St. Cecilia's UEDIN: 767. A technical drawing can be obtained from Friends of St. Cecilia's Hall and Museum . My finished model measures 434mm in length, 235mm across the upper bout, 167mm at the waist and 306mm across the lower bout. The rib depth at the neck is 80mm and 90mm at the tail.   Although the lengths of the three instruments are similar, the body widths of the two Paris instruments are nearly a centimeter wider. Ordinarily, I would have chosen a larger body, thinking that the additional, extended bass strings would benefit. But remembering a conversation with Raphaella Smits, who plays a small body Mirencourt built seven string (post from April 23, 2017), I decided to use the narrower Lacôte. St. Cecilia's also has a six string Lacôte with similar body dimensions that I have modeled many times so I felt confident that I was making the right decision.


While the body of one of the Paris instruments, E.986.5.1, is built with rosewood and the Edinburgh and second Paris instrument, E.1040, are built with mahogany; I chose to use bird's-eye-maple.  I have a long relationship building  instruments in bird's-eye and I have managed to keep a good stock on hand. Lacôte occasionally used  bird's-eye  and several of the theorbos that I built for this client are in bird's-eye. So that was the obvious choice.


Several surviving decacordes were built with full length fingerboards extending to the sound hole. One of the two instruments in Paris that I studied ( E.1040) is such an instrument. Others were built with fingerboards that end at the body joint and  lie on the same plane as the soundboard. Additional frets, usually to the 17th, were then inlaid into the soundboard. My client wanted a decacorde with a flush fingerboard in order to retain the playing feel of his theorbo and other lutes.  This decision offered me the opportunity to model an interesting but challenging feature that is encountered with a flush fingerboard. Lutes have their "points" projecting into the soundboard and baroque guitars often have the edge binding continuing around the perimeter of the tongue of the soundboard that projects over the joint and up the neck a few centimeters. Since the fingerboard ends at the joint between the neck and the guitar body  - what happens to the decorative edge banding? Lacôte's solution wraps it around the entire perimeter of the guitar. When I saw this for the first time I thought it was odd. 


Since the feature  has the visual flow and appeal of a continuous band I didn't want it marred by the typical joint that results where the ends of individual strips of purfling are joined.

 I chose to conceal the joint by staggering the ends of the bands and choosing a location for the joints other than on the centre line of the guitar. 

I made a series of ebony strips .8mm thick and holly strips .65mm thick that were long enough to wrap around the top half of the guitar to the point below the waist and another set that were long enough to wrap around the bottom half of the guitar. I reduced the thickness of the white bands because, when laid against black strips of equal thickness, the white ones appear thicker. I wanted them to appear equal or a little thinner.


I staggered the alignment of the strips at the starting point and included a styrene strip as a substitute for the final outer ebony band that I would apply later. Since the bands were the same length the opposite ends were also staggered. I then fitted the remaining bands around the lower bouts, being careful to snip off the finished ends to fit. I didn't get one of the joints tight enough and it became visible when I levelled the bands. See if you can spot it in the photo above. The other joints are nearby.


The neck on E.986.5.1 is a masterpiece of design, function and implementation of the guitar maker's art. Obviously, Lacôte did not think it was necessary to use a full-width piece of neck wood (mahogany) for strength and stability. Although he started with a full width board he cut a channel completely through the stock leaving an area equal to the width of a five string neck; the string disposition of Lacôte's model is 5+5. The remainder of the width serves as a support for the diapasons. The part of the neck that carries the fretted strings is shaped like his standard necks with the same roundness and thickness. The wood spline supporting the diapasons is left high and elegantly tapered to a thin point, just slightly rounded at its peak. The peg head is grafted to the neck with a long raised V-joint. We will look at the details of the peg head in a moment.


The heel construction consists of a single block of mahogany glued to the neck stock using a scarf joint. Scarf joints lengthen the gluing surface resulting, not only in a stronger joint but also, after sculpting the neck, in a graceful glue line. 


Lacôte used variations of this "scallop" design on all three instruments that I studied. This one is part of the neck of E.986.5.1.  My client wanted a wider nut spacing than early 19th century standard so I altered the peg head to suit.


The four diapasons are carried  on an extension of the fingerboard that is supported by a solid maple block. It is usually ebonized in some manner. I painted it with black shellac.   

I also tapered the end on the fingerboard extension, making it higher at the nut to give the diapasons extra clearance above the fingerboard.


While I was working on the peg head I started to think of it as sculpture. Seen from the rear, the elements of the design stand out in an harmonious complexity; the scallop contour,  the lines and arch of the v-joint, the through channel that exposes the underside of the ebony fingerboard and the channel's curved line and tapered sides. The random angle of the tuning pegs heads add an amusing twist--pun intended.


Lacôte usually spaces the fretted strings on 12 mm centers with the basses on 10mm centers. I used 11mm centers to match my client's theorbo bridge spacing.  Both spacing methods result in nearly the same total width.

His request for an equal tension of 5.0 kg or less per string resulted in the saddle compensation you see here and also for the skewed placement of the  soundboard frets.

I usually string my 19th century guitars with a major brand of light tension classical guitar strings composed of nylon trebles and silver wound basses.The tensions vary from string to string in order to partially compensate for the effect of fretting strings of various diameters. Pushing a string against the fingerboard stretches the string, raising its pitch. The guitar's saddle has to be crowned in such a way as to "compensate" for this effect. There are a number of other factors involved but I won't go into those here. The saddle compensation usually fits on a 2mm thick saddle, set slightly back on the bass side. The stopping point of the string is moved forward or back on the saddle's top surface to suit each string.  This method can result in a guitar that plays or nearly plays in tune. The use of equal tension for all strings however widens the disparity between what each string requires in compensation to the point where the saddle itself has to be moved. That is the reason for the arrangement you see here. 

For a clear and detailed explanation of guitar intonation see the article in Luthiers Mercantile;

Scale Length and Intonation for Beginners


The following photos are of the three instruments that inspired this project.

This is  E.1040. Musée de la musique. There is no label so it is attributed to the Lacôte School. The back is veneered with mahogany while the side ribs are solid mahogany. The body length is 439mm. The width measurements of the body at the upper bout, waist and lower bout are: 252mm, 180mm, 318mm.

The string disposition is 5+5 while the string lengths are 634mm for the fretted strings and 694mm for the 6th and 710mm for the 10th.

The full length fingerboard is an attractive feature for some guitarists and I might have chosen this instrument to model.

Note that the neck is extended to accommodate a zero fret, a tie-down bar and a grooved nut.


This is E. 986.5.1., also from the Musée. It contributed the design of the fine neck and peg head and much of the inspiration for my building a Lacôte decacorde model. The back and side ribs are palisander rosewood veneered on another wood.

The string disposition is 5+5. The fretted strings are 635mm while the diapasons are 649mm to 717mm. The body length is 447mm.  the  upper bout is 247mm, the waist is 182mm and the lower bout is 310mm. The depth of the body at the neck is 75.7 and 80.8 at the tail.


St. Cecilia's, University of Edinburgh, decacorde is the smallest of the three. The body length is 434mm. The upper bout is 231mm, the waist is 165mm and the lower bout 301mm. The body depth at the neck is 81mm and 90mm at the tail. 


Its neck is carved in a similar manner to E. 986.5.1 but not with the same artistry. 


St. Cecilia's decacorde has an unusually wide peg head. The only reason for broadening the peg head that I can think of is an attempt to improve the response of the 9th and 10th strings by increasing their side bearing.


                                                                            *****

All photographs by the author.


Saturday, September 12, 2020

Buchenberg Theorbo in Yew


When I reported on my last Buchenberg theorbo (June 20, 2018) there were two clients who were interested in buying it. I finally finished a second one. 

This one has several important differences. The fretted string length is 93 centimeters, rather than 89 centimeters while the diapasons remain 170 centimeters. The bowl is constructed with 29 ribs of yew rather than bird's eye maple. 


Several years ago my stock of European yew was getting low and I only had short pieces suitable for Voboam guitar backs. I found a source for western yew in British Columbia that is sold as bow staves. They are long and narrow, usually only 2 x 2 inches. Some of them are suitable for large theorbos. They are sold online with a video presentation of each stave. I started buying the most promising ones several years ago and storing them in my shop. A few months ago I felt they dry enough to start using.

I used the same construction techniques to assemble the bowl as the one I described in my post mentioned above.


 This is the string trough of the large Buchenberg theorbo No. 1570, that is conserved in the Musical instrument Museum, Brussels. See my post from August 7, 2018 for a full description of my examination of this instrument.

I modeled this design on my Buchenberg from 2018 but after complaints concerning the difficult angle of the first four strings over the nut I reverted to using a string trough with a narrow treble side cheek


I painted the string trough with a traditional oil paint. It has an egg shell finish.

The ebony line up the center of the extension is not only an aesthetic feature but also a necessary addition. The English walnut that I am using has a light curl that shows best on the quarter which is cut from the edge of the board. The board is two inches thick so it was necessary to use parallel pieces that I book matched. The ebony edge lines and the center continue to the theorbo head where they complete the simple design feature with mitered corner joins.


The face of the theorbo heads are often fitted with contrasting lines. I used walnut and ebony with broader walnut pieces.


The rear of the extension displays the same aesthetic as the front. 

A second set of ebony edge lines begin after an interruption, wrap around the head and join a cross-over line just behind the extension nut.

In my post  A Special Kaiser Theorbo (December 20, 2019) I described a technique for bending tight curves by soaking the small strips of wood in white vinegar. I tried this with ebony strips without success. 


I reverted to the proven technique of steaming the wood and then bending on a hot iron. After several more broken pieces I finally got two perfect ones. The problem lies in the poor quality of black ebony.

Bending tight curves with ebony strips is notoriously difficult. Much of the ebony that is available these days is cut from trees with irregular grain or is cut off the axis of the trunk. The strength of any wood is dependent on the wood fibers running parallel. Any deviation results in a weakness that is exposed in the wood's inability to resist fracturing when stressed.


I turn my pegs from well-aged Castelo boxwood. They are stained black with a spirit soluble stain and then lightly lacquered. I turn them without using templates. There are some inconsistencies in the shape and size. This is intentional. I believe this is one of the many features where subtle variations reflect the instrument's personality.


The core of the neck is quartered Sitka spruce. It is veneered with  strips of California Claro walnut which has a broad diagonal curl. I alternate the direction of the strips to create a random effect. The edges of he neck are veneered with ebony in order to protect against fret damage.


I always enjoy looking at the soundboard of this Buchenberg theorbo. The contour is graceful yet full of energy and the placement of the triple rose and bridge are so harmonious you can almost hear the instrument-without plucking a string.

The sound board is fine grain Swiss alpine spruce.


I often use variations of Leonardo's knots not only for its universality but also because I can cut it entirely with miniature chisels and gouges. I do my best work with these tools.

You can see all of my posts on rose carving by entering "rose carving" in Search This Blog located below the Blog Archive.


The bridge follows an often used 17th century design.

I used European plum and copied the dimensions of the large Buchenberg theorbo conserved in the MIM Brussels (see next photo).


The value of this design is that it lends itself to subtle adjustments, both when it is made and after it is glued to the lute's soundboard. I believe the design of the finials offers the same properties, effecting mass and acoustic distribution, as the cut-outs in the bridges seen on the violin family of instruments.


I would like to wrap up this post with these two views of the bowl.


This post edited 9:54 AM, September 13.

All photos taken by author.

                  *****