Friday, November 20, 2015

Building a Stauffer Terz Guitar- Part 2


In my last post I focused on constructing the adjustable neck and the corresponding V slot.  Now it is time to describe assembling the body of the guitar.


Since I had cut the V slot before I glued the front block onto the side ribs it was essential the everything remained properly aligned. With the side ribs clamped securely in the mold I then clamped the mold to the edge of my bench with the axis positioned on one of the lines on the mat. Then I glued the front and rear blocks in place.


The back slopes gently toward the waist and then plunges by nearly 15mm to the neck joint. The height of the side ribs are contoured from 77mm at the tail to 70.5mm at the waist and then to 56mm at the neck joint.


 This creates difficulty in bending the interior linings for the back because they must conform to both the outline of the guitar and the sloping profile of the sides as well as fitting snuggly against the inside of the ribs. When the profile is less drastic the linings can be bent and twisted into the proper shape. But here that is not possible. I solve the problem by making my lining material extra deep, bending it to the contour and clamping it to the ribs, letting the extra width overhang. Scribing a line, as shown, denotes the correct profile. A second line scribed parallel to the first and then removing the excess makes the linings uniform in depth.  


Once the linings are cleaned up I complete the frame by shaping and fitting the struts for the top and back. These all follow the size, shape  and placement given on the museum's drawing - with one exception. I added a smaller strut, thinner and lower,  in a position behind the bridge.  I like to assemble the backs and tops in this manner. The ends of the struts fit perfectly into notches in the linings, and as a result, the frame is perfectly stable and remains so when the top and back are glued in place. The three back struts are arched as much as 4mm for the lower bout and nearly 3mm for the upper.


The two lower struts on the top are arched 3mm while the two above the rose are flat. These values are my choices.  I also include a thin maple bridge plate that conforms to the arch of the top. The museum's drawing has no information about arching, nor is a bridge plate part of the original guitar.

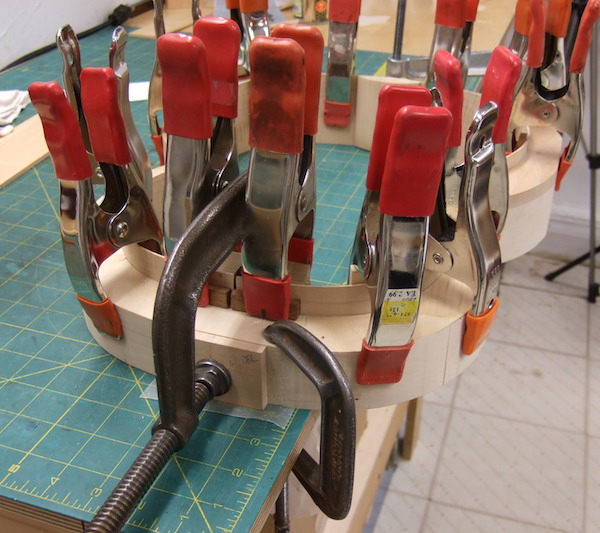
I describe my technique for gluing the back and top onto the struts and frame in  "older posts" from 1/20/13, 9/19/11 and 9/10/11.


The original Stauffer soundboard is thin. The area from the bridge through the sound hole and up to near the front block is 2.1 - 2.2mm. Other areas are 1.9 - 1.7mm. I used the same sort of gradation but I started at 2.4mm.

J.G.Stauffer MIM 4152, Berlin


 The museum plans do not include details of the purfling or the design of the bridge. I photographed the guitar but only in its location in a free-standing display case. The photo is of little value because of poor light and reflections.


N.G. Ries, private owner


I do have a Nicolaus Georg Ries guitar circa 1840 in my shop.  I consulted it for the design and details of the bridge, purfling, peghead and neck contour.


The Ries purfling design is similar to that found on many of Stauffer's instruments so I chose a variation of that for my terz.


Because the waist is so tight I didn't trust the strength of the my masking tape to hold the multiple strips in place at the waist. Also, I chose   not to glue on the thicker hardwood outer piece  at the same time as the others. I substituted a plastic strip and glued everything in the normal way. A special purpose caul with a large cam clamp that spanned the waist secured a tight fit. Hide glue doesn't stick to plastic so the next day I peeled the strip off and glued  on the final ebony strip.


The Ries bridge (see previous photo) is a delicate design that was often used by the Viennese builders. The original is made with a hardwood painted black. I photographed the Ries bridge, re-sized it to the dimensions I needed, printed it and from that made a simple template. I chose a piece of European plum, drilled the bridge pin holes and cut the saddle fret slot.


Here's the finished piece ready to be blackened.
Viennese bridges are usually very low. This one is 5mm high, tapering to less than 2mm at the ends. The rear slopes to about 2.5mm.


Next time, I'll post a photo album of my finished guitar with further descriptions and explanations.

All photos by the author.


Tuesday, November 3, 2015

Building a StaufferTerz guitar


I recently finished a model of Johann Georg Stauffer's terz guitar  Cat. No. 4152 in the Berlin Musical Instrument Museum. This guitar was on display when I was in the museum examining their Christoph Koch theorbo several years ago and that piqued my interest.

Many of my lute/baroque guitar clients play 19th century guitar and I have tried to finish one or two guitars a year for the last twenty years. Recently I have been able to spend more time with them; either by scheduling museum visits, doing restorations and repairs and other opportunities. These occasions are recorded in my 'Older Posts'.

A technical drawing for this instrument is available from the museum.
http://www.sim.spk-berlin.de/en/drawings_570.html

The guitar's dimensions:
string length 554mm
body length 390mm
upper bout 228mm
waist 161mm
lower hour 290mm
maximum rib depth (tail) 77mm, minimum (neck block) 56mm


I built an inside mold  and immediately set about assembling the side ribs. The model has a very tight waist and I was extra careful while making this bend. I made the side ribs about 1.7mm thick over-all but thinned out the waist area to 1.4mm. I wear heavy deer-skin gloves while I bend guitar  ribs. The gloves enable me to cup my hands over the wood and to hold it firmly on the hot iron. In this way I can feel the wood fibers soften and gauge the amount of pressure I can safely apply. I clamped the bent side ribs securely in the mold and set it aside.


The guitar has a raised fingerboard that rides above the soundboard.  The heel of the neck sits in a deep V shaped slot cut into the front block. A simple screw mechanism allows the neck angle to be adjusted with a clock key. It is an ingenious device that was an important  and popular feature of nineteenth century Viennese guitars.


The mechanism is simple in principle but constructing it needs to be done accurately in order for it to operate smoothly. I find it easier to achieve this if I rough out the front block and neck/heel right after the ribs are assembled. This photo show the rear of the block with part of the mechanism in place. The guitar is upside down and you can see the bottom of the slot in the front of the block.


Here is the slot shown in the finished guitar. A wood dowel (shown in both photos)  protrudes through the centre of the upper part of the block. This fits into a blind hole (visible in the next photo) in the rear of the heel.


The dark area is discoloration


The dowel and the surrounding area acts as the fulcrum for the neck to pivot. It also keeps the neck from shifting out of position. The area beneath this is cut back in such a way that only the upper most area is in contact with the rear of the slot. Since the neck pivots on this point the hole must be slightly larger that the dowel.


Here is the mechanism laid out and partially assembled.

From the left, the anchor is the square plate attached to a hollow cylinder that is threaded inside and out. The square part is visible in one of the above photos. It is inlaid into the rear of the block. This keeps it from turning when the mechanism is adjusted. The washer is threaded and securely locks (as shown above) this part of the mechanism in the front block. The hexagon shaped cylinder is open at the front as seen in the photo below, but closed at its rear, except for a hole that allows the adjustment rod to pass through.


The rod passes through the heel. It is threaded at the rear end so that it screws into the rear cylinder. At the front it has a collar (above photo) that holds the rod in the front cylinder. The clock key fits the squared end of the rod.  A quarter turn in direction or the other will change the pitch of the neck raising or lowering the height of the strings above the fingerboard.


This has been a wordy description but here's one last photo that shows the roughed-out nature of the neck. The heel is a separate block glued to the neck. The sides of the heel are cut and planed to the contour that matches the V slot. At the rear part, the heel is cut away leaving a ledge. This is the location of the dowel and the point where the neck pivots in the slot.


And here is the entire neck showing all of the details of its construction. The peg head is attached with a v-joint. The extension that supports the flying fingerboard is attached with a half-lap joint and then tapered to achieve the characteristic Viennese fingerboard.


In the next post on this guitar I'll describe constructing the soundboard, back and bridge and my procedure for polishing the guitar.


All photos by the author.


Saturday, October 10, 2015

Building a Louis Panormo Guitar - Part 1

  I have just about finished this model of a Panormo guitar - it still needs to be varnished. I built this guitar as an extra project when I could borrow time from work on my commissioned instruments so it has taken longer than usual to complete. I always string up my new instruments before I varnish them to see if I need to make any changes - such things are easier to do at this stage. Also I think it is important to allow time for the wood and the various glue joints to acclimatize to both the tension of the strings and atmospheric changes unimpeded by a protective finish. Panormo traditionally finished his guitars with French polish and I am now ready to begin that process.

This guitar is a close model of an 1834 Panormo that I did extensive repairs on last year. My post from 7/9/14 describes that work. While the guitar was in my shop I was able to study it in detail and that provided the impetus to build a model.

The guitar's dimensions:
string length  635mm
body length  452mm
upper bout width  228mm
waist width  177mm
lower bout   286mm
maximum rib depth   92mm (tail)


This show a later stage of construction but provides a convenient talking point
I built the guitar without a mold, assembling the principal parts on plain work board, called a solera in the Spanish tradition. I enjoy the challenge and different perspective that working like this entails as the sequence of assembling the parts is much different than working with a mold. The solera  is not only a platform for assembling the key parts of the guitar but also a sort of template for determining the arching of the top. It is constructed with a depression carved into the wood in the area of the lower bout. When the fan struts are glued in place they and the soundboard are pressed into this depression. The result is a domed soundboard. Domed tops respond acoustically faster with more strength and the possibility of more nuanced tone than flat tops. The depth and shape of the depression helps to determine the tonal characteristics of the guitar. There is disagreement on whether Panormo domed his soundboards in this fashion. I constructed my solera out of well-seasoned pine, cut it to an over-size contour and taking the liberty of doming my model, carved a concavity into the pine in the area under the fan bars.


Next I thinned the spruce top to 2.6 - 2.5mm through the center and tapered the edges  at the bouts to 2.3 - 2.22mm.
The rosette is a double ring; a thin three band outer ring and a wider, multi-band inner ring composed of alternating bands of kingwood and holly wood.


Here's the finished rose at a later stage of construction. The sound hole opening is 86mm wide while the outer ring is 137mm. The thin light and dark rings are each .6mm thick.


 This photo shows how the fan struts glued in place. The seven struts (seen in a previous photo) are positioned in the typical fashion favoured by Panormo; bunched near the harmonic bar then flaring out to the bottom and sides of the lower bouts. I glue them all at once by using foam and wood gluing cauls to force the bars and soundboard into the concavity. Once the glue dries the lower half of the soundboard is permanently domed.


Here the cauls are laid out in order showing the depressions left from  clamping. I like this method because uniform pressure is applied over the length of the struts and they are all glued at the same time.


The neck and heel assembly is a key in the construction of this guitar and others that are built on a solera. The heel block and slipper foot provide structural rigidity and an uninterrupted acoustical pathway from the nut into the heart of the guitar.

Although this style of neck assembly can be cut from a single block of wood Panormo made the heel and slipper out of a single block and glued it to the neck piece with a long scarf joint. Because the scarf runs at a shallow angle (see the second photo down) there is a much larger gluing surface and therefore a stronger joint than would otherwise be the case.


Here's a close up of the original guitar with the scarf joint labeled.


Note that the neck piece (bottom of photo) continues well past the heel and is left square on the end.  Glued to the soundboard it provides support for the top and fingerboard at a critical location and helps to produce strong clear notes in the upper register.

The slipper foot (top of photo) is rounded and glued to the back. It provides rigidity in the transition from the neck to the body.


Original 1834 head


Panormo's peg head design has a simple elegance that I admire. It is constructed from a single block of maple without a capping. The curve at the top of the string slots match the curve of the head and the long broad ramps are accented by the tapered center piece and the finely shaped edges that terminate at the nut.


This design necessitates a blind V-joint so as to not interrupt the simplicity of the face.

I laid out the design in pencil, drilled a very small hole at the point of the V and using a x-acto saw carefully made the two side cuts using the hole as an exit point for the end of the saw.
I then chiseled away the waste portion that left a rough surface since the bottom of the V angled up against the grain. This was smoothed with a file that I re-shaped for specifically for this purpose.


Peghead string slots are always a lot of work, more so using non-speciality tools. Here I drilled dozens of small holes on the waste side of the prescribed line and then finished by cutting away the intervening material.


To finish the surfaces I fitted temporary edge pieces to the peghead stock to make the slots parallel to my bench. I also made two corresponding supports for the file handle that were parallel to the slot depending on its orientation. Progress was fairly rapid.


The string ramps are long but fairly shallow. They are cut below the top surface even at the nut making for a delicate rounded edge at this point.


There's lots more work to do and I'll describe that in one or two future posts.

All photos by the author.


Friday, August 7, 2015

Eight Course Lute after Magno Tieffenbrucker


I finished an eight course lute with an eleven rib curly maple bowl and a string length of 63 centimetres. My client for this lute is a classical guitarist who also plays lute and baroque guitar. He plays with short, but not too short nails.  I didn't think the usual Frei, Hieber or Venere renaissance models would be suitable for him. I needed a lute with good projection and a sort of sturdiness that a player with nails requires.

My post from 10/25/14 describes using the archlute C.45 as the basis for an eleven course lute. I still had that lute on my mind when I started to plan the new eight course. However, C. 45 has thirty-one ribs of yew and I thought a lute with fewer ribs and ribs of maple would be a better match for my client.


I could have adapted the bowl of C.45 to eleven or thirteen maple ribs straightaway but it seems reasonable to think that there might be an unheralded 16th century lute in some museum's storage that fits my requirements. I enjoy undertaking projects like this and fortunately there are resources online that simplify the search for 'new' lutes. The Lute Database  assembled by Klaus Martius and hosted by the Lute Society of America lists hundreds of lutes categorized by maker. Each entry usually lists the lute's location, description and many important measurements. I surveyed the list of lutes attributed to Magno Tieffenbrucker and sure enough in the Museum für Hamburgische Geschichte was Lute ID 246 . The length, depth and width of the bowl of this lute compare favourably with C.45 .  Missing from the Database description of C. 45 is the depth which, on the museum's drawing, is 15 cm. Also, it is constructed with eleven ribs of yew. Now I was hopeful that I could find a photograph.


There are thousands of images of lutes online but none of the Hamburg lute. I was only a little disappointed.  Museum catalogues often include photographs and the MHG had published one  in 1930. I could not find a library copy but I was able to buy one from a German antiquarian.

Museum für Hamburgische Geschichte, Hans Schröder


Alas, there were no photos but there was an interesting difference between the Database entry and the catalogue. The former lists ribs of yew while the latter records  "rötlich lackierten Ahornspänen" (red varnished maple ribs). This was getting interesting but I still needed a photo. I emailed the museum's curator and asked for details about the lute and inquired if photos were available.

My self-imposed deadline for starting the lute came and went without receiving a reply so I reluctantly made a new mold copying the size and shape of C.45 but adapted for eleven ribs and got started. I'm still hopeful that I'll obtain photos of the Hamburg Tieffenbrucker and when I do I'll pass them along.


I've always found that there is a problem with open molds in the transition from the deepest part of the bowl to the area around the apron.
Because the curvature of the bowl changes so quickly at this point it is difficult to make  accurate intermediate cross-section supports. For this mold I avoided the problem by leaving the area open, but I compensated by adding a shaped internal support for the apron area and by making three rib bending jigs: one shaped to the longitudinal axis of the bowl, a second to the profile of the soundboard and a third to a contour intermediate to the two.

By using each in its turn with slight compensation I was able to shape and assemble the ribs over the difficult rear portion of the bowl in a uniform manner without further use of templates or jigs.


Since the construction of the neck, soundboard, pegbox and other features follow my usual methods that have been described in previous posts I'll show you details of the completed lute.


I cut the rose with x-acto knifes and scalpels. As I worked through the pattern I gave the cut areas a wash of thin shellac. This sealed and strengthened the fragile wood fibers.


The bridge is made from plum capped with ebony and patterned after the Hieber bridge in size and design lengthened to accommodate eight courses.


The neck core is sitka spruce veneered with a broad centre piece of Indian rosewood. The edges are protected with veneers of ebony. The pegs are boxwood.


The rosewood veneer continues on to the back of the pegbox. The pegbox core is walnut. I seldom add a chantrelle bracket for the first string on eight course lutes. But in this case I thought my client would appreciate the addition.


Harris Becker is Director of Guitar Studies at Long Island University Post and the founder of the Long Island Guitar Festival. He is co-founder and artistic director of Songe d' été en musique in Quebec. This summer the festival celebrated its tenth anniversary.
Congratulations!

Shortly after taking the lute home Harris wrote:
"The lute has been a big hit with people...!!! I am having a great time with it. I feel like I have a little consort in my hands."


All photos by the author.


                                                                                  *****


Tuesday, June 30, 2015

Benedetto Sanbretto Mandolino


Musical Instruments in the Royal Ontario Museum
Cselenyi, Ladislav (1971)

For many years the Royal Ontario Museum had a European musical instrument gallery that I frequented, visiting my favourite instruments.  Among them was an important mandolino by Benedetto Sanbretto mentioned in The Early Mandolin by James Tyler and Paul Sparks, Oxford University Press. Unfortunately the instrument gallery was disbanded during a re-organization and the instruments were put in storage or made cameo appearances in period room vignettes. I lost track of the mandolin but recently happenstance renewed my interest and I contacted the ROM. Last month I was able to spend a delightful and engaging afternoon  examining the mandolino.

Note: today there are many types of mandolins. This instrument, a mandolino, should not be confused with them. It is similar to a small lute in that it exhibits lute-like characteristics: a flat top, affixed bridge, rounded bowl and gut strings plucked with the fingers. The term "mandolino" and its tuning ( g'', d'', a', e', b, g) both which suggest its diminutive size, were first mentioned early in the 17th century.


The appearance of the Sanbretto mandolino is a combination of elegance and simplicity.  Its elegance undoubtedly has inspired generations of delighted owners - it was built in 1726 - and simplicity is found in its proportions and uncluttered  soundboard.  It is a fine example of the type of instrument that was popular in the 18th century. Antonio Vivaldi (1678- 1741) required mandolinos in many of his compositions and  the concerto for solo mandolino (RV 425) and the double concerto for mandolini (RV 532) are among his best known works.

In fact, Vivaldi is responsible for the 'happenstance' that occasioned by visit to the ROM. A client, requiring a mandolino for an upcoming engagement, inquired whether I had one available. I didn't, but I decided I should.

My study included measuring, photographing and describing the instrument's major features. I also drew a contour outline of the bowl, neck and peg head.  I have started to build a model and I will describe my progress in future posts, but now I want to show you the Sanbretto in detail.


The fingerboard is a profusion of geometric shapes and engraved panels all cut from mother of pearl. Each edge of the fingerboard is lined with a row of chevrons-like forms, followed by a narrow  ivory line and then a row of diamond shapes all set in black mastic. A double line of ivory and ebony completes the edge motif. The engraved panels are bordered by a flowing band of chevrons. Each panel is representational. For example the top most panel is clearly a flower and a winged dragon  makes an appearance but others are more fanciful or fantastical. The display seems to have been made as one long vertical panel because engraved lines from each  "scene" flows into its neighbor. The embedded ivory frets separate the scenes.

The next three photos are close-ups arranged from the top of the fingerboard to the joint with the body. It is a stunning display.


The diamond motif continues onto the sides of the peg head. There are twelve ivory pegs with engraved designs. Black mastic has been rubbed into the lines to emphasize the designs.


The peg head is slightly curved and tapers both in width and thickness before it curls back on itself.


The soundboard is fine grain spruce and is undecorated except for a thin double band of ivory and ebony around the edge. The rose is pierced through the soundboard and is an excellent example of "Leonardo's knots" - a design that appears on many lutes from the 16th -18th centuries.


The bridge appears rough in this photo, because the black substance (paint?) that covers it is corroded. But I believe it is original. The reason for this is that it has all the characteristics of a 17th-18th century lute bridge. It is narrow, front to back and low, allowing the strings to sit close to the soundboard. There is a ledge cut into the rear that catches and secures the free end of the  strings as they are looped over the bridge. The string block, the central part of the bridge, is covered by a thin ivory plate.  The top of the bridge slopes forward (not visible in this photo) and this has to do with vector forces but I won't go into that. Customarily the  ends of the bridge taper to small finials but both have broken off. Stains on the soundboard strongly suggest that the bridge has detached and been re-glued.


The bowl, neck and peg box are all constructed of tiger stripe maple, named for its closely spaced deep curl . The top coat of finish is a little too glossy for me - my guess is that it is a modern application - but  underneath the wood has developed a beautiful rich brown patina. The neck and pegbox in this view are both undecorated but the gentle arch across the back of the relatively wide neck and the rounded edges of the pegbox are sure to please demanding musicians.

The bowl has thirteen ribs. The two edge ribs are very wide while the remaining eleven ribs are narrow and deeply fluted. Ivory lines that are nearly 2mm wide separate each rib.


This view shows the contrast in rib widths.
At the deepest point of the bowl the two edge ribs are 34mm wide while the remaining eleven ribs are between 13 and 14 mm wide.

(Below) I wanted to know the general shape of the bowl so I made a template of a semi-circle from heavy cardboard. Held in position (not quite accurately) over the deepest point of the bowl the photo suggests that the eleven fluted ribs form a semi-circle. The increased width of the two edge ribs add more depth to the bowl. As a result the instrument is louder with a fuller tone.


The end clasp is 50mm high and is assembled from two pieces of maple with an ivory line. The vertical surface of the wider piece of the clasp is flat. The smaller piece follows the curved profile of the bowl. The size of clasp suggests that it is needed to cover the end points of the ribs.


Measurements:

Total length.   555 mm
String length.  335 mm
Length of soundboard.  248 mm
Width of soundboard.  142 mm
Open diameter of rose.  56 mm
Rose centre from rear.  153 mm
Maximum depth of bowl.  84 mm
Neck width at the nut.  52 mm
Neck width at the body.  63 mm
Neck thickness at the body.  24 mm
Neck thickness at first fret.  12 mm


I would like to thank Jennifer Kinnaird, Collections Technician (European) for kindly arranging my visit. Jennifer's assistance during my visit and on my follow-up requests was invaluable.

All photos by the author except where noted.