Friday, August 7, 2015

Eight Course Lute after Magno Tieffenbrucker


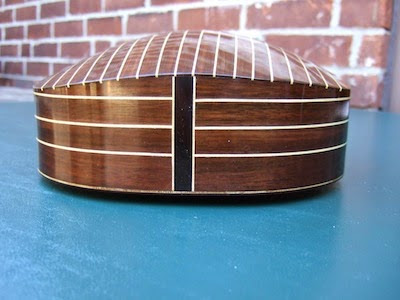
I finished an eight course lute with an eleven rib curly maple bowl and a string length of 63 centimetres. My client for this lute is a classical guitarist who also plays lute and baroque guitar. He plays with short, but not too short nails.  I didn't think the usual Frei, Hieber or Venere renaissance models would be suitable for him. I needed a lute with good projection and a sort of sturdiness that a player with nails requires.

My post from 10/25/14 describes using the archlute C.45 as the basis for an eleven course lute. I still had that lute on my mind when I started to plan the new eight course. However, C. 45 has thirty-one ribs of yew and I thought a lute with fewer ribs and ribs of maple would be a better match for my client.


I could have adapted the bowl of C.45 to eleven or thirteen maple ribs straightaway but it seems reasonable to think that there might be an unheralded 16th century lute in some museum's storage that fits my requirements. I enjoy undertaking projects like this and fortunately there are resources online that simplify the search for 'new' lutes. The Lute Database  assembled by Klaus Martius and hosted by the Lute Society of America lists hundreds of lutes categorized by maker. Each entry usually lists the lute's location, description and many important measurements. I surveyed the list of lutes attributed to Magno Tieffenbrucker and sure enough in the Museum für Hamburgische Geschichte was Lute ID 246 . The length, depth and width of the bowl of this lute compare favourably with C.45 .  Missing from the Database description of C. 45 is the depth which, on the museum's drawing, is 15 cm. Also, it is constructed with eleven ribs of yew. Now I was hopeful that I could find a photograph.


There are thousands of images of lutes online but none of the Hamburg lute. I was only a little disappointed.  Museum catalogues often include photographs and the MHG had published one  in 1930. I could not find a library copy but I was able to buy one from a German antiquarian.

Museum für Hamburgische Geschichte, Hans Schröder


Alas, there were no photos but there was an interesting difference between the Database entry and the catalogue. The former lists ribs of yew while the latter records  "rötlich lackierten Ahornspänen" (red varnished maple ribs). This was getting interesting but I still needed a photo. I emailed the museum's curator and asked for details about the lute and inquired if photos were available.

My self-imposed deadline for starting the lute came and went without receiving a reply so I reluctantly made a new mold copying the size and shape of C.45 but adapted for eleven ribs and got started. I'm still hopeful that I'll obtain photos of the Hamburg Tieffenbrucker and when I do I'll pass them along.


I've always found that there is a problem with open molds in the transition from the deepest part of the bowl to the area around the apron.
Because the curvature of the bowl changes so quickly at this point it is difficult to make  accurate intermediate cross-section supports. For this mold I avoided the problem by leaving the area open, but I compensated by adding a shaped internal support for the apron area and by making three rib bending jigs: one shaped to the longitudinal axis of the bowl, a second to the profile of the soundboard and a third to a contour intermediate to the two.

By using each in its turn with slight compensation I was able to shape and assemble the ribs over the difficult rear portion of the bowl in a uniform manner without further use of templates or jigs.


Since the construction of the neck, soundboard, pegbox and other features follow my usual methods that have been described in previous posts I'll show you details of the completed lute.


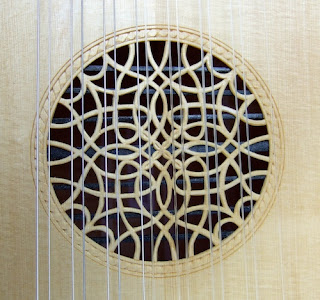
I cut the rose with x-acto knifes and scalpels. As I worked through the pattern I gave the cut areas a wash of thin shellac. This sealed and strengthened the fragile wood fibers.


The bridge is made from plum capped with ebony and patterned after the Hieber bridge in size and design lengthened to accommodate eight courses.


The neck core is sitka spruce veneered with a broad centre piece of Indian rosewood. The edges are protected with veneers of ebony. The pegs are boxwood.


The rosewood veneer continues on to the back of the pegbox. The pegbox core is walnut. I seldom add a chantrelle bracket for the first string on eight course lutes. But in this case I thought my client would appreciate the addition.


Harris Becker is Director of Guitar Studies at Long Island University Post and the founder of the Long Island Guitar Festival. He is co-founder and artistic director of Songe d' été en musique in Quebec. This summer the festival celebrated its tenth anniversary.
Congratulations!

Shortly after taking the lute home Harris wrote:
"The lute has been a big hit with people...!!! I am having a great time with it. I feel like I have a little consort in my hands."


All photos by the author.


                                                                                  *****


Tuesday, June 30, 2015

Benedetto Sanbretto Mandolino


Musical Instruments in the Royal Ontario Museum
Cselenyi, Ladislav (1971)

For many years the Royal Ontario Museum had a European musical instrument gallery that I frequented, visiting my favourite instruments.  Among them was an important mandolino by Benedetto Sanbretto mentioned in The Early Mandolin by James Tyler and Paul Sparks, Oxford University Press. Unfortunately the instrument gallery was disbanded during a re-organization and the instruments were put in storage or made cameo appearances in period room vignettes. I lost track of the mandolin but recently happenstance renewed my interest and I contacted the ROM. Last month I was able to spend a delightful and engaging afternoon  examining the mandolino.

Note: today there are many types of mandolins. This instrument, a mandolino, should not be confused with them. It is similar to a small lute in that it exhibits lute-like characteristics: a flat top, affixed bridge, rounded bowl and gut strings plucked with the fingers. The term "mandolino" and its tuning ( g'', d'', a', e', b, g) both which suggest its diminutive size, were first mentioned early in the 17th century.


The appearance of the Sanbretto mandolino is a combination of elegance and simplicity.  Its elegance undoubtedly has inspired generations of delighted owners - it was built in 1726 - and simplicity is found in its proportions and uncluttered  soundboard.  It is a fine example of the type of instrument that was popular in the 18th century. Antonio Vivaldi (1678- 1741) required mandolinos in many of his compositions and  the concerto for solo mandolino (RV 425) and the double concerto for mandolini (RV 532) are among his best known works.

In fact, Vivaldi is responsible for the 'happenstance' that occasioned by visit to the ROM. A client, requiring a mandolino for an upcoming engagement, inquired whether I had one available. I didn't, but I decided I should.

My study included measuring, photographing and describing the instrument's major features. I also drew a contour outline of the bowl, neck and peg head.  I have started to build a model and I will describe my progress in future posts, but now I want to show you the Sanbretto in detail.


The fingerboard is a profusion of geometric shapes and engraved panels all cut from mother of pearl. Each edge of the fingerboard is lined with a row of chevrons-like forms, followed by a narrow  ivory line and then a row of diamond shapes all set in black mastic. A double line of ivory and ebony completes the edge motif. The engraved panels are bordered by a flowing band of chevrons. Each panel is representational. For example the top most panel is clearly a flower and a winged dragon  makes an appearance but others are more fanciful or fantastical. The display seems to have been made as one long vertical panel because engraved lines from each  "scene" flows into its neighbor. The embedded ivory frets separate the scenes.

The next three photos are close-ups arranged from the top of the fingerboard to the joint with the body. It is a stunning display.


The diamond motif continues onto the sides of the peg head. There are twelve ivory pegs with engraved designs. Black mastic has been rubbed into the lines to emphasize the designs.


The peg head is slightly curved and tapers both in width and thickness before it curls back on itself.


The soundboard is fine grain spruce and is undecorated except for a thin double band of ivory and ebony around the edge. The rose is pierced through the soundboard and is an excellent example of "Leonardo's knots" - a design that appears on many lutes from the 16th -18th centuries.


The bridge appears rough in this photo, because the black substance (paint?) that covers it is corroded. But I believe it is original. The reason for this is that it has all the characteristics of a 17th-18th century lute bridge. It is narrow, front to back and low, allowing the strings to sit close to the soundboard. There is a ledge cut into the rear that catches and secures the free end of the  strings as they are looped over the bridge. The string block, the central part of the bridge, is covered by a thin ivory plate.  The top of the bridge slopes forward (not visible in this photo) and this has to do with vector forces but I won't go into that. Customarily the  ends of the bridge taper to small finials but both have broken off. Stains on the soundboard strongly suggest that the bridge has detached and been re-glued.


The bowl, neck and peg box are all constructed of tiger stripe maple, named for its closely spaced deep curl . The top coat of finish is a little too glossy for me - my guess is that it is a modern application - but  underneath the wood has developed a beautiful rich brown patina. The neck and pegbox in this view are both undecorated but the gentle arch across the back of the relatively wide neck and the rounded edges of the pegbox are sure to please demanding musicians.

The bowl has thirteen ribs. The two edge ribs are very wide while the remaining eleven ribs are narrow and deeply fluted. Ivory lines that are nearly 2mm wide separate each rib.


This view shows the contrast in rib widths.
At the deepest point of the bowl the two edge ribs are 34mm wide while the remaining eleven ribs are between 13 and 14 mm wide.

(Below) I wanted to know the general shape of the bowl so I made a template of a semi-circle from heavy cardboard. Held in position (not quite accurately) over the deepest point of the bowl the photo suggests that the eleven fluted ribs form a semi-circle. The increased width of the two edge ribs add more depth to the bowl. As a result the instrument is louder with a fuller tone.


The end clasp is 50mm high and is assembled from two pieces of maple with an ivory line. The vertical surface of the wider piece of the clasp is flat. The smaller piece follows the curved profile of the bowl. The size of clasp suggests that it is needed to cover the end points of the ribs.


Measurements:

Total length.   555 mm
String length.  335 mm
Length of soundboard.  248 mm
Width of soundboard.  142 mm
Open diameter of rose.  56 mm
Rose centre from rear.  153 mm
Maximum depth of bowl.  84 mm
Neck width at the nut.  52 mm
Neck width at the body.  63 mm
Neck thickness at the body.  24 mm
Neck thickness at first fret.  12 mm


I would like to thank Jennifer Kinnaird, Collections Technician (European) for kindly arranging my visit. Jennifer's assistance during my visit and on my follow-up requests was invaluable.

All photos by the author except where noted.


Tuesday, June 16, 2015

www.schreinerlutes.com


I am shutting down my website www.schreinerlutes.com/.  It has gotten old and cranky and has developed glitches. On some new devices it does not display at all. I do plan on replacing it eventually, but in the meantime, my interest is here, with my blog.

Monday, May 25, 2015

A Chitarriglia after Matteo Sellas


I finished the small baroque terz guitar that was the subject of my post from January 2, 2015. The design is my own creation but it is solidly based on guitars by Matteo Sellas. I analyzed four guitars made by members of the Sellas family in the first half of the 17th century and used my findings to arrive at a final design. That post includes several schematic drawings.


The construction of this guitar follows techniques and procedures that I have described in other posts so this is mostly a photo essay.


The length of the body is 372mm to the neck joint.

The upper bout is 160mm wide while the waist is 142mm and the lower bout is 201mm. The open rose diameter is 64mm and it is positioned at 67% of the body length.

The design of the flourishes of the bridge is inspired by the Matteo Sellas guitar in the Metropolitan Museum of Art, New York.


The core of the neck is poplar veneered with Kingwood strips separated by holly. The heel sits in a recess in the front block of the guitar. Italian baroque guitars are usually glued right to the front of the body. The rear surface of the heel is contoured to fit the curvature. A nail is then driven through the block and heel and into the neck.  This is done before the soundboard is attached. I've built many guitars in this manner. Sometime in the 18th century makers started to fit the heel into a recess in the front block - probably in an attempt to counteract the demand for increased string tension. I use this method on 19th century guitars and I wanted a sturdier joint so I used it here. Also, the soundboard can be glued in place first, meaning any slight adjustment in the angle of the neck, if necessary, can be easily made.


The peg head is fitted to the neck with a full width V-joint. The neck is not curved across its width. The two edge pieces of veneer are flat. This style is sometimes found on baroque guitars. Using this style of neck solves the principal problem associated with a V-joint, namely, how to blend two dissimilar surfaces - the flat peg head and the curved neck into one joint without leaving part of the neck end exposed.


The peghead angle is about 11 degrees and is tapered in thickness. The core wood is American Walnut, capped both sides with African Blackwood.


The maximum depth of the body is 93mm while the maximum rib depth is 76mm at the waist, 58mm at the tail and 45mm at the neck joint.


The finish on all of the hardwood parts, except the fingerboard, bridge and pegs is French polish made with blond shellac flakes applied in the traditional manner. The finish on the soundboard is multiple applications of tung oil finished with beeswax.


A ebony panel edged with holly finishes the instrument.


All photos by the author.


Wednesday, April 22, 2015

Chambure Vihuela Revisited Part 2

 My last post described the emotions I felt while viewing the original vihuela (E.0748) in the Musée de la musique laboratory. Building a model was an unique experience because we - modern luthiers -  seldom have the opportunity to copy such an old instrument. Especially one that has not been altered in modern or near modern times. I went on to give a talk about the Chambure vihuela at the Lute Society of America Seminar.
LSA Summer Seminar 2002
and to publish an article in the LSA Quarterly, Volume XXXVII, No. 2&3, November ,2002.

 I had built a second model of the vihuela to exhibit at the seminar that Dick Hoban, then president of the LSA, subsequently bought. It was his suggestion to inlay the soundboard with motifs from Luis Milan's  El Masetro.


I returned home with the instrument and  thought about how to go about the task. There are numerous images available of Orpheus playing the vihuela taken form El Maetro and I could have used one of those.  But I found  a copy of the original 1535 edition in the Library of the Royal Ontario Museum only a few blocks from my home here in Toronto.  The copy is now in the University of Toronto Music Library, Rare Book musi F-3 120.

This discovery was a nice touch as it added another dimension to my experience with the historical vihuela. From this image I chose the general configuration and placement of each inlay, but the images were not detailed enough to produce an historically accurate inlays. The patterns are similar to those on the Jacquemart-André vihuela. I had purchased museum photos of the instrument for my LSA talk but there were no close-ups so I needed another source.


Distributed by Auvidis E8652


I found that Auvidis/Astrée had re-issued Hopkinson Smith's recordings of Milan, Narvaez and Mudarra's fantasias in this beautiful three CD box set with this close-up of the Jacquemart-André vihuela. Here is the image I needed.


Jacquemart-André


A close-up of the four point star shows the colors and configuration of the design. I set about choosing the woods I would use and working out the exact size of each part.


My colours have darkened and my green is hardly visible in the photograph.  In contrast, the vibrant colours of the original are a testimony to the skill and knowledge of the dyers trade in times past. My border is made of bloodwood and canarywood strips that I manufactured. The interior squares are boxwood, holly, holly dyed green and rio rosewood.


There are other features of the vihuela that I didn't report on in my previous post that are no less surprising or unique. The peg head appears to be attached to the neck with a V-joint. In fact it is a false joint. The neck and peg head of the original instrument are carved from a single block of wood. The anonymous vihuela maker used Mediterranean cypress for the original while I used Spanish cedar.


There is no face plate on the original  Chambure vihuela but the peg head plate on the Jacquemart-André vihuela is deceptively elegant and I chose to include it on my model. The plate is composed of an equal number of alternating strips of contrasting wood resulting in an unbalanced design: the treble side is edged with ebony while the bass side with rio rosewood.


The Chambure vihuela along with examples in the iconography of lutes, viols and violins demonstrate that ancient builders valued thick necks, although modern builders are reluctant to copy this feature. The width of the Chambure
vihuela neck is not unusual; measuring 44mm at the nut and 58mm at the joint with body, the thickness at the last tied fret is 31mm including a thin fingerboard. This is hefty.


 I think extra wood imparts a distinctive colouring to the tone of this vihuela. I've said as much in previous posts about the effect of instrument necks on tone. Some modern players agree with the theory but dislike playing on them. So I built subsequent models with thinner necks.


The decorative tips of the bridges of early instruments are often imaginative and sometimes symbolic.


A bull's horns are represented by the up-turned bridge tips and undulating folds that encompass them.


This is the inset rose from my first Chambure vihuela copy. It is cut from  two layers of pear wood and and a third of coloured art paper.


If you are interested in building a model of this  instrument or appreciate drawings of important musical instrument a large single sheet technical drawing of the vihuela, E.0748, is available from the museum. Also included is this booklet of technical notes. Contact:
musée de la musique
                  *****

All photos by the author


Thursday, March 19, 2015

Chambure Vihuela Revisited


My Original Model, No. 575, 2001
Throughout my career I built the occasional vihuela at the request of friends or clients. As there were no suitable surviving instruments to model the vihuelas I built were based on iconography. Although I achieved some nice results, I felt  they strayed a little too far from historical plausibility.

The emergence of an historical vihuela from the storage vaults of the old Paris conservatory in the late 1990s offered an exciting and fascinating new model. The vihuela, now number E. 0748 at the Musee de la musique, is rightfully known as the Chambure vihuela after Mme de Chambure, the instrument's former owner.

I was fortunate to have an appointment at the museum when the vihuela was being restored. It lay open, the soundboard removed, on an examination table. I was able to see - admire actually - all the construction features, inside and out. I was struck by a sort of duality of the features. They were both complicated and simple; functional and elegant; rough and polished. This was a remarkable instrument and I was  deeply affected by it. I spent the next two years building models, making presentations and  writing an article about it.

Although I eventually stopped building vihuelas I kept two examples of my work from this time for my own collection. One is my original prototype , very simple, built with common but good quality wood, like the original 16th century instrument. The second is a version inspired by the face plate of Luis de Milano's El Maestro.
No. 580, 2002

Recently I had a serious offer and I decided to part with my El Maestro. The vihuela is 13 years old. I had varnished it originally with a rubbed varnish mixture of spar varnish/linseed oil/solvent. This had protected the wood but the finish had dulled over the years and the instrument  had received some dings. I decided to clean up the surface blemishes and to refinish it with French polish. Working on a vihuela again brought back the same sense of admiration and awe that I had experienced during the earlier time. I got into my filing cabinet and retrieved the 35mm photos that I took of the construction of my first Chambure vihuela. I want to share them with you.


The most striking feature of the instrument was its simplicity. I thought the proper way to express this attribute was by simplifying the construction process. That meant building without a mould and as few mechanical aids as possible.

I made the soundboard thinning it to the same thickness as the original in Paris, cut the sound hole, made the tail block and carved and shaped the one piece neck. These parts were all laid out in a straight line on a cutting mat. The tail block was tack glued in place as was the neck.


The one-piece neck is essential to building without a mould.  The handle of the neck and the interior block are carved from one piece of wood. The back is  glued to the foot -- its upside down in the photo. The soundboard  rides onto the neck and is glued to its surface . And the side ribs are let into slots cut into the sides of the heel.
The Paris vihuela is the earliest surviving example of what has become known as the Spanish Neck construction. If the procedure is done correctly the tension in the instrument is focussed at this point, relieving stress from the rest of the instrument and allowing every part to function  in unity. All positive tonal characteristics are amplified as a result.


The soundboard was made slightly over-size  so when I traced the outline of the vihuela body a little margin was left. I bent the side ribs and firmly glued them to the tail block and into the slots in the neck's heel. But I only tack-glued them to the soundboard.


I levelled the side ribs and took a deep breath before starting the daunting task of assembling the deeply fluted back.


The back is constructed with five identical fluted ribs and two side wings that are mirror images. All of the ribs are arched length-wise as well as fluted.


Shaping the flute is really no different than steam bending a neck veneer for a lute. So using the same principle I made a negative form from ash wood of the vihuela's central rib because that rib is the longest. I chose ash for the form because I knew it would remain stable when subjected to prolonged heating.  I thought pre-heating the form would make it easier to mould the rib material and the residual heat in the form would allow the rib to dry slowly and more uniformly resulting in a more stable flute. I warmed the form in my kitchen oven for two hours at 250 degrees F ensuring that it was heated throughout. Once the form was ready I steamed a prepared back rib over the spout of a tea kittle and wearing heavy deer skin gloves I moulded the rib stock over the form and secured it with elastic banding. It was then set it aside to cool and dry over-night.


The form was made exactly to the proper width of a finished rib so I could trim the slight over-hang of the prepared stock flush to the form and have a back rib ready to glue in place. I could also use the ash form to help contour the notches in the ribs that support the ends of the fluted ribs.


Assembling the back was like building a lute bowl. Starting with the centre rib each succeeding rib was laid up against its neighbor. It was remarkable how easily each rib snuggled precisely into place.


The two wing ribs were prepared in the same manner using an appropriately shaped ash wood form.


Once the back was assembled I removed the soundboard which came off easily because it was only tack-glued in place. I papered over the glue joints and positioned the 4 pillars that support the ends of the two harmonic bars. Interestingly, this feature became and remains the standard in the construction of Spanish guitars to this day. The pillars are about twice as wide at the point where they contact an harmonic bar as they need to be. This extra width allows some "play" in fitting the soundboard, ensuring that each bar is properly supported.

The body was now complete and I had finished what I had thought would be a difficult process. The work had gone smoothly but the credit for that belongs to the ingenuity of the anonymous vihuela maker who designed and built this intuitive and remarkable instrument.

There is more to be described about my two vihuela models but this post has gotten long enough. I'll cover those items in a future post.