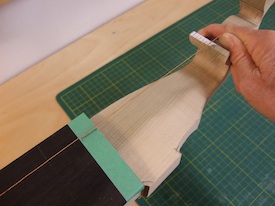
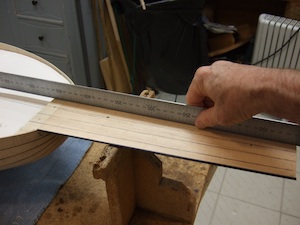
Previously, when I made triple nut or swan-neck extensions I used a drill press to remove the excess material and then trued the edges and finished the bottom of the excavation with various chisels. Using the drill press for this process makes me nervous. There is the risk of something slipping and ruining my work and it is generally rough work. So this time I decided to do the entire procedure with chisels - one pegbox per day.
I laid out the boundaries of the smallest cavity (you can see several reference lines) and proceeded to partially excavate a small area with various sizes of chisels. Working like this it becomes obvious how to proceed: truing the edges, then deepening the recess, lengthening it a little and then truing again. I found that the work went quickly and neatly.
Of course, this pegbox was the easiest to do. The middle one requires working under the over-hanging nut support. It is made even more difficult because of the limited space for the six peg holes. The last hole for this rank of strings goes far under the over-hang. Here I am using a "skew" chisel to reach the rear of the recess. Note that I am using a waste portion of the original block as a support. Later, this cut-off along with the others will go in the wood stove this winter.
The first pegbox is a little more complicated in that the treble side has several crooks and curves. I lay these out with generous side cheeks which provide strength and stability. Here I am using a front bent chisel to clear the bottom of the recess. I like to leave more than six millimeters of wood thickness in the bottom of this pegbox for strength. I can achieve this even with the relatively low profile of the pegbox by drilling the holes off center and closer to the top edge by a millimeter and a half. Although I found this work pleasing I still felt I needed some aesthetic gratification. I reamed out several peg holes in the finished pegboxes and inserted temporary pegs to see what the final product would look like.
One feature of this design puts the chantrelle in its own recess. This allows the string a straight run over the nut and into the pegbox cheek at an angle that is far less likely to break it. I drill a pilot hole and enlarge and square the recess with small chisels.
This photo also demonstrates how I clamp any of the types of extensions that I make. I tie two wound bass string of the same size in the appropriate holes in the bridge at one end and on pegs in the pegbox. When these strings are brought up to equal tension the extension is pulled back into the neck joint in proper alignment. Two spring clamps hold it firmly against the bottom of the neck.
The back of the extension that over-laps the neck can then be contoured. Visible in this photo is the skewed angle of the rear of the extension. I leave a little more room on the treble side for the player's thumb to comfortably grasp the first fret position.
Next time I'll show photos of the finished lute and describe a surprising historical varnishing process.
This is a blog about building lutes and historical guitars. It is not only a "how to" blog but also a "why" blog. I have always enjoyed thinking about lutes and guitars as much as building them. I also enjoy the music associated with the instruments I build as well as the inspiration I gain from visits to museums to examine them.
Wednesday, September 5, 2012
Monday, August 27, 2012
Making the Baroque Lute Triple Nut Extension
![]() |
The triple nut extension that Andreas Jauch made for this lute (Copenhagen, No. 104A) is designed in such a way that the length of the strings, stopped by the second and third nuts, are in whole number ratios relative to each other and to the fretted length.The original string lengths are: 105, 93 and 78 cm. Thus, 105/93 is 9:8 which is a major second and 105/78 is 4:3 which is a perfect fourth. These ratios are important for preserving harmonic relationships across the lute's compass. I wanted to retain them in my lute.
![]() |
| Earlier model is on top |
I hadn't build this particular lute and extension before
so I needed to design and make a template. I used a previous
model as a guide. Since the proportions between nuts were different you can see that I shank the length of the first and second pegboxes. Since I was adding a fourteenth course I lengthened the third pegbox. Also, I wanted a more delicate look. The top template is 24mm thick at the first peg position. I reduced that to 20mm and diminished the remainder of the design accordingly. Because of the nature of the forces with off-set strings it is very difficult to anticipate how much the structure will bow up, twist side-ways, or otherwise move unpredictably, so there is always a concern for strength.
some features of the design and second by using a freer approach to executing the design rather than following a template. I squared a block of poplar, laid out the template, band sawed the bottom surface. Here I am proceeding to finish the cuts on the top surface by using a drill press to fashion the tight contours in the design.
At this point I put the extension aside and cut the recess in the lute neck where the extension will sit finishing it with chisel and files. The third object on the bench is a strip of thin metal that I use as a guard to protect the adjacent wood surface when I'm working into a corner with the file.
Once I'm finished with the joint I can check the alignment by clamping the extension to the neck. The intermediate nut carries the 9th - 11th courses and the third nut carries the 12th - 14th. I mark these string positions on the top of the nut arms. This procedure determines the way the two pegboxes are off-set to the bass side. Now I can layout the side contours.
I saved the waste portions of the original block of poplar and glued the whole assembly together with pieces of thin cardboard sandwiched in between the parts. Referring to photos of historical triple nut extensions I drew the side contours on the top of the re-assembled block allowing for some adjustment in the final shaping. Then I band-sawed the design. I didn't have a photo of this stage but the following photo and description explains the same process.
Here I have tack glued the extension in place and am carefully checking the alignment again. The position of the 9th course as it crosses the nut is marked on the piece of painter's tape so I can run a string from the 9th course on the bridge over the position mark and check the alignment on the second nut. The part of the nut support to the treble side of the string is waste and will be cut off. The treatment of that is one of the design elements that has to be worked out. As I mentioned earlier, I had decided not to work from a predetermined plan but to allow the design to evolve.
This photo, while showing the alignment of the 11th course as it clears the intermediate nut, also shows the initial shape of the treble side of the extension. I have yet to cut the final contours.
The first thing to notice in this photo is the way I off-set the intermediate and third pegboxes. The bass side of the first pegbox is straight. The second is off-set with an edge that defines a "S" curve with the nut support. The second pegbox snakes toward the bass and terminates with the "S" curve of the third pegbox.
To drill the peg holes I set the extension in a machinist's vise and supported the free end. The holes in the first pegbox are drilled perpendicular to the center line of the neck.
The second pegbox leans toward the bass and the third pegbox slants back toward the treble, creating a subtle crook. The holes in the third pegbox are drilled close to the perpendicular of its center line and the holes in the intermediate pegbox nearly follow the crook.
I drill from both sides of the extension with the intention that the holes will line-up. That is problematic, so I use a small drill bit. This allows some adjustment when enlarging the hole to peg size later on. I took great care and fortunately all of the holes lined up.
I made several attempts to fashion an agreeable contour on the treble side. The weak spot on the triple nut extension is at the end of the first pegbox where it narrows significantly and the torque from the intermediate and third nuts exert their force. When I initially band-sawed the side contours I left extra wood planning that I would need to experiment with the design. What I settled on is seen here. The end of the first pegbox is rounded smoothly with the side of the nut support tapering away gently. The pegbox ends in a slight crease, but then broadens out a little to begin the intermediate pegbox. This arrangement leaves a fair amount of wood and thereby avoids a design weakness. The intermediate pegbox thins only a little in width and depth and rounds quickly onto the flat surface of the third pegbox.
Next time I'll excavate the peg recesses, finish the area around the joint with the neck and glue it on.
This photo, while showing the alignment of the 11th course as it clears the intermediate nut, also shows the initial shape of the treble side of the extension. I have yet to cut the final contours.
The first thing to notice in this photo is the way I off-set the intermediate and third pegboxes. The bass side of the first pegbox is straight. The second is off-set with an edge that defines a "S" curve with the nut support. The second pegbox snakes toward the bass and terminates with the "S" curve of the third pegbox.
To drill the peg holes I set the extension in a machinist's vise and supported the free end. The holes in the first pegbox are drilled perpendicular to the center line of the neck.
The second pegbox leans toward the bass and the third pegbox slants back toward the treble, creating a subtle crook. The holes in the third pegbox are drilled close to the perpendicular of its center line and the holes in the intermediate pegbox nearly follow the crook.
I drill from both sides of the extension with the intention that the holes will line-up. That is problematic, so I use a small drill bit. This allows some adjustment when enlarging the hole to peg size later on. I took great care and fortunately all of the holes lined up.
Next time I'll excavate the peg recesses, finish the area around the joint with the neck and glue it on.
Saturday, August 11, 2012
The Soundboard Barring for the Jauch Baroque Lute
In my last post I cambered the neck and glued on the 2mm thick ebony fingerboard. Now it was time move on to barring and fitting the soundboard. This is one of my favorite and most satisfying lute making activities. I spend a lot of time comparing barring patterns used by historical makers, reviewing what I have done before on similar lutes and thinking about the approach I want to take.
Ivo Magherini, who provided me with the drawing and photos for this lute, was also able to get a glimpse of the interior.
Even though the original lute is intact there are several large cracks through which "it was possible to assess part of the barring layout," Ivo reported.
The first bar is 32mm in front of the bridge (measurements are taken from the middle of each bar). The second bar is 76mm from the first. The third bar is 59mm from the second. The fourth bar is 50mm from the third. This bar is the center of the rose. There is one bar that runs from the curved edge of the belly to under the treble tip of the bridge. There was no trace of a J bar (bass bar) It was not possible to determine what the arrangement of bars was like in the area above the rose. For reference, the front of the bridge is 101mm from the rear of the belly.
I think of the three bars between the bridge and the rose as primary bars. Their placement and size control the strength and evenness of the tone. At 32 mm from the bridge the position of the first bar provides strength. The location of the second bar, unevenly spaced closer to the third than the first deserves comment. Friedemann Hellwig in his important article, On the Construction of the Lute Belly, Galpin Society Journal XXI, 1968, describes the division of the lute belly by 16th and 17th century lute makers into equal parts with the bridge and bars placed proportionally. I followed this method when I first started building but I had problems with overly assertive notes or weak ones. Eventually I attributed this to equal spacing and when I moved the second bar the tone evened out. Jauch placed his second bar more unequally than I would but I decided to follow his example - after all, these guys knew what they were doing. The barring I used to support the triple rose area is not the only solution but one that is found in many lutes. Since my client for this lute plays with light tension strings I decided to use only two bars between top of the rose and the front block rather than three. Also, I always make this area of the soundboard thicker than elsewhere, around 2.0 - 2.1 mm. So I didn't think it needed extra support.
The barring pattern in the area around the bridge that I used is typical of Jauch's era. The size and exact placement of the individual bars is based on my experience. I alter dimensions and placement to fit the requirements of individual clients. I drew the diagram from the finished belly. I have made one for each of my lutes dating back to the mid 80s. The belly thickness is listed in 1/1000 inches. So "74", for example, is 74/1000 or about 1.9 mm. I'll continue with a short explanation to help you decipher the diagram. The first finger bar on the treble side (right) measures 7.5mm high at the hash mark and tapers in both directions to 0.0 under the tip of the bridge and 2.0mm where it glues to the rear of the bowl. It is 3.9mm wide. The first harmonic bar is 4.2mm wide and 15.8 high. The hash mark near the end denotes the beginning of the scallop. The bar as it glues to the rib is 6 mm high.
Throughout the process of shaping the bars - rounding the tops and cutting the scallops - I listen to tap tones. Not necessarily the pitch but the clarity and strength. It changes as the bars are shaped, changes again when the bridge is glued on and then again when the belly is glued to the bowl. I make adjustments to maintain the strength and clarity. I always string up my lutes before varnishing to see what how it turned out. More than once I've opened a lute and moved a bar or added a "sweetener".
To finish this post here is a photo of the bridge. Because there is a fourteenth course the bridge is a little wider. To compensate, I shortened the bridge tip.
Before gluing the belly on the bowl I was careful to make sure the bar ends fit snuggly against the edge ribs and by stretching a piece of sewing thread from the bridge to the nut I assured myself that the neck was in proper alignment.
Next time I'll describe making the triple nut extension.
Ivo Magherini, who provided me with the drawing and photos for this lute, was also able to get a glimpse of the interior.
![]() |
| Ivo Magherini photo |
The first bar is 32mm in front of the bridge (measurements are taken from the middle of each bar). The second bar is 76mm from the first. The third bar is 59mm from the second. The fourth bar is 50mm from the third. This bar is the center of the rose. There is one bar that runs from the curved edge of the belly to under the treble tip of the bridge. There was no trace of a J bar (bass bar) It was not possible to determine what the arrangement of bars was like in the area above the rose. For reference, the front of the bridge is 101mm from the rear of the belly.
I think of the three bars between the bridge and the rose as primary bars. Their placement and size control the strength and evenness of the tone. At 32 mm from the bridge the position of the first bar provides strength. The location of the second bar, unevenly spaced closer to the third than the first deserves comment. Friedemann Hellwig in his important article, On the Construction of the Lute Belly, Galpin Society Journal XXI, 1968, describes the division of the lute belly by 16th and 17th century lute makers into equal parts with the bridge and bars placed proportionally. I followed this method when I first started building but I had problems with overly assertive notes or weak ones. Eventually I attributed this to equal spacing and when I moved the second bar the tone evened out. Jauch placed his second bar more unequally than I would but I decided to follow his example - after all, these guys knew what they were doing. The barring I used to support the triple rose area is not the only solution but one that is found in many lutes. Since my client for this lute plays with light tension strings I decided to use only two bars between top of the rose and the front block rather than three. Also, I always make this area of the soundboard thicker than elsewhere, around 2.0 - 2.1 mm. So I didn't think it needed extra support.
Throughout the process of shaping the bars - rounding the tops and cutting the scallops - I listen to tap tones. Not necessarily the pitch but the clarity and strength. It changes as the bars are shaped, changes again when the bridge is glued on and then again when the belly is glued to the bowl. I make adjustments to maintain the strength and clarity. I always string up my lutes before varnishing to see what how it turned out. More than once I've opened a lute and moved a bar or added a "sweetener".
To finish this post here is a photo of the bridge. Because there is a fourteenth course the bridge is a little wider. To compensate, I shortened the bridge tip.
Before gluing the belly on the bowl I was careful to make sure the bar ends fit snuggly against the edge ribs and by stretching a piece of sewing thread from the bridge to the nut I assured myself that the neck was in proper alignment.
Next time I'll describe making the triple nut extension.
Wednesday, July 25, 2012
The Baroque Lute Fingerboard
This is the nut end of the Schelle fingerboard. The curvature of both the nut and the ivory inlaid panel show the degree and evenness of the camber. I measured the height to be well over 4mm. The fingerboard is 78mm wide at this point.
The height of camber at the neck joint of MI 46 is over 2mm and exhibits the same evenness as at the nut. The neck width is 105mm.
These measurements are estimates because the rounded edges of the fingerboard do not allow exactness.
Here's a sample of two necks. The one underneath is the neck of the Jauch that I am building. I have cut out the recess for the triple nut extension and except for final smoothing of the fingerboard surface and rounding of the bass edge, it is finished. The one on top is from one of my theorbos. Unfortunately, the lute was left leaning upright in a corner and fell over, splitting the area of the neck at the back of the recess for the extension. Re-gluing this type of damage always leaves the joint weak, so I replaced the neck, but saved the artifact.
When I glue the neck in place its top surface is on the same plane as the top surface of the side ribs. In order to build a camber into the neck some makers glue a thin wood slab on top of the neck that is then shaped to the desired camber. But the higher the strings are above the plane of the lute, the more upward pull there is on the neck.
![]() |
| Photo: German National Museum, Nuremberg |
This is a restoration photo of the bare neck of the Sebastian Schelle, MI 46. The smudges are glue "shadows" of the inlaid ivory design left on the surface after the fingerboard was removed. On the right end of the neck you can see the recess for the nut and the curvature of the camber. In this example Schelle created the camber directly from the core wood rather than from an added slab. The advantage to this method is that those strings that lie farther from the neck center are closer to the plane of the lute. The top string at the nut, for example, actually lies below the plane. The second string may as well. On lutes with 11 courses on the fingerboard several of the lower courses may lie close to or below the plane of the lute. The over-all effect is to lessen the total upward pull on the neck.
The technique for cambering the fingerboard calls for patience and precision. Whatever the height of the camber is at the nut end of the fingerboard the camber must be continued, to some degree of curvature, the length of the neck and across the front block area. Otherwise, the top and bottom strings will lie very close to or on the neck.
I secure the lute in a cradle and work from the front. Using a block plane with a fine setting I start cambering the neck from the nut area down the length of the neck, across the front block and on to the top edge of the side ribs. Progress is slow as I must check frequently for accuracy. Across the neck I use a straight-edge to eye-ball the camber. In the photo, in which I am beginning to glue the fingerboard in place, you can see four pencil lines on the neck wood. These represent the second, fourth, sixth and eighth courses. I use these as guides to determine the levelness along the axis of the neck (see previous photo). When I was confident the camber was accurate I bent a piece of 2mm thick ebony over a hot pipe and glued the fingerboard in three stages as was shown and described in an earlier post.
My clients are not unanimous about the degree of camber and I construct variations. Historical lutes also exhibit a variety of cambers both at the nut and the neck joint.
The degree of camber at the nut on this lute by Thomas Edlinger, No. 497 in Leipzig is very much like the Schelle.
But at the neck joint the camber has flattened, relatively more, than the Schelle and is only a millimeter or so high.
All photos by the author unless otherwise noted.
Saturday, July 14, 2012
The Baroque Lute Neck
I work within defined limits for each feature. The thickness of the finished neck (fingerboard, spruce core and veneer covering) at the first fret is under 19mm. The thickness at the joint to the bowl is under 29mm. These are measurements for large lutes. I think that necks that are thicker will be uncomfortable. If thinner, the structural integrity will be threatened. Naturally this doesn't suit all lutenist. But I have found that compromise can be achieved by thoughtfully shaping the neck's contour.
With the rough neck material tack-glued to the front block and held level by the tabs, I drill a hole through the block and into the neck. Once a screw is inserted I scribe around the joint delineating the contour of the neck. With the contour marked on both ends it is a quick task to remove the excess wood, first with a larger plane and then finishing with a block plane and a thin steel scraper that can flex over the contour or with sandpaper.
I have never found it easy to apply veneer to the back of a lute neck. There are so many steps that are necessary to assure a good result. Perhaps I make it more difficult than it need be. I bandsaw my own veneer from 3 inch wide ebony boards that are sold as fingerboard stock for bass guitars. I finish the rough sawn pieces to a thickness of 1mm or a little less and bend them over a hot pipe using shaped cauls to ease the ebony into the proper curve.
Since the fingerboard stock is narrower than most lute necks it is necessary to use multiple pieces. I glue each on separately. Here the center piece is strapped down with elastic tape while the glue dries.
Removing the glue squeeze-out is done after the glue dries.
I apply a wet strip of cloth to the edge of the veneer and leave it to soften the glue for a few minutes. Then I run a hot knife along the edge. Any dried squeeze-out is liquified and can be wiped off.
The two edge pieces are bent and glued in place in the same way.
There is one last detail. I like the edges of my
necks to have a substantial roundness. This is difficult to do with veneer because there is always the risk of it splitting when it is forced over a rounded edge. I solve the problem by planing the edges of the neck flat and adding strips of ebony. These are then contoured flush with the veneer surface. The strip on the right side is still "as glued" while the one on the left is finished.
When the fingerboard is glued on there is a solid edge of ebony that can be nicely rounded.
Next time I will describe my technique for cambering the fingerboard.
Friday, June 29, 2012
Detailing the Jauch Triple Rose
After repairing one of the two damaged theorbos that I described in my last post I was able to get back to work on the Jauch triple rose. I still had to lay out and cut the decorative border, round the edges of the organic features, vein the geometric elements and cut the center emblem.
I use a template made of card stock marked off in 5 degree intervals around a pair of circles that exactly represent my rose border. It is then a simple task to punch the diagonal lines. Here I am using a 4mm micro-chisel.
Then I cut the relief on each segment. Here I have worked part way around one rose. The tool is a 3mm micro skew chisel. The blade of such a tool is angled at 30-45 degrees. Held at an angle to the face of the belly opposite corners of each segment are removed, thus creating the relief.
The next step is to detail the organic elements by slicing off the top edge of the veins and petals. This gives them a delicacy that contrasts with the geometry of the border and veined members. The center emblem is created by cutting a series of slightly curved, crossing veins.
Cutting one rose is a lot of work. Cutting three is -- well -- three times as much. I'm happy and relieved when I finish.
They are beautiful.
But now I can get started on deciding how I want to bar the instrument. How best to bring out the inherit character of wood and design.
Friday, June 22, 2012
Air Travel = Smashed Lutes
Over the last two months I have had to stop building new instruments because I have been inundated with clients' instruments that have been damaged in airline travel.
These few photos represent only the worst cases - no pun intended. This theorbo was flying across the US. Although the case is doubled walled fibre-glass the impact shattered the front end of the lid (not pictured), broke the hinge and split the case walls on both side. Expectedly, the theorbo extension split as well.
It could have been worst. The extension popped cleanly out of its lap joint with the neck. I don't use a nail, screw or dowel to help secure this just for this type of accident. The neck joint to the body also popped, but cleanly. The bass side of the soundboard including the tongue, but not the fingerboard points, also popped but without cracking a rib or the soundboard.
The second theorbo was in the same type of case on a trans-atlantic flight and received a blow on the lower bass side of the case ripping off the clasp and compressing the case end. The soundboard cracked in several places, the underlying belly wood that remains when the half binding is assembled split from the rest of the belly for the entire length of the bass side.
These two lutes were the most appalling examples because they were in "flight cases". Other lutes that have been sent to me recently have been lucky and suffered only loose bars and small cracks.
It is disheartening for both my clients and myself to see our lutes treated this way. Airlines banned instruments from their cabins and put us at the mercy of baggage handlers and their machinery. Recently, the US mandated that airlines had to allow smaller instruments in the overhead compartments or allow musicians to purchase seats for their instruments. Canadian airlines are following suit. Airlines in the EU are inconsistent or uncooperative. The International Federation of Musicians has launched a petition "demanding European legislation be updated to ensure fair treatment for performers travelling on planes with their instruments." This links to the petition. It is in all of our interest. http://www.thestage.co.uk/news/newsstory.php/36533/musicians-want-global-action-over-airlines
Subscribe to:
Posts (Atom)