Wednesday, July 25, 2012

The Baroque Lute Fingerboard

The hands-on technique of cambering the neck of baroque lutes doesn't lend itself to a photographic explanation. I only took a few photos while I was cambering the neck for the Jauch because it was difficult to see the details. But on one of my research trips I took photos of the fingerboard camber on two well known lutes:  Thomas Edlinger, No. 497, in Leipzig and the swan-neck lute by Sebastian Schelle, MI 46 in Nuremberg.


This is the nut end of the Schelle fingerboard. The curvature of both the nut and the ivory inlaid panel show the degree and evenness of the camber. I measured the height to be well over 4mm. The fingerboard is 78mm wide at this point.


The height of camber at the neck joint of MI 46 is over 2mm and exhibits the same evenness as at the nut. The neck width is 105mm.

These measurements are estimates because the rounded edges of the fingerboard do not allow exactness.


Here's a sample of two necks. The one underneath is the neck of the Jauch that I am building. I have cut out the recess for the triple nut extension and except for final smoothing of the fingerboard surface and rounding of the bass edge, it is finished. The one on top is from one of my theorbos. Unfortunately, the lute was left leaning upright in a corner and fell over, splitting the area of the neck at the back of the recess for the extension. Re-gluing this type of damage always leaves the joint weak, so I replaced the neck, but saved the artifact.
 I put a fairly high camber on the theorbo neck. This was requested by the client. But you will notice that it is unbalanced. The camber on the bass side flattens out a little which leaves the bass side of the neck thicker. This is intentional. There is no need to continue the same degree of camber on the bass side because the fretted strings stop 2/3 of the way across the neck as denoted by the recess for the nut. The extra wood on the bass side serves to strengthen the neck.
When I glue the neck in place its top surface is on the same plane as the top surface of the side ribs. In order to build a camber into the neck some makers glue a thin wood slab on top of the neck that is then shaped to the desired camber. But the higher the strings are above the plane of the lute, the more upward pull there is on the neck.


Photo: German National Museum, Nuremberg 


This is a restoration photo of the bare neck of the Sebastian Schelle, MI 46. The smudges are glue "shadows" of the inlaid ivory design left on the surface after the fingerboard was removed. On the right end of the neck you can see the recess for the nut and the curvature of the camber. In this example Schelle created the camber directly from the core wood rather than from an added slab. The advantage to this method is that those strings that lie farther from the neck center are closer to the plane of the lute. The top string at the nut, for example, actually lies below the plane. The second string may as well. On lutes with 11 courses on the fingerboard several of the lower courses may lie close to or below the plane of the lute. The over-all effect is to lessen the total upward pull on the neck.

The technique for cambering the fingerboard calls for patience and precision. Whatever the height of the camber is at the nut end of the fingerboard the camber must be continued, to some degree of curvature, the length of the neck and across the front block area. Otherwise, the top and bottom strings will lie very close to or on the neck.

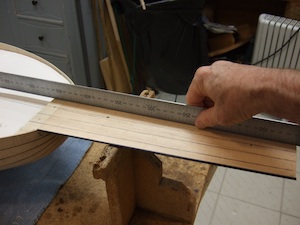
I secure the lute in a cradle and work from the front. Using a block plane with a fine setting I start cambering the neck from the nut area down the length of the neck, across the front block and on to the top edge of the side ribs. Progress is slow as I must check frequently for accuracy. Across the neck I use a straight-edge to eye-ball the camber. In the photo, in which I am beginning to glue the fingerboard in place, you can see four pencil lines on the neck wood. These represent the second, fourth, sixth and eighth courses. I use these as guides to determine the levelness along the axis of the neck (see previous photo). When I was confident the camber was accurate I bent a piece of 2mm thick ebony over a hot pipe and glued the fingerboard in three stages as was shown and described in an earlier post.

My clients are not unanimous about the degree of camber and I construct variations.  Historical lutes also exhibit a variety of cambers both at the nut and the neck joint.


The degree of camber at the nut on this lute by Thomas Edlinger, No. 497 in Leipzig is very much like the Schelle.


 But at the neck joint the camber has flattened, relatively more, than the Schelle and is only a millimeter or so high.


All photos by the author unless otherwise noted.


Saturday, July 14, 2012

The Baroque Lute Neck

The design of the baroque lute neck is anything but simple. The fingerboard is cambered from side to side for ease of barring chords. It is thin in the area closest to the nut becoming gradually thicker toward the joint with the bowl. The back of the neck is shaped for comfort. Those are fundamental attributes. Added to this are the preferences of individual lutenists and luthiers.

I work within defined limits for each feature. The thickness of the finished neck (fingerboard, spruce core and  veneer covering) at the first fret is under 19mm. The thickness at the joint to the bowl is under 29mm. These are measurements for large lutes. I think that necks that are thicker will be uncomfortable. If thinner, the structural integrity will be threatened. Naturally this doesn't suit all lutenist. But I have found that  compromise can be achieved by thoughtfully shaping the neck's contour.

I start with a plank of aircraft grade sitka spruce  that is straight and quartered with about 20-24 growth lines per inch. Usually I cut narrower pieces from several planks and re-glue them into a neck-size piece. This relieves any tension that might be in the wood. Having already beveled the front of the lute bowl to the proper width and angle, first with a back saw and finished with a block plane, I then cut the matching angle on the neck wood  using the same tools. I glue and screw tabs to the top of the neck block to help hold the neck in position while it is being shaped and adjusted.


With the rough neck material tack-glued to the front block and held level by the tabs, I drill a hole through the block and into the neck.  Once a screw is inserted I scribe around the joint delineating the contour of the neck. With the contour marked on both ends it is a quick task to remove the excess wood, first with a larger plane and then finishing with a block plane and a thin steel scraper that can flex over the contour or with sandpaper. 


I have never found it easy to apply veneer to the back of a lute neck. There are so many steps that are necessary to assure a good result. Perhaps I make it more difficult than it need be. I bandsaw my own veneer from 3 inch wide ebony boards that are sold as fingerboard stock for bass guitars. I finish the rough sawn pieces to a thickness of 1mm or a little less and bend them over a hot pipe using shaped cauls to ease the ebony into the proper curve.


Since the fingerboard stock is narrower than most lute necks it is necessary to use multiple pieces. I glue each on separately. Here the center piece is strapped down with elastic tape while the glue dries.


Removing the glue squeeze-out is done after the glue dries.
I apply a wet strip of cloth to the edge of the veneer and leave it to soften the glue for a few minutes. Then I run a hot knife along the edge. Any dried squeeze-out is liquified and can be wiped off.

The two edge pieces are bent and glued in place in the same way.


There is one last detail. I like the edges of my
necks to have a substantial roundness.  This is difficult to do with veneer because there is always the risk of it splitting when it is forced over a rounded edge. I solve the problem by planing the edges of the neck flat and adding strips of ebony. These are then contoured flush with the veneer surface. The strip on the right side is still "as glued" while the one on the left is finished.


When the fingerboard is glued on there is a solid edge of ebony that can be nicely rounded.


Next time I will describe my technique for cambering the fingerboard.


Friday, June 29, 2012

Detailing the Jauch Triple Rose


After repairing one of the two damaged theorbos that I described in my last post I was able to get back to work on the Jauch triple rose. I still had to lay out and cut the decorative border, round the edges of the organic features, vein the geometric elements and cut the center emblem.


There are different styles and treatments of chip borders. The one that I am demonstrating can be subtly changed by varying the individual elements: the width of the ring and/or the number or angle of the individual pieces. Since the top rose is smaller than the other two I made its border slightly narrower. I work this out by what looks good to me -- a fraction less than 3.5mm for the small rose and a fraction more for the larger two.

I use a template made of card stock marked off in 5 degree intervals around a pair of circles that exactly represent my rose border. It is then a simple task to punch the diagonal lines. Here I am using a 4mm micro-chisel.


Then I cut the relief on each segment. Here I have worked part way around one rose. The tool is a 3mm micro skew chisel. The blade of such a tool is angled at 30-45 degrees. Held at an angle to the face of the belly opposite corners of each segment are removed, thus creating the relief.


I think that veining, creating a "V" groove in the geometric elements of the rose, is the most difficult. First it is necessary to scribe two straight, parallel lines -- not to close to the edge of the design but not too close together either. And deep enough to leave a nice impression. Then, holding the knife at an angle, slice off a thread of wood the full length of the element as demonstrated. Repeated attempts will result in a frayed, untidy "V". Since the design runs at various angles to the grain of the belly some cuts are easier than others. Across the grain calls for a delicate touch as the wood is very fragile. With the grain requires a firm, bold hand as the knife may catch on the grain. At an angle to the grain the knife slips along easily and satisfyingly.


The next step is to detail the organic elements by slicing off the top edge of the veins and petals. This gives them a delicacy that contrasts with the geometry of the border and veined members. The center emblem is created by cutting a series of slightly curved, crossing veins.


Cutting one rose is a lot of work. Cutting three is -- well -- three times as much. I'm happy and relieved when I finish.
They are beautiful.

But now I can get started on deciding how I want to bar the instrument. How best to bring out the inherit character of wood and design.


Friday, June 22, 2012

Air Travel = Smashed Lutes


Over the last two months I have had to stop building new instruments because I have been inundated with clients' instruments that have been damaged in airline travel.

These few photos represent only the worst cases - no pun intended. This theorbo was flying across the US. Although the case is doubled walled fibre-glass the impact shattered the front end of the lid (not pictured), broke the hinge and split the case walls on both side. Expectedly, the theorbo extension split as well.


It could have been worst. The extension popped cleanly out of its lap joint with the neck. I don't use a nail, screw or dowel to help secure this just for this type of accident. The neck joint to the body also popped, but cleanly. The bass side of the soundboard including the tongue, but not the fingerboard points, also popped but without cracking a rib or the soundboard.


The second theorbo was in the same type of case on a trans-atlantic flight and received a blow on the lower bass side of the case ripping off the clasp and compressing the case end.  The soundboard cracked in several places, the underlying belly wood that remains when the half binding is assembled split from the rest of the belly for the entire length of the bass side.


And, the inside clasp split completely in two! Fortunately, no ribs cracked and the rib joints held.

These two lutes were the most appalling examples because they were in "flight cases". Other lutes that have been sent to me recently have been lucky and suffered only loose bars and small cracks.

It is disheartening for both my clients and myself to see our lutes treated this way. Airlines banned instruments from their cabins and put us at the mercy of baggage handlers and their machinery. Recently, the US mandated that airlines had to allow smaller instruments in the overhead compartments or allow musicians to purchase seats for their instruments. Canadian airlines are following suit. Airlines in the EU are inconsistent or uncooperative. The International Federation of Musicians has launched a petition "demanding European legislation be updated to ensure fair treatment for performers travelling on planes with their instruments."   This links to the petition. It is in all of our interest. http://www.thestage.co.uk/news/newsstory.php/36533/musicians-want-global-action-over-airlines

Friday, June 8, 2012

Carving a Jauch Triple Rose

The Andreas Jauch lute in Copenhagen that I am using as a model has a single rose. However, my client is partial to triple roses for large lutes and I agree with him. I don't necessarily copy the rose pattern that is on the original of the lute that I am modelling and I seldom change the design from a single to a triple rose. But a few years ago I measured a lute by Johannes Jauck, a relative of Andreas, in Brusssels no.251. This is its rose. I thought Johannes would approve of the switch.


I recognized that the design was taken from a rose pattern that I had in my collection. I selected the portion that I needed, whited-out the bit that wasn't necessary and drew in the continuation of the little part that I did need. I then photo-copied it to the size I wanted.


I had thinned out the soundboard to 2.0mm over its entire surface. In this photo I have marked off the rose area and I am thinning it down to 1.0mm right in the centre of the triangle that the three roses form.  I allow the area to become gradually thicker as it runs toward the edge: 1.3mm at the edge of the rose triangle and 1.6mm or so at the edge of the belly in this location.


I like to layout the ring border of the rose and cut it before I glue on the rose patterns. I have found that the paper patterns distort a little when the glue dries and this causes problems with centering the rings. The circle cutter is really meant for paper and is not substantial enough to adequately cut into spruce so I use it to score a line that I then deepen with a knife. The little black blocks are thin pieces of ebony tack-glued to the soundboard. I have drilled a very small hole in them, not all the way through, but just enough to secure the point of the tool.  They come off easily with a hot knife when I have finished with them. I spaced the three roses in the same manner as the Brussels Jauck but made them a little larger to correspond to the larger size of the Copenhagen lute and placed them in the same location.

I scored all of the lines of the rose pattern with a small instrument maker's knife and then, working section by section, removed the waste portions. Rather than cutting all the way through the soundboard I used two micro chisels that I had re-shaped to make them suitable for rose carving. One 17th century inventory of a lute maker's shop listed twenty-odd small chisels. Presumably for carving roses.


The chisel on the right is unaltered. The blade is 1.5mm wide with a 30 degree bevel. Opposite it is the same chisel reshaped so that the bevel is less than 10 degrees. One millimetre up from the tip the blade is only .25mm thick. The thinner blade displaces less fragile soundboard wood as it is plunged into the cut. Below it is a reshaped chisel that is also ground narrower to 1.1mm wide. By "walking" this chisel around a curved line that has previously been scored it is possible to make a clean cut through the wood without leaving  a faceted contour. The straight section are cut through with the 1.5mm chisel. I also have reshaped chisels that are 3 and 4mm that I occasionally use.

When necessary, perhaps while removing a waste portion that is next to a fragile rose element, I will bevel the edge of the waste. This provides more room and less resistance to the chisel as it separates the waste from the rose element.


The rose patterns and backing are glued on with fish glue.  I like this glue for this type of operation because I think it causes the paper to shrink less. I use a thicker mixture for the backing and a thinner one for the patterns. Since the rose patterns are on the face I want them to come off easily and cleanly. Sometimes they come off unexpectedly while I'm carving. In that case I carry on if possible but otherwise I stop, glue the offending part back in place and start cutting elsewhere. I remove the paper by wetting a small section lightly with a damp cloth for a few seconds and then touching it with a warm iron also for a few seconds. This releases the glue bond. I then loosen an edge with a knife and finish removing the section of paper with tweezers.

 There is still a lot of work to do. The geometric part of the rose design has a double vein cut into it, the vines need to be contoured and the border needs to be finished. I will do all of that next time.


Sunday, May 27, 2012

Assembling the Jauch Lute Bowl

At the end of my last post I had started to assemble the bowl. I made good progress and have finished. With a new mould like this one I never know how difficult it is going to be to assemble the ribs. Each lute is different although there are similarities within in each style. This lute proved to be no different.

The three centre ribs went on easily. I was careful to trim them to the required widths. I added the ebony spacer to each rib before I glued the rib in place. Had this been a solid mould I would have glued the spacers at the same time as I glued the rib to its neighbour. But with an open mould there is always the danger that the spacer will drop a little below the surface of the two ribs. This method is slower but more accurate.


NOTE: I used my usual method of shaping ribs on a long plane mounted upside down which must be nearly universal for lute makers. You can see this technique in my Post Archive from September 28, 2011.


After the first three ribs things became a little more challenging. Since there is some flattening in the design of the bowl and particularly because the bowl becomes relatively deeper around the front block the ribs develop an odd shape that is difficult to make. Here is a series of photos of the profile in paper of the 5th rib on the treble side counting from the edge. The top edge has been shaped to fit to the previous rib and the bottom edge has been shaped to fit within the rib lines of the mould.


The straight line is added for reference. It is not a centre line. You can see the difference develop on the right side of the photo.  The bottom edge has a smooth curve but the top edge has gone flat.


This is the middle third of the rib. The bottom edge continues its smooth arc while the top edge has actually gone negative. That is, it has become concave. The deepest and widest point of the bowl is denoted with an arrow on the right of the photo.


 The two sides of the rear of the rib appear more conventional, but interestingly, it is the top that has a tighter arc. All of these features are a result of the flattening. With bowls that have a more pronounced flattening the rib shape is more exaggerated. The negative aspect is greater and the arc of the bottom edge of the rib at the rear becomes straighter and in extreme flattening, reverses. Crazy!


All in all, I was pleased with the way the new mould worked out. There were some problems though. I hadn't gotten several facets flat so the rib sat too high. That was easily remedied. At several other places it was obvious that I had filed the facet too low and the rib wouldn't make contact with the mould. My temporary fix for this problem is to insert a small piece of card stock wrapped in clear plastic tape. This provides a surface for the rib to sit on. Before I assemble another bowl on this mould I can make a permanent fix if I choose.


The rear area worked out really well. The rib ends came nicely together without problems and they maintained a uniformity of widths.

Once the bowl was assembled I cleaned it up to a respectable finish. Usually, I like to apply the apron or at this time. But I didn't build that capability into the mould. I had decided to follow another sequence because of what I have been seeing in historical lutes and guitars recently.  The inside clasp in lutes or the end blocks in guitars are often shaped to provide a good gluing surface for the belly but are otherwise reduced in size and mass. Also, I had seen one instance where the bowl apparently was papered before the inside clasp was applied. So I decided to paper the bowl, apply the clasp and then glue on the apron in that order. I use 90 lb water colour paper.  As the glue  and paper dry it creates  tension laterally across each rib and it was that effect that I wanted to concentrate in the rear area of the bowl. It seems to me that delicate instruments require extraordinary treatment of seemingly insignificant features.


I wrapped the outer surface of the bowl in plastic tape in order to protect it and made a wooden form that fit the contour of the rear edge of the bowl. Clamped in place, it and the plastic tape secure the form of the bowl while I apply the paper and the clasp. This photo was taken after I glued the clasp in place. Naturally I used more clamps. The clasp is spruce 6mm thick tapering along the top surface to 1.5mm at the ends. Before I glue the belly in place I will taper it in the other direction as well down to 1.5mm along the bottom edge.


To apply the apron I use as many clamps as would fit. The little wooden cauls are concave so that the top and bottom edges of the apron are in firmly in contact with the bowl.


I have thinned out the soundboard material and have started to carve a triple rose of the lute. I am using a different cutting method for these roses than I did for the Kaiser theorbo in previous posts. I'll report on this soon.

Thursday, May 17, 2012

Building a Baroque Lute Mould - Continued


At the end of my last post I had finished "roughing out" the mould. There was still lots to do! I had carefully band-sawed the arc of each piece but the angle of the edge of each was only approximate. Remember that the profile of the center axis is not the same as the profile of the face and therefore the angle changes along the course of each arc. I used a rasp initially, followed by files and finally various curved sanding blocks, rocking back and forth, with each tool from one cross-section to the other to smooth the transition. Working thoughtfully, the proper angle was obtained.


Now I had to lay out the position of each rib.  I drew this diagram of the larger cross-section from the lute plan. The width of the 15 ribs average 35 -36 mm wide but there is much variation. The two edge ribs are significantly narrower ( 26 and 29 mm) than the average. Presumably, they were originally as wide or wider than the average. But at some time the bowl was cut down which was and still is the usual method to lower a troublesomely high string height. Several ribs are 34 mm wide while another is only 31. Such variations are commonly found in surviving lutes although our modern aesthetic prefers a more uniform treatment. A millimeter or two here or there is almost unavoidable and I am willing to accept such variation when I am assembling a lute bowl as long as the discrepancy is not obvious.

I did want the two edge ribs to be wider than the others. I measured the distance along the arc of each cross-section and divided by 15. For example, the largest cross-section is 538 mm so each rib would be 35.87 mm wide measured along the curve of the cross-section. I rounded that up to 36 mm and added 4 mm to make the edge rib 40 mm wide at the widest point. Subtracting the width of these two ribs from the total left me with 458 mm for the remaining 13 ribs which works out to 35.23 mm per rib. Remember that this represents the distance along the curved surface of the cross section and therefore must be measured with a flexible ruler. I repeated this process for each cross section. This takes time.

Before I cut the facets for each rib on the cross-sections
I wanted to be sure that the points I marked out created smooth transitions from one section to the next. I used a flexible ruler secured on edge with two clamps. This gave me two free hands to hold the ruler and mark the rib line. In order to create a smooth rib line I found that it was necessary to wander a little from the rib divisions that I had marked off. This is where the variations in rib widths creep in.


Ivo Magherini photo
  I wasn't sure how the rib lines were going to run over the rear section of the mould. If these lines are badly laid out it will be very difficult to assemble the ribs around the rear of the bowl.  On the original each side of the bowl is different! On the treble side the ribs nearly come to a point but on the bass they spread out and would join well below the level of the soundboard. I tried several times but had trouble marking rib lines that looked reasonable.


 Finally, I covered the area with painter's tape and drew more attempts on that surface. Ultimately I got something I liked. I pricked through the tape along the lines with a pin and used these marks to pencil in the appropriate lines.
When I was confident that these rib lines would result in nicely shaped ribs, I created the individual facets using a rasp and files. I replaced the front of the mould with material for the front block and shaped that to the proper contour.


While I was building the mould I prepared a set of curly maple ribs, so when I finished the mould I could begin the work that I really enjoy.