Sunday, May 27, 2012

Assembling the Jauch Lute Bowl

At the end of my last post I had started to assemble the bowl. I made good progress and have finished. With a new mould like this one I never know how difficult it is going to be to assemble the ribs. Each lute is different although there are similarities within in each style. This lute proved to be no different.

The three centre ribs went on easily. I was careful to trim them to the required widths. I added the ebony spacer to each rib before I glued the rib in place. Had this been a solid mould I would have glued the spacers at the same time as I glued the rib to its neighbour. But with an open mould there is always the danger that the spacer will drop a little below the surface of the two ribs. This method is slower but more accurate.


NOTE: I used my usual method of shaping ribs on a long plane mounted upside down which must be nearly universal for lute makers. You can see this technique in my Post Archive from September 28, 2011.


After the first three ribs things became a little more challenging. Since there is some flattening in the design of the bowl and particularly because the bowl becomes relatively deeper around the front block the ribs develop an odd shape that is difficult to make. Here is a series of photos of the profile in paper of the 5th rib on the treble side counting from the edge. The top edge has been shaped to fit to the previous rib and the bottom edge has been shaped to fit within the rib lines of the mould.


The straight line is added for reference. It is not a centre line. You can see the difference develop on the right side of the photo.  The bottom edge has a smooth curve but the top edge has gone flat.


This is the middle third of the rib. The bottom edge continues its smooth arc while the top edge has actually gone negative. That is, it has become concave. The deepest and widest point of the bowl is denoted with an arrow on the right of the photo.


 The two sides of the rear of the rib appear more conventional, but interestingly, it is the top that has a tighter arc. All of these features are a result of the flattening. With bowls that have a more pronounced flattening the rib shape is more exaggerated. The negative aspect is greater and the arc of the bottom edge of the rib at the rear becomes straighter and in extreme flattening, reverses. Crazy!


All in all, I was pleased with the way the new mould worked out. There were some problems though. I hadn't gotten several facets flat so the rib sat too high. That was easily remedied. At several other places it was obvious that I had filed the facet too low and the rib wouldn't make contact with the mould. My temporary fix for this problem is to insert a small piece of card stock wrapped in clear plastic tape. This provides a surface for the rib to sit on. Before I assemble another bowl on this mould I can make a permanent fix if I choose.


The rear area worked out really well. The rib ends came nicely together without problems and they maintained a uniformity of widths.

Once the bowl was assembled I cleaned it up to a respectable finish. Usually, I like to apply the apron or at this time. But I didn't build that capability into the mould. I had decided to follow another sequence because of what I have been seeing in historical lutes and guitars recently.  The inside clasp in lutes or the end blocks in guitars are often shaped to provide a good gluing surface for the belly but are otherwise reduced in size and mass. Also, I had seen one instance where the bowl apparently was papered before the inside clasp was applied. So I decided to paper the bowl, apply the clasp and then glue on the apron in that order. I use 90 lb water colour paper.  As the glue  and paper dry it creates  tension laterally across each rib and it was that effect that I wanted to concentrate in the rear area of the bowl. It seems to me that delicate instruments require extraordinary treatment of seemingly insignificant features.


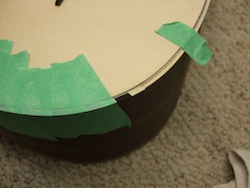
I wrapped the outer surface of the bowl in plastic tape in order to protect it and made a wooden form that fit the contour of the rear edge of the bowl. Clamped in place, it and the plastic tape secure the form of the bowl while I apply the paper and the clasp. This photo was taken after I glued the clasp in place. Naturally I used more clamps. The clasp is spruce 6mm thick tapering along the top surface to 1.5mm at the ends. Before I glue the belly in place I will taper it in the other direction as well down to 1.5mm along the bottom edge.


To apply the apron I use as many clamps as would fit. The little wooden cauls are concave so that the top and bottom edges of the apron are in firmly in contact with the bowl.


I have thinned out the soundboard material and have started to carve a triple rose of the lute. I am using a different cutting method for these roses than I did for the Kaiser theorbo in previous posts. I'll report on this soon.

Thursday, May 17, 2012

Building a Baroque Lute Mould - Continued


At the end of my last post I had finished "roughing out" the mould. There was still lots to do! I had carefully band-sawed the arc of each piece but the angle of the edge of each was only approximate. Remember that the profile of the center axis is not the same as the profile of the face and therefore the angle changes along the course of each arc. I used a rasp initially, followed by files and finally various curved sanding blocks, rocking back and forth, with each tool from one cross-section to the other to smooth the transition. Working thoughtfully, the proper angle was obtained.


Now I had to lay out the position of each rib.  I drew this diagram of the larger cross-section from the lute plan. The width of the 15 ribs average 35 -36 mm wide but there is much variation. The two edge ribs are significantly narrower ( 26 and 29 mm) than the average. Presumably, they were originally as wide or wider than the average. But at some time the bowl was cut down which was and still is the usual method to lower a troublesomely high string height. Several ribs are 34 mm wide while another is only 31. Such variations are commonly found in surviving lutes although our modern aesthetic prefers a more uniform treatment. A millimeter or two here or there is almost unavoidable and I am willing to accept such variation when I am assembling a lute bowl as long as the discrepancy is not obvious.

I did want the two edge ribs to be wider than the others. I measured the distance along the arc of each cross-section and divided by 15. For example, the largest cross-section is 538 mm so each rib would be 35.87 mm wide measured along the curve of the cross-section. I rounded that up to 36 mm and added 4 mm to make the edge rib 40 mm wide at the widest point. Subtracting the width of these two ribs from the total left me with 458 mm for the remaining 13 ribs which works out to 35.23 mm per rib. Remember that this represents the distance along the curved surface of the cross section and therefore must be measured with a flexible ruler. I repeated this process for each cross section. This takes time.

Before I cut the facets for each rib on the cross-sections
I wanted to be sure that the points I marked out created smooth transitions from one section to the next. I used a flexible ruler secured on edge with two clamps. This gave me two free hands to hold the ruler and mark the rib line. In order to create a smooth rib line I found that it was necessary to wander a little from the rib divisions that I had marked off. This is where the variations in rib widths creep in.


Ivo Magherini photo
  I wasn't sure how the rib lines were going to run over the rear section of the mould. If these lines are badly laid out it will be very difficult to assemble the ribs around the rear of the bowl.  On the original each side of the bowl is different! On the treble side the ribs nearly come to a point but on the bass they spread out and would join well below the level of the soundboard. I tried several times but had trouble marking rib lines that looked reasonable.


 Finally, I covered the area with painter's tape and drew more attempts on that surface. Ultimately I got something I liked. I pricked through the tape along the lines with a pin and used these marks to pencil in the appropriate lines.
When I was confident that these rib lines would result in nicely shaped ribs, I created the individual facets using a rasp and files. I replaced the front of the mould with material for the front block and shaped that to the proper contour.


While I was building the mould I prepared a set of curly maple ribs, so when I finished the mould I could begin the work that I really enjoy.

Tuesday, May 8, 2012

Building a Lute Mould for a Jauch Baroque Lute

Ivo Magherini's drawing of the 1734 Andreas Jauch 
My newest project is the construction of a model of the Andreas Jauch baroque lute that is in the Musikmuseet, Copenhagen. Fellow lute maker Ivo Magherini generously sent me a copy of the working drawing, photos, fact sheet and report that he made when he measured the instrument a few years ago.

Before I can begin to construct the mould that I will use to assemble the bowl I need to analyze its contours and make cardboard templates. On the drawing you can see the contour of the face, the centre axis of the back of the bowl and two cross-section contours. Historical lute bowls often display a sophisticated design for enclosing space. This Jauch is no exception. The bowl is flattened in the deepest (and widest) part. As the rib lines flow toward the front of the bowl this shape changes to a point where its depth is equal to half the width. Then, at the front block, the bowl is deeper than half the width. The photo demonstrates the flattening while my diagram illustrates the transition from one region to another.


Ivo Magherini photo


The two larger cross-sections are from Ivo's drawing. For comparison, the broken line represents a semi-circle. I created the smaller cross-section which is near the front block. You can see the flattening of the two larger arcs while the smaller arc is noticeably deeper. Making this transition is tricky even when a lot of information is available.

The problem I faced was to construct a number of cross-sections that accurately represented the contours of the bowl from the limited amount of information contained in the drawing. I need to create enough cross-sections so that there is one about every two inches. Here's how I did it.

At any spot along the centre line of the lute I can determine the bowl's width and depth, plus I have the two known cross-sections from the lute drawing. The image (below) represents the method.


The scribed  arc on the card stock is the contour of the larger  of the two cross-sections from the drawing.  I want to use it to create the arc for the centre cross-section (the widest and deepest point of the bowl) while retaining the characteristic shape. I  marked the width and depth for the arc on the card stock and aligned a flexible ruler to those points, allowing the ruler to mirror the smaller arc. I repeated this procedure several times for various points along the length of the bowl. Each new arc formed the basis for its neighbour.

 Then I arranged the templates on the drawing to see if the result looked reasonable.


 Once I was satisfied that I had made enough templates I transferred them to pieces of pine wood that I had previously prepared for this mould. I set the bandsaw table at a slight angle to represent to slope of each section of the bowl and cut out each member.


These were glued to the longitudinal section in the appropriates locations.


When all of the sections were added I filled in the front block area and the rear area of the bowl and shaped them to  reasonable contours. That finished "roughing out " the mould. I still had to mark off the mould into individual ribs. 


I'll explain my method for this in a few days. 

When Magherini measured this instrument the lighting was dim and the workspace inadequate, which explains the dark photo. Visiting instrument makers find varying work conditions at museums; from well-equipped laboratories to a shared table in a storage room.  I understand the Copenhagen collection has moved to a new building.

Information about surviving lutes is always valuable and  much appreciated. Thank you Ivo.


Wednesday, April 25, 2012

Measuring the Checchucci Guitar at Boston MFA

This evening I'm in Boston having finished the first day of measuring the baroque guitar by Jacopo Checchucci, Livorno, 1628. Tomorrow I'll be back in the museum making templates of the arching of the back and recording things that I missed today. Several factors have bought me here. First for an Italian guitar, I've been building an anonymous model  since 1994. Although it has been successful for me, I thought it was time for a change. Second, I've been attending the Boston Early Music Festival for years, either as an exhibitor or just going to shows. While here I've visited the Museum of Fine Arts and admired their Checchucci guitar (acquired in 2002).


I emailed curator Darcy Kuronen to set up a visit. Darcy explained that even though the guitar is one of the few intact, nearly original Italian guitars from the first half of the 17th century, few builders have expressed an interest in it and no one has measured it. You can see from these two photos that it is an ornate guitar. But it is more than that. It is a comfortably sized guitar. The body measures 46 cm long with a string length of only 63 cm on a 10 fret neck. Stretched to 11 frets it is still 65 cm. Perfect.


I think it is rare to find a guitar that combines a beautiful aesthetic that is well crafted with important acoustical elements. The back  has a very high arch and the side ribs are angled inward around the  circumference of the body. I'm sure this will make an interesting model.


Both of these features are visible in the photo at right.

Kuronen is concerned about the securing the long term documentation of these instruments. It is one thing to display them to the public as artifacts but quite another to make them and drawings  of them available to interested builders to turn into living musical instruments. Darcy has arranged with a musical instrument draftsman to record important instruments in their collection.

 In the meantime, you can visit the MFA collection online at:
http://www.mfa.org/node/4475

Scroll through the thumbnails to find the Checchucci guitar, a Berr baroque lute, an Alexander Voboam guitar and many other interesting instruments.  The Checchucci is in playable condition. Audio files of the it and the Voboam, recorded by Olav Chris Henriksen, are available on the these pages.

I will make my report on this guitar along with measurements and more photos available on this blog in the near future.


Monday, April 16, 2012

Repairing Lutes and Guitars


It is inevitable that my instruments are damaged in one way or another. I expect to have one in my shop at any given time, but my clients are having a run of bad luck over the last few weeks. Here's the casualty list, all with loose bars caused by age or careless baggage handlers; 1983 ten course, baroque guitar, large Schelle model theorbo and most recently, as a rush item, a small theorbo with .... loose bars.

The story of the ten course is interesting. It was built by my early apprentice, Bruce Duncan. Bruce went on to study in England and returned to build lutes. This was one of them. He is no longer involved with lutes but stills builds early instruments - analog synthesizers.

 The damaged lute has had its belly lifted numerous times over the years. This procedure takes a toll on the wood fibres around the edge where it is attached to the side ribs. This is a photo of the area above the bridge on the treble side. You can clearly see the damage that repeated repairs has caused. I did not look forward to removing the belly again but I decided to take it off and then to completely renew the edge. Here is how I did it.

There was damage similar to this around the rear edge of the belly continuing up to the third bar on the bass side. The procedure to repair this type of damage requires that the inside damaged edge of the belly be removed to a uniform width and depth and then filled with a splint of wood of similar grain direction and structure.


I removed the three harmonic bars and the finger bars that support the underside of the bridge and made a template to guide my router. This is a handy machine. It is smaller and more manageable than many routers but more sturdy and accurate than the Dremel Tool. It is called a laminate trimmer and its industrial use is to remove the overhanging veneer or laminate that occurs in the fabrication of counter tops, shelves, etc. The 1/4 inch thick  plywood template  allows the circular base of the router to move freely, smoothly and precisely around the edge of the belly at a set depth. Just enough wood is removed to expose the underside of ebony half binding (left side of above photo) that encircles the edge of the belly.


Then I cut thin pieces of spruce and shape them to fit snuggly in the routed channel. I glue them in place with hot hide glued, secured with painter's tape and sandwiched between layers of plexiglass. The inserted pieces of spruce are allowed to dry then they are levelled flush with the surface of the belly and the harmonic bars and fingers are glued back in their original places.


Here is the result after everything is done. This is a lightly built lute that gets a lot of use. I think it is good for another 30 years.

To a greater or lesser degree I carried out this procedure on the other instruments. It is frightening to use the router for such a delicate operation. But if care is taken and the set-up is well thought out it does the job very nicely.

All of these repairs have taken time and a toll on me. Although they are necessary and appreciated I would rather be building new lutes. 

I have started the mould for a triple nut baroque lute after the A. Jauch in Copenhagen. Very shortly I will begin to describe building the mould and then follow through with posts concerning the construction of the entire lute. 

The last week of April I'll be at the Boston Fine Arts Museum to measure the Checchucci guitar. 


Thursday, March 15, 2012

Building a Voboam Guitar - The "Rope" Banding


Museé de la musique E.2087
If there is one characteristic feature of French baroque guitars and those built by the Voboam family in particular it is the "rope" banding. The effect is pleasing even in the simpler form that I use. The example by Jean Voboam (right) is one of the more elaborate treatments.


Jan Vermeer 1672
Kenwood House
Vermeer's use of the motif in his iconic painting, The Guitar Player (left) is stunningly vibrant. This is my favorite "guitar" painting and I included this image because painters in the 17th century began to present guitars seriously in their work. Many of then used the Voboam as a model. I saw Vermeer's painting several years ago after examining lutes at nearby Fenton House. Sunlight was streaming through a nearby window and I couldn't see the subtle detail in the painting until the docent drew the curtains to put the painting in the shade. Then I could see that Vermeer had used bold brush strokes on the light colored banding to create the effect of individual threads woven into the "rope"!

Kenwood House is definitely worth a visit if you are in London. Walk across The Heath from Hampstead and enjoy the splendid views of open fields and the distant city. Lunch in the Brew House is a treat. http://www.english-heritage.org.uk/daysout/properties/kenwood-house/

The technique for making the rope banding is not that difficult but it does require sitting up a jig to accurately cut the  lozenges.
I took a piece of plywood and accurately duplicated the contour of the guitar belly. Then I routed a channel in the edge the same width as the banding that I planned to use and deep enough to accommodate two pieces of material that I had prepared; one each of holly and ebony. These I bent carefully and while still warm bound them in the channel of my jig to thoroughly dry.

The next photo shows the cutting of the individual lozenges. I had measured and marked 9mm intervals along the edge of the jig and drawn tangents of about 20 degrees from the perpendicular.

Following these lines I cut through the two pieces of banding into the jig itself. After each cut I inserted a thin clock spring scraper into the previous slot in order to prevent the banding material from shifting; thus ensuring that the lozenges were exactly the same length. I carefully and securely put each pair of lozenges aside in sequence.


Gluing the lozenges in place with hot hide glue is actually the easy part. Since the strips of banding were carefully bent and the shape was accurately cut and the pieces were not mixed up, the lozenges  fit snuggly in place. I added a narrow band of black-white material that was glued in at the same time.

Allow this all to dry thoroughly and level carefully with files.


*** 
All images on this site other than those so labeled are by the author. Readers are welcome to use my material with attribution. For other images I have endeavored to accurately attribute copyrighted material.
If any copyright holder wishes me to withdraw their material I will do so.


Tuesday, March 6, 2012

Building a Voboam Baroque Guitar - The Barring

Unshaped barring on the Voboam(left) and
the beginning of a Lacôte (right).

I always put a lot of thought into the barring pattern that I will use on a new instrument. Although all parts of an instrument work together and influence the tone production the barring is the single most important element. Even if I have built a particular model many times I will alter the barring pattern from one instrument to the next, sometimes to accommodate the playing style of a particular client and other times to appease my curiosity and need to experiment. Whatever I  choose to do the decision is always firmly based on historical precedent as far as that is possible to interpret.

Unlike the record of historical lute construction that is now well documented, the same level of interest in the baroque guitar has only recently begun to develop. My own research has focused on the exterior of conserved guitars, by necessity, because their interiors are seldom accessible. At best, x-rays are available  and occasionally technical drawings. There are two sources that I find valuable for historical information on Voboam guitars. The website of  Daniel Sinier and Françoise de Ridderhttp://sinierderidder.free.fr/ records their restoration of historic instruments with text and photographs, including their work on Voboam guitars.


Florence Gétreau

 The chapter, René, Alexandre et Jean Voboam: des  factures pour "La guitarre Royalle" by Florence Gétreau in the book, Instrumentistes et Luthiers Parisiens XVII-XIX Siècles, edited by the same author, includes this diagram of the barring pattern that survives in several guitars by various members of the Voboam dynasty. In this work are descriptions  and  measurements of twenty-nine guitars from the various members of the Voboam family including drawings of peghead designs and other aesthetic details. This is essential reading for anyone interested in building models of Voboam guitars.

On previous models I have used number 5 and number 8. But liking to experiment, I was intrigued by number 9 -- although I was worried that the treble side would be too firm.  I have a photo of the inside of the belly of this guitar but I dithered for some time unable to make up my mind. The diagonal extends beyond the bridge line and a finger bar is used for even more reinforcement. Wouldn't that be too stiff?

photo by Thomas Georgi


Then, I realized that the finger bars are tiny and must be intended as a kind of secondary moderator. The diagonal, low and sort of fat and very rounded on the top is shaped very much like a violin bass bar. And, I think, serves the same purpose of providing an element of localized stiffness without adding a lot of mass.

The player who ordered this instrument intends to play with nails (artificial ones glued on at a salon) so I knew that it would take a stiff, regulated belly to stand up to that kind of attack.


Here's the finished belly ready to be glued to the ribs. I have been making diagrams of the bellies of my lutes and guitars for 30 years so I have a record that I can consult form instrument to instrument. Here I've written the measurements on the spruce. I'll copy those on a tracing of the belly, draw in the bar positions and list their height. The measurements are in thousands of an inch.

Note that the diagonal falls well below the bridge line that is visible  just below the top of the finger bars. The diagonal tapers from 6mm wide and 10.2mm high in the centre toward each end where it is 5.5mm wide and 7.5mm high. The fingers are 5mm wide and 6 mm high at the back edge tapering to 0 just beyond the bridge line. The belly is basically 2.4mm thick over-all, thinning a little through the waist area.

***
 All images on this site other than those so labeled are by the author. Readers are welcome to use my material with attribution. For other images I have endeavored to accurately attribute copyrighted material.
If any copyright holder wishes me to withdraw their material I will do so.

schreiner@sympatico.ca