Showing posts sorted by date for query French. Sort by relevance Show all posts

Tuesday, July 2, 2024

A French Baroque Lute


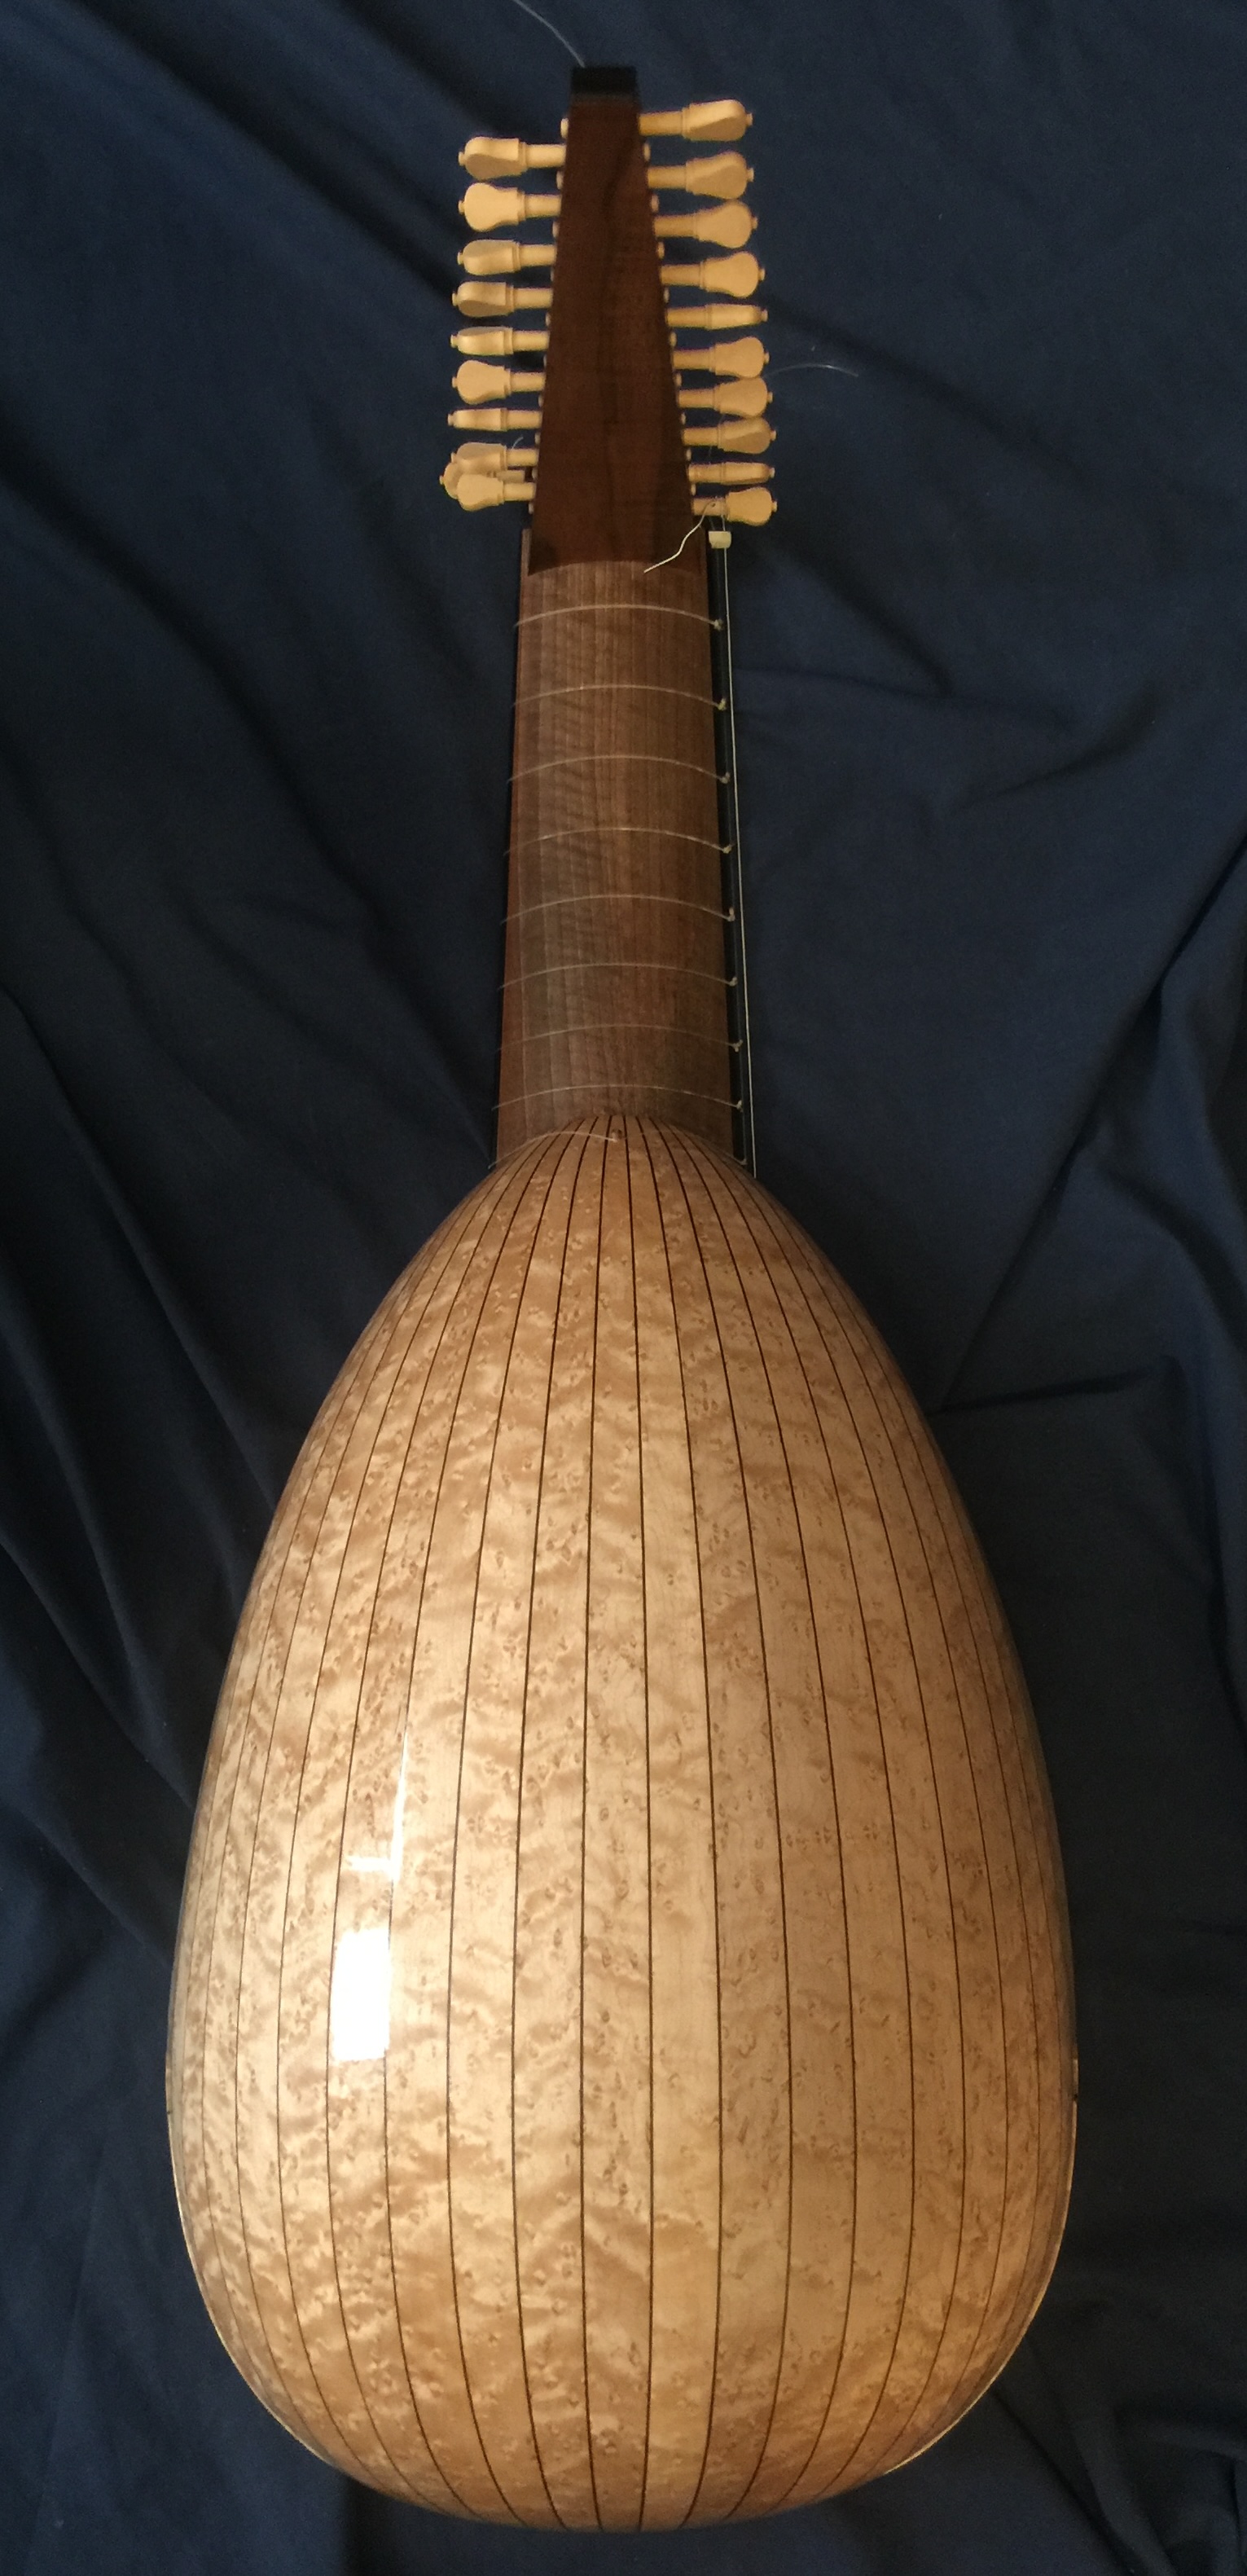
When I took this photo three weeks ago my French baroque lute was assembled but there was still much to do. You may be able to see the scribbles on the top. These are thickness measures I made at various locations before I glued the top in place. The idea is to string and tune the instrument and see how it responds. If I think it can be improved by thinning the top in specific spots I scrape some wood off. The top thickness at this point of construction varies from 1.75 mm behind the bridge gradually diminishing to 1.5 in the rose area and 1.0 at the rose itself. Then increasing to 1.8 mm at the neck joint. If you are able to decipher my scribbles the numbers are thousandths of an inch. 


The lute bowl shape and size is modelled after E.25, an anonymous instrument that is conserved in Musée de la musique, Paris as an archlute. The details of the top; bridge, rose position and rose diameter are borrowed from the Hans Burkholtzer baroque lute, Kunsthistorisches Museum, Vienna. 

There is a strong connection between E.25 and the Burkholtzer but rather than repeat myself see my blog from 9/22/22, "An Anonymous Archlute" and from 2/17/16 "Thirteenth Course Baroque Lute After Hans Burkholtzer and Anonymous E.25". 

Like the Burkholtzer, the bowl is assembled with twenty-one ribs, my lute with bird's eye maple and Burkholtzer's with ivory ribs. My lute has walnut spacers as I have given up on ebony for everything other than fingerboards. For thin parts like binding and spacers that need to be bent the quality of today's ebony is poor and it breaks easily. The bowl is varnished with a true oil varnish.


The neck veneer is curly English walnut edged with ebony laid over a quartered spruce cord. The pegbox is also walnut cut from the same plank. I turned the turning pegs on a mini lathe without templates using only calipers to keep track of the dimensions. The wood is Castelo boxwood. The pegbox and pegs are finished with multiple applications of rubbed tung oil.


This photo offers a narrow view of the chanterelle bracket. Note that the tenth course is fully on the neck while the eleventh is completely of the edge. The fingerboard is flat rather than arched.

If you think the strings look funny you're right. My client who lives in Buffalo NY planned on taking the lute to the LSA Seminar in Cleveland a week ago. I didn't think there was enough time for my string order to clear customs and get to me here in Montréal before the lute was scheduled to be hand-delivered to Buffalo. I had strung the lute with these strings multiple times to learn what characteristics it displayed and whether there were buzzes on the nut and fingerboard or to reveal other problems. I nearly had enough spare strings but I ended up with only single strings for the 3rd through 5th courses. When the lute reached its owner he strung it with the new and complete set of strings and happily attended the LSA Seminar.


The rose design is from an Unverdorben lute in the collection of Harvard University (see the original  below). I am not aware of it appearing on any other instrument.


I took this photo of the original rose when I examined the lute in 2008.

If you study the design you can find instances where the pattern is interrupted or does not repeat as expected. I copied the design as it appears without improving the Master's work.


                                              Photographs by the author and John Edwards


                                                                            *****


Friday, December 20, 2019

A Special Kaiser Theorbo


After nearly two years I have finished an elaborate model of the Martin Kaiser theorbo, E.24, conserved in Musée de la musique, Paris.

Please take a look at the original Kaiser by using the MIMO portal. My story will make a lot more sense.
https://mimo-international.com/MIMO/

Enter "Martin Kaiser theorbo" in the search box and then click on the image of the lute. Be sure to click through all of the options. The images expand and can be scrolled through with the magnifying icon for a close detailed view. Keep this portal open while you read my post because I refer often to specific photos of the original lute.


The Kaiser model theorbo is not new to me. I have built over a dozen since 1997 but I never attempted to copy the detailed ivory work on the neck and extension. My clients have been young professional theorboists starting their careers so I always kept the aesthetic concept simple.


The story of this instrument is different. The client contacted me with the suggestion that I build a close copy of the Kaiser. He also wanted an instrument with low tension, low action, double stringing on the fretted strings, double tied frets and narrow spacing on the bridge and nut.

I have felt that I have drifted away from historical practice in the sense that modern players need to be heard and need to travel. I adjusted by adding a few tenths to the rib thickness or the belly and bars and adopted single stringing even though few of the many surviving historical theorbos are single strung.

I eagerly accepted the commission unaware that it would deplete my stock of black ebony, challenge  my skill and try my patience. But along the way I learned new skills and techniques and improvised on old ones. I felt I needed to do this. This is the story, in picture and words.


Where to start? I built the first few models of the theorbo using plans that I created from images of the instrument that you have seen on the museum's website and published measurements. A description of the instrument by Joël Dugot had also been published in Journal of the Lute Society of America, Volumes XVII & XVIII 1984 &1985.  Once I was able to examine the original ( March 2000) I improved the accuracy of my models.


All of my Kaiser models have been built on this mold although I have changed my technique recently. I no longer use the lines denoting the rib positions as the only means to determine the shape of each rib. Once I have fitted the edge of a new rib to the previous one I measure the distance to the edge rib of the bowl at various locations along the length of the bowl. These numbers are divided by the number of remaining ribs. I mark the results on the new rib and then plane off the excess material to the marks and then smooth them on a sanding board.


The widths of the ivory rib spacers of the original theorbo are not uniform. I recorded various widths  during my examination. I chose a median width of 2.2 mm. Visually this seems right as I compare it with photographs of the original. I also used white holly for the spacers throughout rather than ivory.

The green masking tape denotes the depth of the end cap and the two vertical lines on each side mark the two end points of the middle third of this important feature. This is a visual guide that helps me keep the ends of the ribs uniform as they pass under the end cap.


The original lute has a one piece ivory end cap with an incised black line (see the museum's photos). It is not original. I chose to use the standard early 17th century design composed of multiple pieces.


I usually build up my end caps by gluing them separately on the bowl one at a time and then cutting the finials. The work goes well but cutting the finials in place is tricky. Another technique, that I find awkward, is to construct the cap separately and glue it as one piece.

I tried a yet another method. I assembled the cap, fitting and tack gluing each piece separately on the bowl including the stepped top piece. The ends of the cap, not shown here, are left uneven. I planed the bottom edge of the cap flush with the bowl rim and then glued a piece of cotton cloth over the cap.


In the photo I have slipped a hot spatula between the bowl and the cap. The heat melts the weak glue joint and the cap comes off in one piece while also retaining its shape. I then cut the finials and glued the cap back onto the bowl using full strength glue.


The cloth support is then removed with warm water and a hot iron.


The procedure takes more time but I am happy with the result.


Before I release a new bowl from the mold  I cover it completely with clear plastic packing tape. If the bowl is too tight to the mold the tape will hold it all together while a little more force is applied. The rear end of the ribs are lightly glued to the mold but their integrity is protected by the end cap. A spatula slipped between the mold and the ribs releases the joint. I glue the front block to the front of the mold with three small drops of glue. These release when a spatula is forced into the joint.

With the plastic tape still protecting the bowl I use a curved scraper to smooth the inside of the bowl. The ribs joints are then covered with a light weight water color paper soaked in glue. The internal cap is spruce bent to shape and trimmed. A broad quarter moon shaped piece of water color paper covers the rear. This area is often the thinnest part of the bowl due to the amount of levelling that is necessary to fit the end cap and I think it needs extra protection. Only after these procedures are completed is the plastic tape removed.


I use quartered Canadian sitka spruce for the core of my necks. This is shaped and fitted to the front of the bowl. It is then covered with a hard, dense veneer in one of the many styles or designs that are represented on historical theorbos. The neck veneer of the original Kaiser is unique. It is composed of nearly 200 individual pieces of ebony and ivory arranged in chevrons.


Optical illusions created with black and white lines are popular mind-teasers. I spent a lot of time looking at photographs of the original design and decided that the white strips were slightly broader than the black even though they appear to be equal. I figured out the necessary dimensions and cut the strips of ebony and holly from larger stock.


 I laid out the design on a thin piece of plywood and using various templates to insure uniformity I glued the individual pieces of ebony and holly to the board using normal strength hot glue.

As I proceeded it became obvious that the slightest error in preparing the width of each piece would result in a misalignment of the mitred center joint.
To correct this, I constantly had to adjust the width of the individual pieces. It was a long, laborious process but the finished  result was satisfying.

Using the same technique as with the end cap I glued a single piece of cloth over the pattern. This remained in place while I planed off the plywood backing, bent the pattern to the curvature of the neck core and glued it to the neck core.


 I had second thoughts. My bending iron which is a 3 inch diameter metal pipe heated with a propane torch wasn't long enough to bend the entire pattern all at once which I thought was necessary to prevent the pattern from becoming distorted. I decided to split the pattern in half, left and right, and bend and glue separately. I also bevelled the abutting edges so the two halves would join without the possibility of a gap forming.

In the photo I am removing the cloth support after gluing the pattern to the neck core.


The result was fairly successful. I was unhappy with the alignment of several pieces so I cut them out and corrected the problem. 

I finished the neck with two white lines of holly along the edges of the chevrons and then two broader pieces of ebony that extended slightly beyond the edge of the neck core. The neck was then fitted to the bowl as shown in a previous photo.


The next step in my construction sequence was the preparation of the soundboard. The top is 6-year-old Swiss spruce. I had been working on it while I was assembling the neck veneer so it was nearly ready.

Large Italian theorbo soundboards are always impressive but I think the Kaiser soundboard is particularly harmonious due to the graceful flow of the contour, the proportions of the triple rose and the delicately thin bridge. The original Kaiser does not have a heart, but this instrument deserved one.


The Kaiser triple rose uses Leonardo's Knot as an elaborate center piece. I have always liked this design and what's better then cutting three of them?


The bridge is conserved separately from the instrument and I missed seeing it during my visit.
It is made of black ebony and is asymmetrical, larger on the bass side (13.6 mm front to back and 11 mm on the treble side) and higher on the bass side (8.5 and 7.4). The tips of the bridge are missing and whatever style they might have been can only be conjectured. The footprint of the original bridge is clearly visible and can be seen in the photographs of the instrument. To me the circular outline suggests a sunflower or rosebud. This style of finial is usually seen in paintings of 16th century lutes and survives on several surviving lutes. The top of the bridge is decorated with thirteen  6 pointed "stars" scribed into its top surface between courses. There are two scribed lines parallel to the front and back edges. There is no lip on the front edge of the bridge and the rear does not appear to be angled. I do not know if the rear face of the bridge is sculpted in any way to accommodate the string ends.

During my examination of the instrument I measured the footprint of the bridge that remained on the soundboard ( 14.2 / 11.8) and was surprised when I saw the published measurements some time later.
A very poor cleanup of the excess glue could explain this discrepancy but the lack of refinement in the construction of the bridge leads me to believe that it dates from a more recent time.

I constructed my bridge from European plum stained black and sealed with tung oil.  I created my "stars" with a small chisel, pressing it into the top of the bridge in a criss-cross fashion. I cut a string channel for the string ends to sit in.

   
The ebony veneered extension is tastefully decorated with triple bands of ivory/ebony/ivory and a single ivory line dividing both the face and rear veneers in half. Furthermore, on the face of the extension the triple bands are joined  in front of the ebony/ivory striped theorbo head by a crossover band with mitred corners.


On the rear the extension narrows so that all of the elements come together as nine equal bands.


The outermost bands of ivory wrap around the theorbo head and meet in a cross-over piece behind the nut.


Bending tight curves on a hot iron is a challenge. The thought occurred to me that I am substituting  a medium dense, fine grain wood for ivory and I remembered that ivory becomes pliable after soaking in white vinegar. So I cut a test strip of holly, submerged it in white vinegar (5% acetic acid by volume) for a couple of hours, and washed it off. After I allowed the strip to partially dry, it bent easily into the necessary shape with only finger pressure.

For the finished instrument I followed the same procedure but strapped the bent bands  onto the theorbo head with dressmakers elastic and allowed them to rest overnight.


I turn my pegs by hand without templates, shaping by eye and checking diameters with Vernier calipers. Many of the problems encountered with sticking pegs are caused by insufficient drying of the wood before they are turned. I use Castelo boxwood that I cut into turning squares. These are stored for at least a year. When I start a new lute I turn a set of squares to a rough shape. A while before I start applying the finish to the completed lute I turn the pegs to their near final shape. The heads and shanks are finished last and then fitted to the lute as part of the initial setup. If they are to be black, I ebonize them with a  process using quebracho extract and iron acetate. I use the process described in:
https://www.popularwoodworking.com/techniques/ebonizing_wood/  After the pegs have dried for several days I seal them with tung oil sealer.

The theorbo's bowl, neck and extension were varnished with several light coats of French polish applied in the traditional way. This was allowed to dry thoroughly and then was rubbed out with 4F Pumice stone. The soundboard received two coats of tung oil sealer, allowed to thoroughly dry and  was rubbed out by hand.

The string disposition: 8x1/6x2
The string lengths:  88.5/171 cm
Strung in gut
Information added 12/29/19
Instrument weight : 1970 grams ( fully strung)
Original instrument's weight: 1942 (without strings)
Instrument balances at the fourth fret 
  
All photographs by the author.         


Monday, July 22, 2019

July Update - Theorbos and Early guitars

   It has been almost a year since I last posted. That doesn't mean that I haven't been busy. Here is an update on what I've been doing.

 
I designed and built a small  travel friendly theorbo to be used by a client who is playing a lot of the late seventeenth century French repertoire.

I thought this instrument should be different than the early seventeenth century Italian theorbos, even the small ones.  So I used construction features that I associate with the iconography of French lute/lutenists of the era or that anticipate lute designs that became popular in the early eighteenth century.

The fretted string length of my instrument is 78 centimeters while the diapasons are 105 cm.  With an extra peg for the fretted strings the  lute can be strung either 7/7 or 8/6 as well as 7/7.  My client's choice of diapason length was so short I could not mount the diapasons in the usual way - on a straight extension. the choices were either an extension with the theorbo head off-set from a straight extension, or  one with the extension angled precariously off the end of the fingerboard. I settled on a solution that Joachim Tielke and others started to use at the end of the eighteenth century for out-fitting  angélique or baroque lutes.


I thought an archaic rose design would be appropriate so I chose a pattern that is very close to the 1550 era Hans Frei's Warwick lute.


My client has liked several of my Venere model theorbos from the 90s so I used the same cross -sectional arching as the original Venere but with eleven ribs. I also thought that maple, in this case bird's eye, would be the most suitable wood for a lute of that era.


Here is a model of one of my Venere theorbo circa 2004 with the historically correct number of ribs (27) for comparison.


As you know I have been avoiding the use of ebony or other exotic woods when possible. The neck veneer is Claro walnut, Juglans hindsii. from California or Oregon. The board I used has a diagonal curl. I cut thin, narrow strips, and reversed the direction of every other one to achieve the pattern.


The extension is English walnut, Juglans regia, cut on the slab.

The pegs are Castelo boxwood stained black.  Smooth operating pegs are essential. Therefore, I prefer to turn my own pegs because I can have control of every step of their creation. I buy the wood as lumber and cut it into manageable boards if necessary. From these I manufacture 1 inch square lengths about 3 feet long which are sticked and stacked for storage. When I begin a new lute I cut the number of peg blanks I need from these lengths and turn them to a rough form. Each peg is indexed to fit back on my lathe. When I need a break from carving the rose I put the pegs back on my lathe and finish turning the form, free hand and by eye using only calipers to check the size of the various components. Inevitably, the heads vary in size but I use this to advantage and fit them in descending order from largest to smallest along the length of the pegbox- a feature often observed in historical lutes.


Guitar Connoisseur is an online magazine that publishes interviews and articles accompanied by high quality photos of guitarists and luthiers. Occasionally, it delves into the world of classical guitar and recently even back to the nineteenth century.


The Spring issue of GC includes this interview by client and staff writer Pat Bianculli.

http://www.guitarconnoisseur.com/


For more than a year I have been working on a copy of the Martinus Kaiser theorbo, E.24 Musée de la musique, Paris. I have built a dozen models of this instrument but this is the first that I have copied all of the aesthetic details.


 In April I was nearly finished. I had strung the instrument and was letting it settle before I started the final adjustments when the bridge exploded. I took a photo (see below) and put the lute in its case. I notified the client that there would be a significant delay and offered to return his deposit. He kindly agreed to wait until I replaced the soundboard. I needed some time away from the instrument but now I am anxious to begin work on it again.


This is type of failure is troubling because I am not sure of the reason; perhaps the glue on the treble side of the bridge jelled before I applied the clamps resulting in a loss of strength while the bond on the bass side held firm, or perhaps my support caul was not positioned properly. Whatever the reason,  it took a great bite out of the belly.


I have just about finished a model of the 1813 Josef Pagés guitar that is conserved in St Cecilia's, University of Edinburgh. I spent a wonderful day with the original two years ago. You can read my post from that visit at:
http://schreinerlutesandguitars.blogspot.com/2017/10/josef-pages-1813.html
In this photo I have strung the guitar with six single strings from a set for romantic guitar tuned to 432Hz.


There are twelve planetary pegs and the bridge is drilled for six courses. A second nut is grooved for an eleven string (single first) set-up.

The back and ribs of the original Pagés are Lacewood. I was unable to obtain suitable Lacewood boards so I got into my stock of planation grown Cuban Mahogany for the first time. The neck is Spanish Cedar.

The finish on the entire guitar is multiple coats of tung oil sealer. The oil has been drying since early June. Soon I will French polish the back, sides and neck. The top will be left with the oil finish.


interior of my Pagés model


As promised, some time ago, I am making a drawing of this guitar and I will publish it here along with the story of building this model.


I will soon be finished with another Buchenberg.
This one in yew at 93 and 170. A story will follow.


In June Susan and I exhibited at the Boston Early Music Festival. On the table is the Pagés and a Baroque chitarriglia after Matteo Sellas that I borrowed from a client.

We always look forward to renewing friendships from previous years, attending shows, some featuring our friends and talking to an enthusiastic public. This year was as exciting and interesting as all the others.


I wanted to have something special for a back drop so Susan created these wonderful posters of my clients when they visited us to picked up their instruments.


All photos by the author


Wednesday, June 20, 2018

A Buchenberg Theorbo


As I mentioned in my April Update from 4/20/18 I still needed to finish a few details on my Buchenberg theorbo.  I also hoped the case would arrive in time for the lute to have its coming out in a performance of Ulysses .
I got everything done but the case didn't arrive after the show closed. I am sure there will be other opportunities.


V&A No.190-1882

My Buchenberg is based on a technical drawing made by Stephen Gottlieb. Although Stephen based his drawing on  several instruments by Buchenberg the principal source seems to be No.190-1882 conserved in the Victoria & Albert, London. I never was able to arrange an appointment to examine this instrument but I did visit the V&A instrument gallery in 2006 and shot this photo

The V&A instrument gallery was permanently closed in 2010. I took photos of all of the lutes that were on display. Eventually I hope to post a photo story of that visit.

The technical drawing is available from The Lute Society.
Click here for the link.

To see the Museum's photos of No. 190-1882.  Click here.


 The bowl of the original (and in Stephen's drawing) is made of 41 shaded yew ribs. My stock of yew boards was insufficient for this project and my hands are no longer nimble enough to handle such narrow ribs so I built my model with 29 ribs in bird's-eye maple. I knew that several surviving lutes by Buchenberg were built with maple bowls. His large theorbo (99 and 170cm) Number 1570 in MIM Brussels is built with 21 ribs of maple. I have an appointment to examine this instrument later this month so the configuration of fewer maple ribs was an appealing option. Furthermore, the properties ( density, hardness and elasticity) of yew and birds'-eye maple are similar. I'm a fan of bird's-eye, a believer in its acoustical properties and I had large boards, well speckled with tiny eyes.


I built an open mold with a central spine and the five cross-sections that are represented on the drawing. I marked off the position of the two edge ribs and the center rib then divided the reminder of each cross-section into the required number of segments. A"segment "denotes the position and width of each rib. I did not cut facets into the cross sections since the ribs are relatively narrow and lie close to the mold in any case.


The rear of the bowl is always a difficult area in constructing both the mold and in assembling the ribs. I try to make the procedure as simple as possible.


I dispensed with adding a final cross-section as I have done previously.  The shape never seemed to be quite right and its presence caused additional problems.

My technique now is the construction shown in the photo. Its shape is derived from three known profiles; the longitudinal profile (the center rib), the soundboard profile and the the profile of the last cross-section. I roughed out the shape on a bandsaw, glued the curved sections in place and finished with a fine rasp. I bent three ribs out of scrap wood each one representing a given shape; the center rib, the edge rib and an intermediate one whose curve lay between the two. These served as templates to guide the final shaping. I did not lay out the course of the individual ribs but I did mark the location of the future endclasp. As I proceeded to assemble the ribs beyond those seen in this photo I found it necessary to slightly alter the shape of this addition to the mold which was easily done.

Flattened back lutes such as this one usually require that about a third of the ribs terminate horizontally rather than vertically.

It is necessary to monitor the width of the ribs as they pass under the endclasp.

When I examine an historical lute I am always careful to record the size of the end clasp and the width of each rib as it passes under the clasp. The two notches on top of the endclasp are usually an important indicator of a transition point in the construction of the bowl.


 The end clasp covers the untidiness.


The soundboard is 40 cm wide and 63 cm to the neck joint.
The  string disposition on my model is 7x1 / 7x1 at 88.3 cm and 164 cm.

The bridge is plum with the string holes on 11 mm centers.

The belly frets are positioned according to 1/6 comma meantone.


The neck is 31 mm thick at the joint tapering to 22 mm at the first fret. Its core is quartered sitka spruce. The veneer is made from Claro Walnut rib stock that I bought to use on multi-piece flat-back baroque guitars. I cut several of these into tapered strips,  and re-assembled them reversing the grain direction on alternate stripes. The pattern is edged with ebony that better resists marring from the fret knots.

This photo shows the bird's-eye maple to good effect. The finish on all hard woods except the fingerboard, that has none, is blond shellac as the base coats with garnet shellac on top applied with the French polish method.


The fingerboard has a 2mm camber at the nut centered under the 6th and 7th strings. From that point the degree of camber diminishes toward the neck joint where the fingerboard is nearly flat. I also scraped a little relief into the length of the fingerboard.


I decided to restrict my use of ebony, limiting it to fingerboards and purfling or banding. My decision is partially based tougher CITIES restrictions on Dalbergia (rosewood) and Diospyros (ebony) and a skin sensitivity to these woods that has now become troublesome.

I had been thinking about this switch for several years and last summer I found a plank of European walnut in southeastern Pennsylvania that was cut from locally grown timber. The story is told that early English colonists wanted English walnuts and brought the saplings with them. The trees' descendants survive to this day.

The extension is constructed with a sitka spruce core capped on the edges with a 5 mm thick strip  of European walnut. The top and back surfaces are veneered with the same walnut.  I sawed  all of these pieces from a large plank.


The back of the extension is cambered along its entire length while the sides taper in from top to bottom. This reduces weight without reducing strength.


 The theorbo head is a separate piece of solid walnut that is 'finish' shaped and then glued to the extension.

The tuning pegs are European plum.


This Buchenberg has been an interesting and exciting model to build, not as daunting as one might image. Its tone is truly large yet lyrical.


    All photos are by the author.


                                               *****