 |
The triple nut extension that Andreas Jauch made for this lute (Copenhagen, No. 104A) is designed in such a way that the length of the strings, stopped by the second and third nuts, are in whole number ratios relative to each other and to the fretted length.The original string lengths are: 105, 93 and 78 cm. Thus, 105/93 is 9:8 which is a major second and 105/78 is 4:3 which is a perfect fourth. These ratios are important for preserving harmonic relationships across the lute's compass. I wanted to retain them in my lute.
 |
| Earlier model is on top |
I hadn't build this particular lute and extension before
so I needed to design and make a template. I used a previous
model as a guide. Since the proportions between nuts were different you can see that I shank the length of the first and second pegboxes. Since I was adding a fourteenth course I lengthened the third pegbox. Also, I wanted a more delicate look. The top template is 24mm thick at the first peg position. I reduced that to 20mm and diminished the remainder of the design accordingly. Because of the nature of the forces with off-set strings it is very difficult to anticipate how much the structure will bow up, twist side-ways, or otherwise move unpredictably, so there is always a concern for strength.

some features of the design and second by using a freer approach to executing the design rather than following a template. I squared a block of poplar, laid out the template, band sawed the bottom surface. Here I am proceeding to finish the cuts on the top surface by using a drill press to fashion the tight contours in the design.

At this point I put the extension aside and cut the recess in the lute neck where the extension will sit finishing it with chisel and files. The third object on the bench is a strip of thin metal that I use as a guard to protect the adjacent wood surface when I'm working into a corner with the file.
Once I'm finished with the joint I can check the alignment by clamping the extension to the neck. The intermediate nut carries the 9th - 11th courses and the third nut carries the 12th - 14th. I mark these string positions on the top of the nut arms. This procedure determines the way the two pegboxes are off-set to the bass side. Now I can layout the side contours.

I saved the waste portions of the original block of poplar and glued the whole assembly together with pieces of thin cardboard sandwiched in between the parts. Referring to photos of historical triple nut extensions I drew the side contours on the top of the re-assembled block allowing for some adjustment in the final shaping. Then I band-sawed the design. I didn't have a photo of this stage but the following photo and description explains the same process.
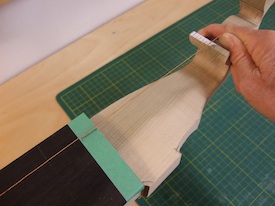
Here I have tack glued the extension in place and am carefully checking the alignment again. The position of the 9th course as it crosses the nut is marked on the piece of painter's tape so I can run a string from the 9th course on the bridge over the position mark and check the alignment on the second nut. The part of the nut support to the treble side of the string is waste and will be cut off. The treatment of that is one of the design elements that has to be worked out. As I mentioned earlier, I had decided not to work from a predetermined plan but to allow the design to evolve.

This photo, while showing the alignment of the 11th course as it clears the intermediate nut, also shows the initial shape of the treble side of the extension. I have yet to cut the final contours.
 The first thing to notice in this photo is the way I off-set the intermediate and third pegboxes. The bass side of the first pegbox is straight. The second is off-set with an edge that defines a "S" curve with the nut support. The second pegbox snakes toward the bass and terminates with the "S" curve of the third pegbox.
To drill the peg holes I set the extension in a machinist's vise and supported the free end. The holes in the first pegbox are drilled perpendicular to the center line of the neck.
 The second pegbox leans toward the bass and the third pegbox slants back toward the treble, creating a subtle crook. The holes in the third pegbox are drilled close to the perpendicular of its center line and the holes in the intermediate pegbox nearly follow the crook.
I drill from both sides of the extension with the intention that the holes will line-up. That is problematic, so I use a small drill bit. This allows some adjustment when enlarging the hole to peg size later on. I took great care and fortunately all of the holes lined up.
 I made several attempts to fashion an agreeable contour on the treble side. The weak spot on the triple nut extension is at the end of the first pegbox where it narrows significantly and the torque from the intermediate and third nuts exert their force. When I initially band-sawed the side contours I left extra wood planning that I would need to experiment with the design. What I settled on is seen here. The end of the first pegbox is rounded smoothly with the side of the nut support tapering away gently. The pegbox ends in a slight crease, but then broadens out a little to begin the intermediate pegbox. This arrangement leaves a fair amount of wood and thereby avoids a design weakness. The intermediate pegbox thins only a little in width and depth and rounds quickly onto the flat surface of the third pegbox.
 Next time I'll excavate the peg recesses, finish the area around the joint with the neck and glue it on.
This photo, while showing the alignment of the 11th course as it clears the intermediate nut, also shows the initial shape of the treble side of the extension. I have yet to cut the final contours.
To drill the peg holes I set the extension in a machinist's vise and supported the free end. The holes in the first pegbox are drilled perpendicular to the center line of the neck.

I drill from both sides of the extension with the intention that the holes will line-up. That is problematic, so I use a small drill bit. This allows some adjustment when enlarging the hole to peg size later on. I took great care and fortunately all of the holes lined up.


