 |
| Museé de la musique E.2087 |
If there is one characteristic feature of French baroque guitars and those built by the Voboam family in particular it is the "rope" banding. The effect is pleasing even in the simpler form that I use. The example by Jean Voboam (right) is one of the more elaborate treatments.
 |
Jan Vermeer 1672
Kenwood House |
Vermeer's use of the motif in his iconic painting,
The Guitar Player (left) is stunningly vibrant
. This is my favorite "guitar" painting and I included this image because painters in the 17th century began to present guitars seriously in their work. Many of then used the Voboam as a model. I saw Vermeer's painting several years ago after examining lutes at nearby Fenton House. Sunlight was streaming through a nearby window and I couldn't see the subtle detail in the painting until the docent drew the curtains to put the painting in the shade. Then I could see that Vermeer had used bold brush strokes on the light colored banding to create the effect of individual threads woven into the "rope"!
Kenwood House is definitely worth a visit if you are in London. Walk across The Heath from Hampstead and enjoy the splendid views of open fields and the distant city. Lunch in the Brew House is a treat.
http://www.english-heritage.org.uk/daysout/properties/kenwood-house/
The technique for making the rope banding is not that difficult but it does require sitting up a jig to accurately cut the lozenges.
I took a piece of plywood and accurately duplicated the contour of the guitar belly. Then I routed a channel in the edge the same width as the banding that I planned to use and deep enough to accommodate two pieces of material that I had prepared; one each of holly and ebony. These I bent carefully and while still warm bound them in the channel of my jig to thoroughly dry.
The next photo shows the cutting of the individual lozenges. I had measured and marked 9mm intervals along the edge of the jig and drawn tangents of about 20 degrees from the perpendicular.
Following these lines I cut through the two pieces of banding into the jig itself. After each cut I inserted a thin clock spring scraper into the previous slot in order to prevent the banding material from shifting; thus ensuring that the lozenges were exactly the same length. I carefully and securely put each pair of lozenges aside in sequence.
Gluing the lozenges in place with hot hide glue is actually the easy part. Since the strips of banding were carefully bent and the shape was accurately cut and the pieces were not mixed up, the lozenges fit snuggly in place. I added a narrow band of black-white material that was glued in at the same time.
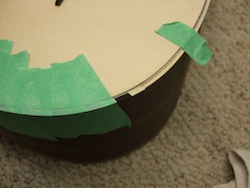
Allow this all to dry thoroughly and level carefully with files.
***
All images on this site other than those so labeled are by the author. Readers are welcome to use my material with attribution. For other images I have endeavored to accurately attribute copyrighted material.
If any copyright holder wishes me to withdraw their material I will do so.


No comments:
Post a Comment