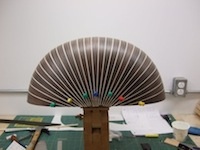
At this stage I have not only finished applying all of the ribs I have also done a fair amount cleaning up. Each day I begin work on the bowl by removing the residual glue and any high spots between the ribs of the previous day's work. Also, I slip a thin artist's scapel under the most recently glued ribs to loosen them from the mould. When I am finished with the bowl I don't want to find that it is firmly glued to the mould. Now I only have to make sure that the rib joints at the rear are secure. These are very fragile and have a tendency to break open. I often rub extra glue over the surface of the bowl in this area, cover it with plastic tape and all it to dry for a day before I start the next stage. In the photo I have secured them with push pins.
I like to apply the apron to the rear of the bowl before I remove it from the mould for several reasons. The rear of any bowl at this stage is very fragile. The glue joints can easily break open. Also the bowls are so flexible they will distort when the support of the mould is removed. Having the apron in place helps to insure the stability of the bowl.

Depending on the style of the bowl and the contour of the rear area the apron can be one or several separate pieces. Although the original Kaiser has a single piece apron in ivory I think that a multiple piece one is appropriate. The technique is to bend the individual pieces in the same manner as ribs. It is even necessary to bend them sideways in order to get them to settle against the bowl properly. Each one is glued in place separately with spring clamps and wooden cauls. The cauls are concave on the contact side which allows the clamping pressure to equalize over the width of the apron part. To insure that no gaps occur between each piece I gently tap the top edge after I apply each clamp. To accommodate the clamps while the bowl is on the mould I have cut a continuous channel in the under side of mould equaling the length of the apron.

The photo on the right shows all of the clamps in place. As the apron increases in depth it is necessary to use longer cauls and different clamps. Since I assemble the apron on the bowl from individual pieces I can not cut the characteristic design at each end in advance. This I do after the glue has dried and I have cleaned up my work. The photo below shows the finished design. I accomplish this by first making a diagonal saw cut across all of the pieces of the apron. It is very important not to cut into the rib below. I lay out the circular element of the design and score that with an appropriately size of gouge, cutting through the material to the rib surface. The excess apron material is removed with a hot iron.
The second photo shows what happened to Johannes Jauck in 1746 when his diagonal cut went astray.
This lute is No. 251, Musical Instrument Museum, Brussels, photo by the author.


No comments:
Post a Comment