Sunday, March 17, 2024

Building an English Theorbo


I was surprised when I received a commission to build an English theorbo. The commission was unusual because few modern lute makers have built them and I doubt that many others have seen or heard one. My client is a member of an ensemble that had a program of late 17th century English music organized for touring and dates in the United States were on their calendar. 

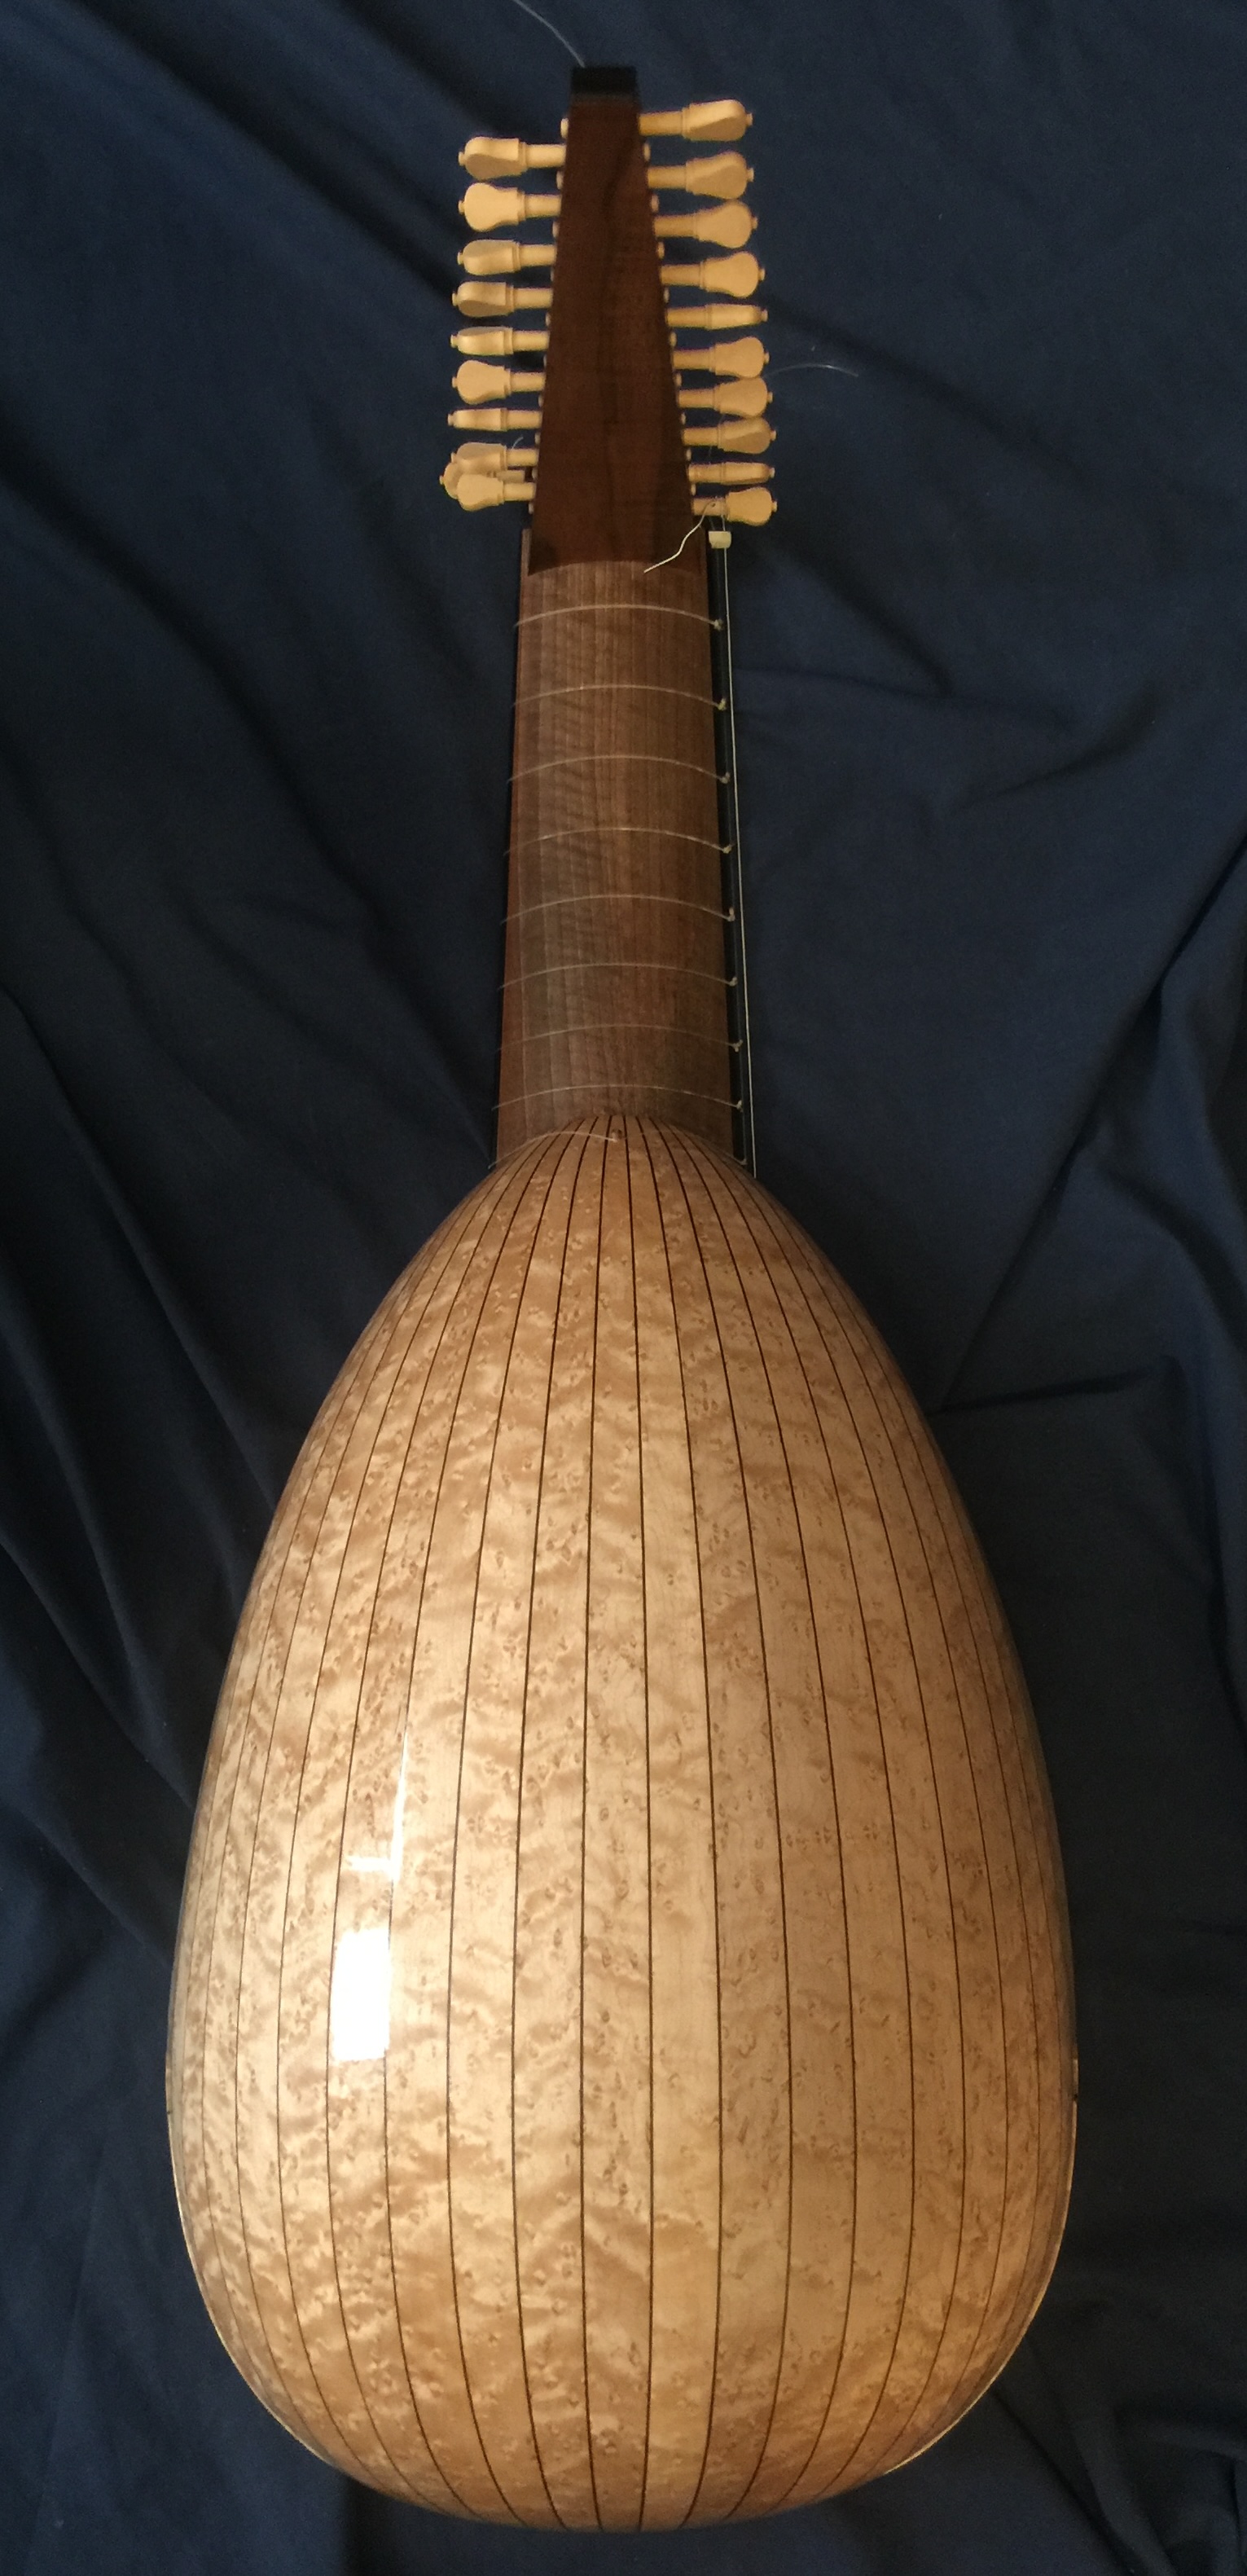
On the left is my finished English theorbo. It looks a lot like a small Italian theorbo except for the extension where four small nuts are arranged at unequal intervals along the extension with a plate of boxwood glued to the front of the theorbo head serving as the fifth diapason nut. I will explain the reasons and benefits of this arrangement further along in this post.

Italian theorbos had made their appearance in England early in the century and had become  popular for voice accompaniment and consort. As well, twelve course lutes  with the diapasons arranged along a straight second pegbox were to become popular a little later for the same reasons. Jumping ahead to the early 1670s  a particularly English variation appeared, double strung and tuned in G with the first course and if the lute were large enough, the second tuned down an octave. The diapasons were arranged as described above. 


There were at least two variations of the English theorbo that are documented either in the iconography or surviving documents. Below is an image of Thomas Mace's Dyphone, built by him, and described in his

book Mace's Monument. As you can see the Dyphone is two lutes in one. The left hand part is a twelve course lute. While the right hand side is the theorbo. Note: the facsimile of Mace's Monument seems to have come under copyright. However a plain text version can be read Here

The facsimile


I enlarged and cropped the theorbo half of the Dyphone which now shows in better detail the curious construction of the extension. 

The diapasons are mounted on three semi-circular wooden "bridges" which function like bowed instrument bridges with a foot planted on each side of the extension. The longest diapasons ride on a plate glued to the front of an odd theorbo head. Mace describes the spacing of the diapason bridges and the reason therefore, "that each diapason descends gradually step by step; by which means, the whole number, both of short and long strings speak uniformly and evenly to themselves which is a very considerable matter in any instrument". I will return to this description when I describe how I arranged the diapasons for my lute. 

Andy Rutherford built three theorbos using Mace's design; for Stephen Stubbs, Lyle Nordstrom and one for himself.

I saw his first one at the Amherst Early Music Festival around 1996. I was building a lot of theorbos then and I was delighted to see an English theorbo. I was astonished by the method of mounting the diapasons and remember thinking - No way.

In a recent phone conversion Andy and I discussed many issues with the English theorbo and I'll relate a few of them:  Andy said initially he treated the arched bridges as free standing structures but eventually it was necessary to glue them in place because they kept falling over when tuning the instrument. He is a fan of gut strings and he uses them on all of his personal lutes. When you listen to the video link at the end of this paragraph you'll understand Andy's preference for gut strings and Mace's reason for designing the theorbo half of his Dyphone with stepped diapasons and octave stringing. On string tension his reply was reminiscent of the advice to tune your chanterelle near the breaking point and follow with the other strings.  Andy chose a position on the theorbo's extension, picked out a promising string from his collection and tuned it up until he liked the sound. Then he sent the string and other relevant information to his string maker and asked for a complete set. 

Here is the link that Andy kindly sent of him playing Mace's composition Fancy- 13th Variation on his English theorbo.  You will get a good look at the entire instrument.

Play here

Around the same time David van Edwards built an English Theorbo for Lynda Sayce based on the second variation of the English theorbo as represented in the painting Lady with a theorbo by John Michael Wright (Columbus Museum of Art, Columbus, Ohio). His website includes photos and a description of his English Theorbo.  David van Edwards English theorbo  In addition, David also includes his article, Talbot's English Theorbo Revisited that was published earlier.


Lady with a theorbo

Now for my take on the English theorbo. Since I had sworn off Mace's design nearly 30 years earlier I certainly was not going to change my mind. There was some urgency in having the instrument ready for my client's rehearsals so I moved along quickly. I started by thinking of the Lady's theorbo as a model for the instrument that I was about to build, not just the treatment of the diapason nuts, but also for the fullness of the face and the depth of the bowl. I noticed that she was holding the lute far enough from her body to suggest that the lute's bowl was deep and rounded rather than flattened. The lute has a single rose which I thought appropriate. I can't recall seeing an English portrait from the seventeenth century that includes a lute with a triple rose.

I was not interested in trying to copy the Lady's theorbo or even building a one of similar size. I was interested in building a lute that might have been built in England or at least assembled there from parts of of older or damaged instruments much like the lutes of Thomas Edlinger in Prague. 

Since the ensemble that hired my client played robustly I thought a large theorbo was needed. Thomas Mace agrees. He recommends two lusty full-sized theorbos when paired with two violins. I admire the  lutes of Wendelio Venere particularly his large theorbo built in 1606, E. 548 conserved in Musée de la musique, Paris. The details of this instrument's history align with my fictional story. This Venere was not originally a theorbo but probably a seven or eight course octave bass that was converted to a theorbo at an unknown date. You can see the instrument   HERE .

 I hardly had time to draw a schematic of the instrument before I received word that the group's travel coordinator had vetoed the idea of traveling with a large theorbo. 

I had sold myself on the idea of using a Venere as a model so I decided to look at the smaller Venere theorbo KHM C.47, Vienna.  


I unrolled my rumpled but much appreciated plans of C 47 and studied its measurements (367mm wide, 559 to the neck joint and 153 deep). The original neck is only 80 mm wide at the joint with the bowl. I would need to cut the front block back to accommodate a wider joint for the new extension. That would make the block too small so I decided to increase the length of the bowl to make up for the discrepancy.


  I added 8mm at the widest point of the bowl while maintaining the    elegant profile.


This is a photo of one of my 1611 Veneres from the late 1990s.  

I didn't think this shape of back expressed the style that was favored during the 17th century in England and I have already stated that I wanted my lute to have a deeper depth.


 In fact Mace is very clear that the old lutes build by Maler, Frei and Unverdorben were the most sought after and demanded the highest prices. Their backs were not flattened, but more or less half round. This is a seven course lute by Marx Unverdorben, Mùseu de la Musica, Barcelona. I adopted this shape for the arch of my bowl but retained the face contour of the 1611 Venere. Search "Unverdorben" in my blog's search box for my story on this lute.


Satisfied that I had enough information to build a mold I drew a full size face of the instrument on a large piece of poster board and the side profile on another poster board as well.  
I like working on open molds because it allows me access to the underside of each rib as I assemble the bowl. However, there must be enough cross-sections to insure that the proper rib curvature is maintained.


Now that all of the preliminary work is done I can actually start building the lute. 


I decided to use 21 ribs of bird's eye maple, inspired by the Barcelona Unverdorben, separated by 1.5mm walnut spacers. I chose twenty one ribs simply because I like working with that rib width.


The ribs came together neat and secure and the photo shows the shape and depth of the bowl.


Several large steps later the lute was ready for its theorbo extension. I ordered the case long in advance because I wanted to make sure the lute and case were compatible.


The alignment of the extension was critical, not only for aesthetic consideration     but also for the distribution of forces exerted by the strings. I like to keep these forces directed into the neck and bowl of the instrument by aligning the bass edge of the extension on a line that is parallel to the center line of the soundboard. 


                                                 Now the details of construction.


In this much later photo the extension is nearly finished but it is only tack glued to the neck. You can see how each course moved closer to the edge of the extension until the eleventh course, nearest the theorbo head is partially off the edge of the extension.

Achieving the proper alignment required a lot of trial and error which I did with the aid of a dummy plywood extension.

Unlike Thomas Mace who spaced his diapasons by whole numbers I spaced mine by uniform string tensions with the effect of minimizing disparities in feel and volume. The results seem to be about the same.


In the following photo I am checking the alignment for the final time before I glue the extension into its joint. I tied sewing thread to the bridge holes of the 8th through the 11th string holes and stretched the strings over small walnut posts, checking the clearance both within the courses and between them. 


The posts sit in 4mm deep recesses that I chiseled out. At this point they are not glued in place.                                                
Once I was satisfied that my alignment was going to work I removed them, contoured their front surface with a curved relief and shaped individual bone nuts that I glued on top. 


 In the drawing of Mace's Dyphone it is difficult to make out the shape of the theorbo head. I wanted to give him a shout out and make something like a tea pot spout - Thomas' teapot.

The head sits partially off the edge of the extension so I glued a platform to its edge.  The head is being aligned and held in place by a rubber band.  The excess wood will be removed before I glue the theorbo head permanently.


                     Here are closeup photos of the different parts of the finished extension.


The strings are a combination of New Nylgut on the first four trebles, followed by a carbon fifth and then KF fundamentals with New Nylgut octaves on the sixth and seventh.

The diapasons begin with a carbon eight with a New Nylgut octave. The ninth is a KF with a Nylgut octave and the rest are KFs with carbon octaves.


 I turn the pegs by hand using only calipers.
 The peg wood is Castelo boxwood stained black and sprayed with a light coat of lacquer. The pips are small map pins inserted in predrilled holes and glued with Crazy Glue.


The tenth course post and nut are located very close to the edge of the extension while the eleventh overhangs slightly. The teapot carries the twelfth and thirteenth courses with a medallion of European boxwood glued to the front of the theorbo head.

The tops of the nuts are not on the same plane. I was concerned that the courses would slap together so I added one or two millimeters in height progressively to each one. That was not necessary as the end of the extension bows up under string tension, putting each course on a separate plane. The extension is finished with multiple coats of rubbed tung oil.


The bowl is varnished with a true oil and resin varnish that I bought at a paint sale just before the manufacture of oil paints were  prohibited. I have managed to preserve it in small containers.


The top  is alpine Swiss spruce air dried for six years.  Waxed and rubbed with bees wax.


 The rose is inset. This fits in with my fictional story that the lute was built or assembled by an English luthier. Samuel Pepys records in his diary on February 17, 1659, "... then came Mr. Hills the instrument maker, and I consulted with him about my lute and my viall." (quote from Pepysdiary.com)

We are unlikely to learn much more about Mr. Hills but it is clear that he was a skilled luthier favored by a privileged clientele.

Over my career I have assembled a collection of roses from severely damaged lutes that came back to me for repair or replacement. This rose came from I one of my Venere theorbos. That seems appropriate. I feel that I am taking part in a living history of the lute by reusing and prolonging the artifacts of the past. An historical performance, so to speak.

                                                            More photos


A view inside. The short bar near the top of the soundboard is positioned under the twelfth fret.


The long view. The neck core is quartered sitka spruce veneered with English walnut. The extension is solid English walnut. This walnut comes from eastern Pennsylvania, cut from descendants of trees planted by English colonists.

The neck is edged with ebony to protect the softer walnut from marring by the fret knots.


The walnut veneer has a little figure in the grain. I cut the veneer from solid timber.


I made the butt end of the extension flattish with a sharp edge. This is a feature on the Venere theorbo C47. The construction is much easier to make and easier to fit to the instrument's neck. This and the narrow width of the neck leads me to believe that the lute was originally a bass lute converted to a theorbo. 

Lutenists find the chanterelle bracket a useful addition.


                                                              Dimensions


The total length: 150 centimeters
Strings lengths:  
Fretted. 78.9 cm
Diapasons: 96.7 (8),  102.4  (9),  113.3. (10),  121.2, (11),   129.4 (12 & 13) 
Length of the soundboard to neck joint: 55.4 cm
Width of soundboard: 37.3 cm
Depth of bowl: 17.3 cm
String span at bridge: 15.3 cm
String span at nut: 49 mm (seven courses)
Total weight: 1235 grams


I started the theorbo during the second wave of Covid and finished it during the third.  My client's tour was cancelled and he walked away from the commission: a different outcome than I expected. 
That said, building the lute was a challenging, absorbing and an enjoyable experience for me.   

                                                         All photos by the author


Monday, August 28, 2023

A Late Medieval Lute after Sedano Triptych


It has been many years since I built a medieval lute. So I was      surprised when Esteban La Rotta (photo) asked  me to build one modelled after the  lute portrayed in the Gerard David (1460-1523) painting,  Triptych of the Sedano family, 1490-95, Musée du Louvre, Paris.


You can see the entire central panel that measures 97cm x72cm. 


I studied the painting with the same diligence as I do when I examine a museum instrument; I recorded my impressions, made notes of the visual details and estimated various proportions and measurements. These follow.

Many of the lute's construction features are rendered in detail, others are ambiguous. The number of frets on the fingerboard is ambiguous.  Perhaps there are only eight but there could be nine. The neck appears to be long enough for another fret near the neck joint.  The bridge is set low on the lute's belly and is thin and wide.  The design of the finials is ambiguous. The five course string spacing at the bridge is narrow, while the width of the nut appears a little wide. The spacing within each course appears generous. The edges of the neck are nearly parallel. The first course appears  to be a single string. Two of the five visible pegs are heart shape while a third is oddly squarish --  a self made replacement? The peg box is bent back at or near 90 degrees. The bridge and the fingerboard are the same color, one that reminds me of boxwood.

There is a beautiful crumpled (silk?) lace around the edge of the bowl that obscures the neck joint. My guess is that the joint is an abrupt butt joint rather than the earlier medieval style of the bowl's ribs blending into the neck stock. There are two openings in the belly. The central rose is composed of three layers probably assembled from parchment and wood similar in design to known early baroque era roses. A second sound hole in the shape of a lancet window, often referred to as a fenster is positioned at the top of the belly and appears to be constructed of parchment and wood. Two inlays are positioned on each side of the rose.

Good representations of the back of lute bowls are rare in the iconography but here there is an excellent depiction of the bass side rear of the bowl. The width and arc of the visible ribs suggest a nine rib bowl.  The shape of the arc also suggests a bowl whose cross section at the widest point is a slightly flattened  circle. The wood has no figure or other distinguishing characteristics that could identify it. The artist's choice for the wood's color is the only clue. However, the representation may say more about the color of the finish than the wood itself. I have noticed lutes rendered in the same color by artists of the same era.


I thought if I could figure out the proportions of the Sedano lute I could construct an accurate model of  an A pitched lute with a string length of 54 centimeters. 

To the left is an open copy of The Strad, May 1995, Early music issue. I subscribed at the time and I kept this issue in my library specifically for the article on making a renaissance viol.
This image shows the painting, The Ecstasy of Saint Cecilia by Raphael (1514) and the first page of an article by viol maker Toon Moonen on deciphering the size and proportion of the early viol shown at the feet of an elevated Saint Cecilia. Moonen reasoned that since Raphael was known as a master of perspective drawing the instrument would be accurately portrayed.  Moonen did the math and went on to a build a copy of the instrument. Without getting into the details, recent research questioned Moonen's methodology and the authenticity of his subsequent reconstruction. 


Despite this criticism I thought the composition was interesting and I could see that it was dependent on geometry. I set out to see what I could discover.


 I quickly identified two parallel horizon lines; one passing through the eyes of both musicians and perhaps more importantly, the second through each musicians' right index finger - their plucking hands. The center of the panel is equidistant from the left eye of the lutenist and the right eye of the harpist. A perpendicular line from this point passes through the left eye of the Madonna. This fact places the key figures in the painting in a geometric relationship. However, the manner in which the lute is represented is more complicated. The lutenist stands as if facing a viewer who is viewing the scene from the right front. As a result the lute is angled away from us. It is held at an angle slightly up from the horizontal and tilted away from the vertical. My investigation went no further.
 

Returning to David's representation of the lute I found myself thinking: if you strip away the medieval features; the tiered rose, the secondary sound hole and the soundboard inlays, the lute bowl looks very much like a lute from the late 16th century. I decided to design a lute based on this idea but I wanted  a candidate to serve as a model. Turning to my collection of lute plans and photographs I soon decided to take a closer look at the  the 1592 Venere.


I have a Venere model built by my early apprentice Bruce Duncan around 1983. It has a string length of 60 cm. I recruited Susan to pose with the lute in the same posture as the angel lutenist for comparison. Even though the Venere is a larger lute the similarities are obvious.


My lute was to have a string length of 54 centimeters with eight tied frets and designed for a neck and bridge to carry six courses rather than five. I proportionally reduced the Venere contour to a bowl width of 27 centimeters. The resulting length was a little longer than I wanted so I removed a short section of the face at its widest point giving the lute a plump appearance that I thought matched the contour of the Sedano lute.


I drew a cross section for the widest point of the bowl as a half circle flattening it slightly as I described in my description of the lute in the triptych. I divided the flattened arc into nine equal parts that represented the lute's nine ribs. From this drawing I created further cross sections by reducing the size of the original on a photocopier and then using the result to further create a smaller cross section and so on until I has seven sections. The width of each cross section was determined by its assigned place on the profile of the top as represented here by the plywood base.


As I assembled the ribs I undercut the joints so that when I papered over them on the inside of the bowl the drying glue and shrinking paper pulled the two faces together closing up the joint and forming a noticeable peak.


The end clasp was fairly high but the bowl design in cross section is somewhat squarish so gluing the clasp in place was much easier. I glued the clasp in place using thin wood cauls of varying lengths that have a concave surface and a selection of spring clamps or one inch clamps spaced at close intervals. When clamping pressure is applied the top, middle and bottom edges of the each caul makes good contact with the bowl insuring a perfect bond.


I finished the neck and pegbox and even fitted the pegs before I began working on the top. The wood for both is the last of my stock of brown ash that I have been saving for a special project. The neck is solid ash while the pegbox is assembled from five pieces; two sides, top and bottom blocks and a thin back cap.


The sound board is Swiss spruce thinned to about 1.5 - 1.4 mm in the lower third of the top down to 1.2-1.3 in the middle third and gradually up to 1.6 over the front block

I positioned the fenster near the neck joint. It overlaps the neck block by about 5 millimeters. When the top was finished and ready to glue to the bowl, I cut away the part of the block that would be visible and painted the area black.

The decorative parchment ring is the first layer of the tiered rose that I temporarily put in place.


The next element is a vertical ring punched with a four point star. You can see that I indexed the underside of the first tier to aid in positioning the two parts. I also added narrow strips of parchment to the top and bottom of the vertical ring to reinforce the gluing surface.


The second tier is an elaboration of the top tier but broader with an added ring of small punched holes. 


The second vertical ring, shown while it is still held in a retainer, is a simple pattern of pairs of vertically punched holes. Reinforcements will be added to it as with the first ring.


The last layer is a cut pear wood design borrowed from the plastic rose that I removed from an oud many years ago.


The barring is adapted from the 1592 Venere allowing for the reduced length of the sound board. This choice might surprise you as you think,"too many bars,"given the early date for the lute.

I think that this pattern of barring had been in use for many years. before the Venere was built. My reason for thinking this is influenced by the genealogical evidence of lute making families enduring for generations. The success of a design or style of lute achieved in one generation would likely be carried over to the next and so on until it became outmoded by a technological innovation or charge in playing style. The two major innovations that did take place from 1495 to 1592 were the increase in the number of courses and the plucking technique. The success of both benefited from a sophisticated barring pattern.


                                      Additional photos                                                    


The soundboard is Swiss spruce. It is edged with a parchment paper banding that is varnished for protection.


The inlays are walnut and holly while the bridge is plum.

The fingerboard is European boxwood. 


The window near the neck joint is assembled with eight separate pieces of walnut; a Y shaped mullion, two side frames bent to form the arch and three circles.


The bowl is blistered North American maple. The ribs were thinned to 1.3 mm before assembly.


                                                          All photos by the author.

Edited for clarity August 29, 2023


Monday, February 6, 2023

Koch archlute


This post is about why I chose a particular historical model for my client and how I altered it to suit his needs. Along the way I found that there were some visual trickery in historical lute making. 

This is my model of a small Christoph Koch archlute. It has a fretted string length is 59 cm with diapasons of 119 cm. These measurements are considerably different from the original lute. I took the photo with it leaning against my studio wall surrounded by small tools and the soundboard for a small theorbo in order to emphasis its size. 

My client formerly had one of my Venere theorbos (C 47, KHM) with string lengths of 79cm and 150cm. The soundboard in the photo was constructed for such a theorbo. He enjoys playing in a small ensemble but was finding his theorbo too much of a chore. He decided that a small archlute would enable him to continue making music with friends without the stress of handling a larger instrument. 

I supported his decision and immediately pulled out my drawing of the small Koch archlute that is conserved in Musée de la musique, Paris (E.546). I was familiar with this lute having seen it while studying other instruments in the museum. I did buy the museum's technical drawing because I was immediately attracted to it and thought the plans would come in handy. The original instrument is configured with an eleven fret neck, a fretted string length of 61.8 centimeters and diapasons of 142.9 centimeters. The fingerboard, neck and extension are all elaborately decorated. You can see the original lute here. The page also includes a short video of the lute's restoration and several audio videos of artists playing the restored lute. My client would not have wanted a long fretted neck and he did want a short extension. I thought the contours of the bowl and the shape of the soundboard would offer superior tone and volume even if I built it with a ten fret neck and a 119 centimeter extension.


The soundboard is only 405mm long but the face contour is full with a squat bottom.  The rose is located at 3/5 of the length of the belly and the open area of the rose is 1/3 of the belly width at the rose position. The bridge is set low on the belly and it spans 2/3 of its width at that position. The remaining area that hosts the J-bar and two short low diagonals appears cramped. This is the most important area for producing and controlling the sound of the lute. But the squatness of the form increases the area more than it would if the profile were more round. 


The contours of the bowl are important as well because they determine the internal air capacity.

Its depth is slightly more than half its width. (152mm vs. 300mm). But the significant increase in volume comes about from the high shoulders and squarish sides as seen in this view of the bowl's cross-section.


The side profile is full, flowing gently from its highest point and then dropping quickly to the neck joint. 

All of these features maximize the internal air volume of the bowl.


I approached building the mold with some trepidation because of my experience in building the Koch theorbo, No. 3581 Musikinstrumenten Museum of Berlin's Staatliches Institut für Musikforschung. See my post Theorbo after Christroph Koch, September 20, 2013. On that occasion I built the mold and it was only when I started making templates of the ribs that I discovered that the rib orientation was hopelessly out of alignment. I abandoned that mold and built a new one with the ribs aligned more uniformly.


 Before I started building the mold for this archlute I checked the accuracy of the rib alignment as described in the technical drawing. I made poster board templates of the cross-sections of the bowl and compared the ribs positions on the treble and bass sides. It was clear that the layout of the ribs was badly out of alignment on this lute too!


I thought it was strange that an experienced lute maker who built both an elaborately decorated theorbo and an archlute in expensive, exotic woods would be so clumsy as to construct a bowl with misaligned ribs. It was only when I started writing this post that I realized that rib alignment might have been a secondary consideration. I thought back to when I examined  a baroque lute built by Thomas Edlinger (NMM 10214 in Vermillion SD). The bowl is composed of 21 shaded yew ribs of varying widths.  However, the distribution of heart wood and sap wood is fairly even. It then became evident to me that the bowl was assembled to display the shaded yew as uniformly as possible with the wood that was on hand.  You can see the lute by following the links here. Both of the aforementioned Koch lutes have 15 ribs of flat sawn Kingwood, sometimes called violetta (Dalbergia cearensis). The ribs of both lutes display intense color and interesting grain patterns and the rib alignments on both lutes are asymmetrical. However, they show their wood grain to great advantage. My Koch bowl is Indian Rosewood cut from commercially available guitar sides. The holly spacers are 3 mm wide. I  also used this width of holly with the neck and extension veneers.
 
I proceeded to built an open pinewood mold with a central axis and five cross-sections per the plan but I  divided each cross section into 13 equal widths (the edge ribs are wider) and marked the position of each  rib. The rear of the mold is constructed with a wrap around form that is a little higher than what the end clasp will be. It provides support when the ribs are scraped clean and level. The wrap around is less than an inch thick so it provides a convenient surface for holding multiple small clamps when the gluing the end clasp.


Although I "corrected" the mold for rib width uniformity I did not alter the symmetry of the bowl's contours. That affected the position of the ribs as they wrapped around the tail end of the bowl. However, this irregularity is covered by the end clasp. See the earlier photo.
 
For all of the trouble the bowl caused me I was happy with the way it turned out.


I copied the positions and size of the rose but I used a different pattern than the original. The bridge position is the same too. the original lute has a long soundboard tongue that projects nearly two frets length over the neck joint. It does not look out of place and structurally it provides a little extra support to the bowl/neck joint.
 
Unfortunately, I did not photograph the barring that I used but if you watch the restoration video you will have a brief glimpse of it as the camera pans by. 
The top has a full set of harmonic bars; three between the bridge and the rose, three above the rose, three full width bars across the rose itself, two fingers on the treble side and a long J-bar that extends halfway under the finger bars.
 
I had doubts about the dense barring of the top but it is only 1.3 mm thick in the area from the rose to the bridge and 1.2 mm behind the bridge. Listening to the audio videos convinced me and I copied the thickness of the top and the barring scheme of the original archlute as closely as possible.


My extension is much different. It is much shorter by 23 centimeters, it has a different style of head, one that folds back on itself like the majority of Italian achhlutes. The lute can be strung in courses as a 13 course (1x1, 6x2, 6x1) or single strung as a 14 string (7x1, 7x1).
The original lute is 1x1, 5x1,8x1). I made this alteration at the request of my client.


The core wood of the extension is quartered spruce veneered with Indian rosewood cut from guitar sides and thinned to 1 mm. The back of the extension is flat like the original lute rather than contoured. 


 For the extension head I use the design found on the Tieffenbrucker archlute  C.45, KHM.  


The neck core is quartered spruce veneered with Indian rosewood cut from a leftover guitar side and thinned to 1mm. A spacer of holly borders the rosewood followed by a strip of ebony. Even though I shortened the string length from 61.8 to 59 centimeters the neck was still long enough to carry ten tied frets. The tenth is held in place with the help of a small wood pin inserted into the middle rib with the fret looped over it.


I delivered the instrument strung in New Nylgut, carbon fibre and Savarez wound copper.
 

                                                          All photos by the author